


Originally Posted by Mike

Haha well put, Mike!

Haha well put, Mike!
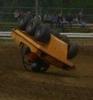
"Looks like you have a problem with your 4 wheeler........you're missin' two wheels there"
Big updates today. Its been a while since i last posted any updates, been spending all my time in the garage putting this thing back together.
the frame dropped in really nice. Everything went together very well. All the holes lined up perfectly. Almost as if i knew what i was doing. I had to open the holes up in the body and drill new ones to adapt the new bearings to fit. i went with the newer style 4 bolt bearings rather than using the old style. i like the double seals and being able to grease them is nice. This is it semi together before placing it in the body:
Minor oversight where the power pack mounts to the frame i didnt have clearance for the bolts on the bottom of the pack under the transmission so i had to make a few cuts with the hand grinder. came out pretty good for what it is.
next i made a L shaped bracket to mount to the front left corner which i can mount a plate to for holding down the battery. Makes it really easy to remove the plate if i were to need to get underneath it to the chains for any reason
I had a nice yellow top optima marine battery i bought last year that i strapped down with a piece of aluminum across the top to keep it in place
Got the rest of the chains on and put 2 piece lock collars up against each bearing to keep the axles from being able to move. Also replaced the set screws with socket head cap screws so i can get an allen wrench on the easier. used red loctite on everything of course. Also used nylon locking hex nuts on everything to keep from coming loose.
I got the power pack installed and started working on how to mount the new motor in place. There was a clearance issue with the oil filter hitting the rotor so i ordered a longer belt from richards relics when i bought the new clutch so i could space the motor back 1 1/2 inches from the transmission. I had to make an adapter plate as the existing plate was not long enough

Before bolting everything down i made a plate that fit directly under the power pack to put my bilge pumps. since i know it would be a pain to get at them if one died on my i put 2 in on seperate switches. I plan on running the hoses out each side to drain. I used the tsunami pumps available at walmart for around $20 each.
Next i plumbed the exhaust using 1" black pipe to the muffler under the housing. I had to change it a little from how it is in the picture because it was interfering with the top, but it all came out good and it sounds excellent.
Next i rewired the whole machine. Ran wires for the ignition from the motor to the firewall and rerplaced every other wire in the machine. Put in all new headlights and taillights. I also added in wire harnesses using standard trailer light harnesses so i dont have to unhook any wiring when i take the top off, just unplug the harness and go.
Guess i dont have a picture of that at the moment....
Anyways new i worked on the floorboards. I used all aluminum diamond plate whick looks amazing. I re upholstered all the seats with didi camo material and covered it with clear plastic for waterproofing. I moved the backrest back a few inches to make it more roomy up front. i lose a bit in the back but im not concerned about that i like having the extra room for my legs.
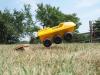
After that i got the top put back on and im driving it!

nice, real nice
Kevin Hough
TREBMASTER
(____>
.OOO
awesome pics! Thanks for posting them.

NICE JOB, I like the nice big pictures
Very nice!! Looks like the planning was very thoughtful and came together nicely. Excellent work!
Thanks for the comments guys. And yes there was just as much time spent designing it as there was building it, but the hours and hours spent, plus all the cases of beer all paid off and my design came together great. Ive been testing out a little more every night. last night i gave it a good 3 mile ride. It ran absolutely great. Turns on a dime. I'm still far from done though. I have a hood to design and build, plus finish the floorboards in the back and permanently mount my gas tank. I cant wait to get tracks on her too....ordering them next week
Good job man. love the paint job, I want to do that to mine too~~
Steve Cornick
1993 Vanguard Argo w/16hp B&S
you dont by any chance have the measurements of a frame for the max iv i cant find any specs for it
 Posting Permissions


 Reply With Quote


