


All I gotta say is AWSOME Mike


All I gotta say is AWSOME Mike

Hey Mike got any pics of how the sticks exit the firewall. Would love to see my bigfoot do that, wheels are turning in my head.

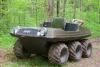
That's turning into a cool machine, love it.
RD

Thanks for the comments everyone. I'm working on the exhaust this weekend.
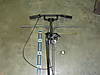
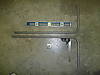
I have a handful of photos of the laterals in my gallery. Here are a few of them:Originally Posted by trevorakm1

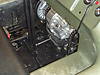
I have worked on the exhaust some this past weekend and like everything else on this project, I made it more complicated than it had to be. I am using a stock Briggs muffler on the Bandolero motor mainly to help keep the sound levels down since my wife will be driving it most of the time. I shortened the stock pipe coming out of the muffler and then had to use some compound bends to get the pipe routed back up to a point where it could come out in the stock Avenger exhaust location. I was tempted to just make another screen in the side of the engine bay with a relocated hole but this way, I can still use the stock screen. It was time consuming to tack each piece together and get it exiting the screen in the correct location.
I took the stock Avenger exhaust tip and shortened the pipe that it is attached to so that I could keep the stock flare. I then made a somewhat round flare on the new muffler extension to mate up. The only thing left is to weld some attachment points for the springs that will hold the exhaust tip on and then I will clean everything up and paint it.


Lately I've been working on the heat shroud for the exhaust. I want to sandwich the muffler as much as possible in the heat shroud and direct the heat out to the stock Avenger side vent. I started with some cardboard templates and after a lot of trial and error, I finally cut out the metal shroud and began to bend it. I made as many of the side plates into the bottom plate as possible so that I could just bend them into place instead of welding them. I still have three pieces to weld in to complete the sides.
I don't have a brake but I was able to use a couple of pieces of steel and a hammer to get the sides into place. This is the bottom piece:
This is the bottom piece on the right with the top to the left. You flip the top piece over to the right and it will fit onto the bottom piece and completely enclose it:


[QUOTE=Mike;174719]
I don't have a brake but I was able to use a couple of pieces of steel and a hammer to get the sides into place. This is the bottom piece:
Real nice!
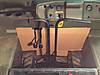
Not too much going on this week. I had to remove the engine and air duct to test fit the exhaust heat shield. There was a lot of "install, remove, grind, repeat" going on today. Then I painted the heat shield and have it ready to install. The top that I originally created won't work so I plan on getting the bottom/sides installed and remaking the top piece. I just took some photos to keep the thread and my progress creeping forward.
Here is the heat shield painted:

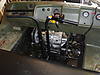
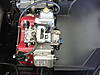
Here it is installed in the engine compartment with the motor:
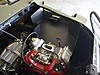
You can see how well it fits against the motor in this photo:
this thing is awesome! I just read through the entire thread and can't wait to see this on the trails. I assume there will be some awesome videos when it's done?
 Posting Permissions
 Reply With Quote


