1st. Attex Rebuild done over.

  1. Welcome to 6x6 World.

    You are currently viewing our boards as a guest which gives you limited access to view most discussions and access our other features. By joining our free community you will have access to post topics, communicate privately with other members (PM), respond to polls, upload content and access many other special features. Registration is fast, simple and absolutely free so please, join our community today!

    If you have any problems with the registration process or your account login, please contact us. Looking forward to seeing you in the forums and talking about AATVs!
+ Reply to Thread
Page 2 of 3 FirstFirst 1 2 3 LastLast
Results 11 to 20 of 21

Thread: 1st. Attex Rebuild done over.

  1. #11
    Join Date
    Jul 2009
    Location
    Cleveland,Oh.
    Posts
    1,589
    Riotwarrior, thanks for the kind words.
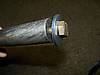
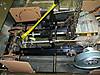
    Well,here I go again. This is why nothing ever gets done,too much thinking and not enough wrenching,lol. Anyhow,upon further review,the Yamaha dual front caliper set is just not going to work for me. The units themselves are much larger than they look when placed down by the front axles of an Attex. Between this and the fact that I'm still looking at having to install some kind of discs on the sprocket tubes,compounded by need to make some sort of mount to allow the calipers to "float",is well beyond my scope of abilities. I would prefer to use (re-use) existing components wherever possible,for various reasons. I really want to use old Colt front tubes w/ the discs already on them (that I have 2 sets of) and the original calipers from the "trans mounted" system as they do not appear to differ much from the mechanical ones I'm seeing in some of the links in riotwarriors thread http://www.6x6world.com/forums/wante...-calipers.html. Still workin on a camera so I can post some pics. Between the "mounts" and sprocket tubes from old Colts and the calipers,I think I can make something work.

  2. #12
    Join Date
    Jul 2009
    Location
    Cleveland,Oh.
    Posts
    1,589
    Update time again. Let's see,it's been about 15 months since this project was started,things are moving,just not too fast.

    A great big thank you to member Hydromike for braving a 10 deg Buffalo day to round up some disc brake components for a 4 chain Attex frame. This has given the "jump start" I needed to quit goofing off and get er done.

    Still working on a camera but for now,this is what has been accomplished,

    -Remove the "droop" all the way around the body. Done,and made nice side "bumper" from angle iron and some flat stock.

    -Lift the "nose" up a little. Looks like something heavy sat on the gas cap area for a long time,pushing it down a little. Done.

    -Install bracing to prevent everything from just sagging back in due time. Done.

    -Repair all the holes/leaks in the lower tub. Done (I think,lol).

    -Install some kind of skid plate(s) Postponed,indefinitely.

    -Install the poly fuel tank with full alum frame that I bought for this unit. Done.

    -Remove the brake discs and related hardware
    from the trans. Done.

    -Install "Colt" Type brakes on the front axles.

    Ahha,this is where we've (I 
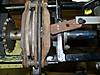
) been stalled for quite some time now. As previously posted,the OEM Colt stuff is just TOO close to the frame,etc to fit in there and the hydraulic set I mentioned are even larger,presenting even more of a challenge. I even made an attempt at using a band brake set-up,that I was satisfied with and may use on a future build,until the opportunity for things that were pretty much designed and built for this application arose. And,yes,even this is not exactly a "bolt-in" operation. Why,I'm still not clear on but as I find more things out I will certainly share them here.
    Last edited by JoeMeg; 02-11-2015 at 07:03 AM.

  3. #13
    Join Date
    Sep 2013
    Location
    Caldwell, Idaho
    Posts
    1,174
    Sounds great Joe, looking forward to pics

  4. #14
    Join Date
    Jul 2009
    Location
    Cleveland,Oh.
    Posts
    1,589
    Wow! What a difference 30 deg F makes. 36F out feels a LOT better than 6 
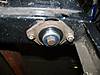
. I think I have officially emerged from hibernation now. I've managed to put grease zerks in the lateral pivots (another operation NOT on the original work order,wonder why this takes so long ). The trans should get drained,and hopefully split to begin left output shaft replacement,this evening. This should get things back "on track". I know I've been slacking with the pics but I just bought a "new" camera today so,as soon as it arrives,I can begin putting some photos up

  5. #15
    Join Date
    Sep 2013
    Location
    Caldwell, Idaho
    Posts
    1,174
    Pics would be cool

  6. #16
    Join Date
    Jul 2009
    Location
    Cleveland,Oh.
    Posts
    1,589
    T-20 is repaired and re-assembled. Frame moved to garage build bay. 66 deg feels even better than 36 . Trans mounted in frame. Engine on mounts set in place. Driven clutch sat further out on the input shaft when the big brake discs where installed. I opted to put the driven all the way onto the trans which required shifting the engine aprox. 1/2" to the starboard side of the machine. That being completed,things appear to be lined up to my satisfaction. Need to re-rivet my fresh air intake in one place and this should complete the "removal" part of the old braking system. (yeah,imagine that,a lot more to the "removal" process than just removing things.lol!) As soon as I get and post some pics,I will elaborate on the "new" front axle disc system. Need (want) to make some spacers to keep the sprocket tubes held captive between the inner and outer bearings and then it's pretty much a "drop the frame in and put everything else back together" operation. June is rapidly approaching
    Last edited by JoeMeg; 04-30-2015 at 12:11 PM.

  7. #17
    Join Date
    Jul 2009
    Location
    Cleveland,Oh.
    Posts
    1,589
    I'll get some pics up soon,gotta do that here at work and this work stuff just keeps interfering . All 6 axles are in and "locked" in place. To prevent outward movement I drilled and taped the axle ends Argo style to accept a 3/8-16 H.H.C.S. and a nice heavy fender washer. To prevent inward movement,after both flange sets were tightened,I tapped the end of the axle to be certain it's all the way out,then drilled little "dimples" into the axle,through the bearing race,and then put the set screw in. Did this to both screws in all 6 positions. The dimple should help retain the axle under the set screw and also facilitate easier disassembling by not leaving it's fingerprint on the OD of the axle,we'll see. All 6 sprocket tubes are bolted in place. Next is drop engine in,hook engine up,install chains,trim engine bay cover to accommodate the moved over engine (fresh air intake will need "adjusted"),etc,etc,etc,lol.
    Last edited by JoeMeg; 04-30-2015 at 12:14 PM.

  8. #18
    Join Date
    Apr 2015
    Location
    Northeast OH
    Posts
    2
    Joe, looks good!

    Leoman

  9. #19
    Join Date
    Jan 2011
    Location
    northern Wisconsin
    Posts
    892
    Sounds like a fun project. Hope to see it at Ash some day.
    What it lacks in ground clearance it makes up for with traction.

  10. #20
    Join Date
    Jul 2009
    Location
    Cleveland,Oh.
    Posts
    1,589
    Thanks Leoman! Thanks Trevor! Yep,Ashtabula in June (of 2015,lol) is the goal and should be no problem.
    Here are a few pics.

    "Argo style" axle retention bolts
    ,

    6 pretty new axles


    New braking system


    Going together


+ Reply to Thread

Posting Permissions

  • You may not post new threads
  • You may not post replies
  • You may not post attachments
  • You may not edit your posts