Joe's 252 Colt Trail Machine "Gadget"

  1. Welcome to 6x6 World.

    You are currently viewing our boards as a guest which gives you limited access to view most discussions and access our other features. By joining our free community you will have access to post topics, communicate privately with other members (PM), respond to polls, upload content and access many other special features. Registration is fast, simple and absolutely free so please, join our community today!

    If you have any problems with the registration process or your account login, please contact us. Looking forward to seeing you in the forums and talking about AATVs!
+ Reply to Thread
Page 10 of 13 FirstFirst ... 8 9 10 11 12 ... LastLast
Results 91 to 100 of 122

Thread: Joe's 252 Colt Trail Machine "Gadget"

  1. #91
    Join Date
    Oct 2013
    Location
    Eastern Washington State
    Posts
    94
    I read thru the pages of your build. VERY NICE! And, money wise, that's one helluva machine for $2.5k. Of course, that doesn't include your 1.5 million man-hours.

    As for some women, that's about right. Their interest in a man's garage/workshop and the projects within is about what ours is for a sewing room... next to nada.

    I like your air duct ideas. I was considering 8" round stovepipe, but I like the flat duct better. I still need to make a duct setup for my Max II. There's a 20 HP Vanguard shoehorned in there by the previous owner. I've taken it out playing a couple times, but in the mid to high 40's for temp. It ain't gonna' make it come late spring or summer though, so I need to make a duct soon.
    "Sand is pavement to a 6x6!"

  2. #92
    Last edited by Model Citizen; 07-12-2016 at 11:18 PM.

  3. #93
    Join Date
    Jul 2009
    Location
    Cleveland,Oh.
    Posts
    1,589
    Adondo,thanks for the compliments,you got it with 1.5 million man hrs Do you self (and your engine) a huge favor and give it a fresh air intake duct asap. Don't worry so much about the hot air,it will find it's own way out. Shoehorning a big v-twin into a confined engine bay is a recipe for disaster,how do I know? Paragraph 1 of post 1 of this thread 
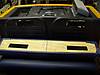
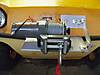
I am convinced that lack of this duct had a big part in the demise of my 23hp Kohler (suspect other issues too but overheating did not do any good). This was in the green one in my signature photo. Here is the duct I made for the 20hp replacement

    Bridget,thank you for the compliment. Yes,to do a through job one must completely disassemble the machine. It's so much easier to access everything and get into the corners of the lower tub that seem to take a beating over the years. The empty tub is so light weight and easy to move around,flip over,etc. Turning it over to wire it was one of the bigger favors I did myself recently. I later had to redo the GPS power supply tucked up under the dash due to a pulled off connection from an overzelous tape job. It was while lying on my back reaching up that I realised just how nice it was to wire upside down 
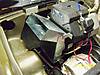
I'm so pleased with the outcome of this build that old Gizmo is going to receive the same tlc. I didn't strip it down completely during the first build and have been getting nickel and dimed with minor issues since. So,a complete tear down is coming for her. I'll start a thread on it,stay tuned.

    Joe.

  4. #94
    Join Date
    Jul 2009
    Location
    Cleveland,Oh.
    Posts
    1,589
    It's about time for an update here. I'm bad with taking and posting photos but I promise I will get some current ones up soon. Made and installed a bench type seat and back. Used 2" wide adhesive backed velco strips further enhanced with a dash of Gorilla glue as a means of fastening. First time I ever "monkeyed around" with it. Pretty amazing stuff. Also,got my winch installed. Just want to add an eyebolt as an extra attachment point. IDK,maybe it's just me but,when I get an old machine there is usually at least one thing that say's "re-use me,re-use me". On my "PA" colt,one of those things was the rear rack that seemed to be OEM or otherwise just a real nice unit.


    It was pitted and caked with rust so I just knocked of the loose stuff with some 100 grit cloth and am prepping it with Kleen-Strip Rust Converter (Duro "Extend"). Once finished prepping,I will paint it black with something.

  5. #95
    Join Date
    Jan 2008
    Location
    Vicksburg, Michigan
    Posts
    3,507
    Thanks for by he update Joe! Look forward to the pictures.

  6. #96
    Join Date
    Jul 2009
    Location
    Cleveland,Oh.
    Posts
    1,589
    Bench seat and back. Had 3/4 plywood at home. Foam was "samples" for being good customer (I buy from them for work). Marine grade vinyl was leftover from project years ago (re-covered my quads seat with it as well). My Brother gave me the velcro. So,the cost was minimal to say the least.
    ,

    Did the electrical installation during the build,needed only to fab and install a mount for the winch. There is an equally sized plate inside the nose.
    Last edited by JoeMeg; 05-06-2014 at 03:15 PM.

  7. #97
    Join Date
    Jul 2009
    Location
    Cleveland,Oh.
    Posts
    1,589
    This is the rack that I wanted to salvage and reuse. Made new mounting "pins" from 5/8 dia. aluminum.

    ,

    Painted it with Rustoleum Grill paint,why,it was free

    ,

    Now,we are ready to ride!


  8. #98
    Join Date
    Jan 2008
    Location
    Vicksburg, Michigan
    Posts
    3,507
    Looks Good! That is a neat rack.

  9. #99
    Join Date
    Jul 2009
    Location
    Cleveland,Oh.
    Posts
    1,589
    Thanks Larry. It would be interesting to learn some history on it. Factory,aftermarket,made by owner,etc.

  10. #100
    Join Date
    Jul 2009
    Location
    Cleveland,Oh.
    Posts
    1,589
    Tow vehicle has not been roadworthy thus far in 2014. Rear brake lines rotted during the winter layover at my camp in Andover,OH. If anyone is wondering why they charge so much for this type of repair,please see me,I can explain it very accurately,lol. So,this is all the further Gadget has made it from the build shop since completion.

    ,,

+ Reply to Thread

Posting Permissions

  • You may not post new threads
  • You may not post replies
  • You may not post attachments
  • You may not edit your posts