You are currently viewing our boards as a guest which gives you limited access to view most discussions and access our other features. By joining our free community you will have access to post topics, communicate privately with other members (PM), respond to polls, upload content and access many other special features. Registration is fast, simple and absolutely free so please, join our community today!
If you have any problems with the registration process or your account login, please contact us. Looking forward to seeing you in the forums and talking about AATVs!
Sorry, I can't remember the specs on the chain at this time... But it's for #40 chain... They offer the bigger chain, but I haven't paid attention to it.. Thanks for the kind words on the rebuild..
I'm enjoying your build. I also put in a plug/connector when I wired the motors in my machines. It takes a little more planning on the front end but it definitely saves time down the road. Nice touch.
Hi Brunpup, Tattooman here. I am also rebuilding a 1970 maxll! I was wondering if you plan on changing your driven clutch to a four stroke clutch or do you plan on changing the spring to a red one. I think I am going to change mine to a comet 780 series with a 28 degree ramp! MFG supply sells them for around $160. I really like that plug you installed! I will be going to Radio shack soon to purchase one as well. Do you plan on splitting the T-20 while you have things apart? Well anyway, thanks for sharing!
Hi Tattooman, it's nice to see more people taking on the task of rebuilding such an early machine... As for the clutch, my clutch is still in pretty good shape, and I haven't messed with the spring yet... At this time, I'm trying to get it all put together so I can make sure everything works... Then I'll pull the transmission back out and change the spring out for the red one... And as for splitting the transmission, since my machine didn't seem to have much runtime on it, I simply did some inspections on it... Looking into the trans through the fill and drain plugs, that gave me a good view of the drums and bands... Mine still looks practically new! After I saw that, I talked to my friends dad that had it the longest of all the owners, and he told me that he only ran it for a few hours, because the old balloon tires were causing too many problems for him... And Mike, thank you! It may seem odd, but it's sort of an honor to me to hear that the founder of this amazing forum is enjoying my build.. My tally so far in my binder of the build, I only have 360 dollars invested into this entire thing...
A little update on my restoration/build, I've gotten it much more put together. Got wheels and tires for it from a local junkyard, 22-11-8 inch, all 6 for 50 bucks.. Granted a couple of the tires are trashed, I figure it will at least get me rolling for now. I had my buddy that works in his families machine shop here in town make me adapters to go from the factory 3 lug to 100 mm 4 lug bolt pattern using the CAD templates off of here. Loc-tited on the adapters and just had to trim the rims a little in the center to get them to clear the flange nuts on the adapters. Also, to make it legal to drive around in my town, I had to add on complete taillights with park, turn, and brake lights.. I've been working on that recently, and almost have that part done.. Pictures to come soon, but made my own quick little sheet metal brackets to bolt through the rear two bolts that hold the upper and lower halves together.. That way if I decide to remove the lights for any reason, I can very easily. Also, I didn't want to permanently mount them to the body, due to the age of my machine.. I plan on adding some little orange flatbed style marker lights to the front to complete the whole turn signal thing.. I'm using an old GM brake light switch from a squarebody (I have over 50 of them) on the emergency brake for the brake light signal, and mounted a on-off-on toggle switch on the dash for the turn signal wiring.. As for the park light side of things, I'm just going to run that off of the headlight circuit.. Still need to get my plate cut out to bolt my engine to and weld it to the engine slider assembly I made up for it, but that's coming soon. As of right now, I still have under 500 dollars in this entire build, and just need to get the engine bolted in, and make up all of the exhaust pieces.. I started welding up my header for my Honda engine, and just need to have the engine in place to finish it off. My goal is to have this at least driveable by the 9th of July, so just short of 2 weeks from now, so I can run around in it during the tri-county fair that goes on here in my hometown.. I can easily say that I'm getting really excited to run it for the first time, and experience my very first 6x6 and get all of the odd questions that you guys talk about, and that I've even already gotten just from it sitting on my front porch.. About a month ago I finally got asked for the first time if it was a boat or a four wheeler.. I've been asked several times since then the exact same question.. My response everytime is "sort of, yes", and explain it to them.. This forum has been of unexplainable help to me in this entire adventure of rebuilding my first 6x6. Just from the fun that I've had rebuilding this one, I want to get more.
Well, I didn't get it going in time for my fair, but that was at my own choosing. I decided that since I've taken my time on everything else so I didn't half ass anything, and thought it all out, I didn't want to rush the biggest part of it with the engine install and exhaust building, because knowing my luck that would lead to a catastrophe.. I finished up my front blinker install, just like the rear mounts, I have them on sheet metal brackets going to body bolts.. Grounded through the headlights ground screw, with the wiring going past the headlight grommets. Full LED lighting, including LED 1157 bulbs in the rear housings. Now I just have to figure out exactly where I want to mount the brake light switch on the e-brake system, and it should be completed. Anyways, I got my engine mount all welded up, and painted the same color that I put the frame back to, which is as close I could come up with to the factory frame color. I had to trim the cargo area a little to clear the top of my engine, but I figured I would have to do that anyways. I have to pull back out the transmission, or suck the fluid out of it in place, because it turns out the bulk jug I grabbed from our farm wasn't actually HyTran like I thought it was..
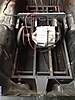
Here is the mount that I made up for the engine.. It's inch by inch angle iron, with 1.5 inch by 1/4 inch crosspieces, and a 1/4 inch plate welded to that. I made the slots in the angle for belt tension adjustments, and the holes in the plate are for clutch alignment adjusting.
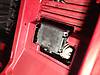
Here's the last look at the empty engine bay before I put in that nice hefty Honda GX610.. After all the test fitments that I did with that engine, I'm really glad to not have to lift it in and out again. That engine gets heavy after lifting it half a dozen times in one night.. The little bit of rust color on the frame rails is simply from the bare unpainted angle iron sitting on the frame rails for a while before I finished the mount..
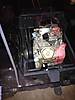
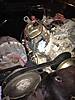
Here the engine is in place, and it looks good in there.. I had the air cleaner of the engine because I was trying to figure out how to run the fuel line into the engine.. Sorry for the crappy angles on these pictures, but it was about 3 A.M. and I was tired but felt so accomplished I wanted to get it documented.. On the frame side of the mount, I just stuck with the 5/16" bolts that the factory used, and on the engine side of it, I used 7/16" bolts..
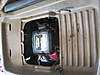
Again, crappy angle for the picture, but oh well.. As you can see, I still need to get all of the exhaust made and routed, and make the heat shields for it, but I'm currently working on that.. I'm simply making a header out of exhaust tubing I bought at Auto Zone, and going to a piece of flex tubing, then out of the tub over the rear wheel like the early machines did.. The engine is a little closer to the T20 than I thought it would be, but theres still 3/4 of an inch or so, so I think I'll be alright.
Here is how much I had to trim my body to get the top to go all the way down.. I ended up trimming it just a little bit more, but not all the way to where the sharpie marks are.. I plan on probably just making an expanded steel cage to go over it, so it has the ability to pull air through that hole, and I figure that should help the air cleaner pull in cooler air than it would if it was sucking more from the engine bay area..
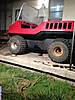
Here's a shot of it with the wheels I bought for 50 bucks on it.. I hadn't put on the middle set yet, but that gives a good look at the adapters I had a buddy make at his fab shop.. The adapters are red loc-tited on, and the wheels are anti-seized on, just like everything else that I think I may have to take back apart on it.. Being a mechanic by trade, anti-seize is my best friend when I go back together with most anything.. I'm still working on repainting the upper half, and I've since painted the rims white.. I found decent looking tires for a good price at Sears, and figure I'll give them a try, they're a chevron style tire, with knobs on the outside of the tire.. Best part to me is they're only 46 dollars a piece..
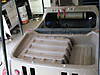
Here's a decent picture showing the way that the taillights are mounted.. And showing the ground clearance that I have. I wasn't expecting it to set that high off the ground honestly. Forgive the pictures being turned all sorts of different directions also please, as I can't figure out how to make them be upright properly..
Well, that pretty well covers my update for now, other than I don't have pictures of my front blinkers, but those will come with the next update, once I have the entire system wired up, and have it good to go..
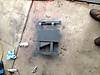
Looking good. When I was looking at your picture of the cutout you made for the engine, it looks like you may be able to retrofit a second-generation engine cover in there for a factory-finished look if you wanted to. Here is a photo of the hole on the 2nd generation body from the gallery:
There are two slots closer to the driver's side edge of the tub. The cover just slides in there and then uses the rubber fasteners to secure it. Here is a picture of the cover:
Well, I finally got to experience my first 6x6 today.. I got the header all welded up, and though it may not be the prettiest, I think its good enough for what I had to work with.. At this time, I'm just running the original two stroke muffler, and it actually doesn't seem to choke up the Honda at all, so I may just continue using it. Time will tell as far as that is concerned.. I still only have 4 wheels on it, and don't have the seats reupholstered yet, so they're still unmounted at this time.. Also, I forgot until tonight to order a new throttle cable for it, so for my test drive I simply ran a wire through my engine access opening. I just couldn't resist trying it out for the first time ever.. I have to say, all the hype that I've read on here about these things being more fun than a four wheeler is most definitely true. In the couple little 5-10 minute runs that I made with it, I've already had more fun in it than I ever have on a four wheeler. Of course, I still have a few bugs to work out, and things to finalize, but I can manage that stuff pretty easily.. One big thing, is if I can get some decent pictures of how anyone has ran air ducting to the engine, that would be great.. I have my original two stroke hot air ducting still, but it doesn't fit up to the new engine, and I'm trying my best to not hack up any of the two stroke stuff so that if I ever decide to go back to that engine, then I can.. Anyways, I'd like to give a huge shoutout to all of you guys that have helped with any advice or hints during my build so far, and especially a shoutout to the guys that helped me with this build by selling me the few big things that I needed for this, thanks Nubs for the Honda wiring and regulator, and thanks to jpswift1 for the Comet clutch.. Now to get new tires purchased, finish up painting it, and see if I can find a decent chrome rollbar for it.. Then time to have fun with this thing..


 Posting Permissions
 Reply With Quote