Max IV frame repair and upgraded T-20 mount

  1. Welcome to 6x6 World.

    You are currently viewing our boards as a guest which gives you limited access to view most discussions and access our other features. By joining our free community you will have access to post topics, communicate privately with other members (PM), respond to polls, upload content and access many other special features. Registration is fast, simple and absolutely free so please, join our community today!

    If you have any problems with the registration process or your account login, please contact us. Looking forward to seeing you in the forums and talking about AATVs!
+ Reply to Thread
Page 1 of 2 1 2 LastLast
Results 1 to 10 of 19

Thread: Max IV frame repair and upgraded T-20 mount

  1. #1
    Join Date
    May 2009
    Location
    Meadville, Pa
    Posts
    3,286

    Max IV frame repair and upgraded T-20 mount

    As some of you know, I may be a little hard on my machines. Also, the Max IV is prone to having issues with the t-20 mount. Well, I've had a few issues and kept trying to patch the problem. This weekend my intent was solving the issue by reworking my frame and adding some extra strength to it.

    My IV already had a 2008 upgrade kit added to it when I purchased it. However, the PO just welded in the new mounting plate on top of already bad holes. This caused the new plate to get tore up as well. I also have broken off my front ears a time or two.


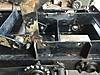
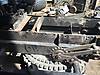
    I started by cleaning up the area and welding the holes closed.


    Once that was done, I then trimmed the ends off of a new support plate, lined it up with the original holes, and welded it in place.


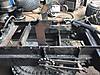
    Once the plate was welded I could use the plates holes as a jig to drill the holes through my welded up frame.

    This essentially makes my lower mounting holes 3-plates of 10 gauge thick rather than one or two.

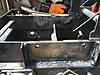
    With the new holes in place I set a t-20 in it and figured out how far off my front ears were since they were welded in while the rest of the mounting holes were already enlarged. So I cut them off.

    And the I welded them on in the proper position and ground down anything that would interfere with other items mounting points.


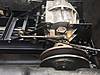
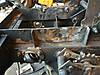
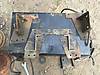
    Once the frame was right, it was time to add some rear support. I have discussed many ideas with other members and stole a bit from almost everyone. Onlyonce uses a thicker plate for his lower mounts, hence my triple plate. He also uses a custom rear lockdown point made from uni-thread. Others have made full cradles to lock it in with. The key is the rear supports have to be removable to get the t-20 in and out. Having many parts from different machines, I decided to utilize and Attex t-20 dick brake mount for my starting point. In this shot you can see the stock parts as well as the trimmed pieces.

    Because the t-20 is not the same front and back side, I had to trim a few spots for the fins to clear as well as the trimming the back bottom parts to sit in the frame correctly. I left some of the caliper mount on to ad support. There was discussions of cutting it off completely, but I thing the extra support is a good thing.

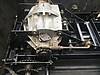
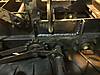
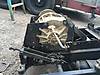
    Finally, I was able to mount the t-20 on the frame and attach the rear supports to the t-20. With the support clamped in place, I drilled out the first mounting hole in the frame. Then I bolted the support to the frame and drilled the other hole on that side. Repeat for the other side, and here is the almost finished product.


    I do have to paint everything still, and I will be utilizing the original bars that go from the top front t-20 mounting points down to the frame by the battery tray as well. I don't know that I need to still utilize them, but it can't hurt having another support piece in there anyways.
    l like to buy stuff and no I don't do payments!

  2. #2
    Join Date
    Aug 2011
    Location
    Kotzebue, Alaska
    Posts
    1,209
    This is a lot of work. I bet the T20 stays where you put it! I might have to do something like this someday. (but lets hope mine holds up for a few years first,eh?)
    Stand for the Flag. Kneel for the Cross.

  3. #3
    Join Date
    May 2009
    Location
    Meadville, Pa
    Posts
    3,286
    Quote Originally Posted by Rusty-Gunn View Post
    This is a lot of work. I bet the T20 stays where you put it! I might have to do something like this someday. (but lets hope mine holds up for a few years first,eh?)
    Mine had some issues when I got it. I kept trying to patch the problem instead of fixing it properly. There was much research and advise given and sought after. I was originally going to do an upside down shaped U brace over the entire t-20, but never was able to get the piece fabbed. The. While tearing a chief down the idea hit me to modify the braces for extra rear support. If your frame is good for now where the t-20 mounts up, I suggest making a similar brace sooner than later. If you brace it while it's good, it's a really quick and easy job, but wait till it's as bad as mine was and your looking at several hours of extra work putting in and pulling out the transmission and fixing those junked up holes.
    l like to buy stuff and no I don't do payments!

  4. #4
    Join Date
    Aug 2011
    Location
    Kotzebue, Alaska
    Posts
    1,209
    I certainly don't need junked up bolt holes. You advice is well recieved. Thanks.
    Stand for the Flag. Kneel for the Cross.

  5. #5
    Join Date
    May 2010
    Location
    Fairbanks AK
    Posts
    1,456
    I've also done the torn out slot repairs with inserts I turned on the lathe and weld in the damaged area. I usually find previously repaired frames have the transmission sitting a bit low. Sounds like your fix should be permanent. I had the factory frame parts drawn and cut , unfortunately the USPS lost the box with 10 sets in it.

  6. #6
    Join Date
    Aug 2011
    Location
    Kotzebue, Alaska
    Posts
    1,209
    Ten sets? I hope the box show up. Got to keep these Max astvs running smooth.
    Stand for the Flag. Kneel for the Cross.

  7. #7
    Join Date
    Jan 2011
    Location
    northern Wisconsin
    Posts
    892
    Well Drew you shouldn't have any more troubles. Looks like you beefed er up good now. I copied the rear brace on mine from members on here. I've got to believe the loose trans mounts are do to chassis flex. What do you think? I've got a full length cage and the rear seat tied in with the tub and never had a problem.(I hate chassis flex) Just recently added the rear brace while tore down for bearings as a precaution.
    What it lacks in ground clearance it makes up for with traction.

  8. #8
    Join Date
    May 2009
    Location
    Meadville, Pa
    Posts
    3,286
    I believe the tranny mounts fail due to the engine being above it. The force of the clutch is constantly pulling up on the back side where no support was ever really given. That loosens it up and then the chains intensify the stress to help distort the holes and eventually snap the ears. If my upgrade fails this time, my next step will be to relocate the t-20 in front and set up my IV like a 4 chain Attex with the engine down low. I do intend on utilizing the rear brace setup in my 980 build as well though. I believe it is a good setup and as stout as anyone else's I have seen. I'll surely report on how it holds up at Ashtabula.
    l like to buy stuff and no I don't do payments!

  9. #9
    Join Date
    Nov 2009
    Location
    TUCSON
    Posts
    777
    I did mine 18 years ago and hasn't failed yet, the az desert just tore mine up , it twisted the frame rails all to hell.
    So i called r.i and they told me to add outer frame rail plates and weld them in. And the rest is history, dosent have anything to do
    with where the engine is mounted. Its from forcing it to turn in hard terain.

  10. #10
    Join Date
    May 2009
    Location
    Meadville, Pa
    Posts
    3,286
    Regardless of the actual cause, it needed some help. Here is my finished product.

    [IMG][/IMG]

    [IMG][/IMG]

    I know my fab skills are not as good as many of yours, but this is by far some of my best custom work yet. It may not be perfect, but compared to some of my early work, I am pretty proud of how this turned out.
    l like to buy stuff and no I don't do payments!

+ Reply to Thread

Posting Permissions

  • You may not post new threads
  • You may not post replies
  • You may not post attachments
  • You may not edit your posts