You are currently viewing our boards as a guest which gives you limited access to view most discussions and access our other features. By joining our free community you will have access to post topics, communicate privately with other members (PM), respond to polls, upload content and access many other special features. Registration is fast, simple and absolutely free so please, join our community today!
If you have any problems with the registration process or your account login, please contact us. Looking forward to seeing you in the forums and talking about AATVs!
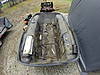
I picked up a 2006 Max II with no engine or trans and a broken axel, the rest of the parts were in buckets tossed inside the tub. the only things I see missing so far are the two motor mount brackets and the front floor pan.
I am going thru it and I have found that I have two axels with ring clips and the others have the Allen screws that hold on the sprockets. Did RI build it like this and what position do the axels with the ring clips go? and since I have one broken axel I am going to order another one will that come with the ring clips or allen screw holes in it?
I guess it would help if I had a parts list and a service manual, does anyone happen to have a copy of the service manual they can upload or sell?
The newer MaxII axles (clips) are location specific. The older ones (set screw) are able to be put anywhere. The current ones are also slightly shorter, I think 1/2" than the older ones, and use a 1" inner bearing and bolt on the inner end to retain them in place. I prefer to use a spacer between the sprocket and outer bearing, then add a split collar on the inner side of the sprocket for axle retention.
Your rear chains/sprockets will ride next to the frame while the front ones will be spaced off from the outer frame rail. Notice the location of the tensioners.
ok that description helps thanks . it looks like the two axels that have the clips were used in the center on mine and the other four had the allen screws. I think I would rather use split collars on them instead if there is enough room or if I can figure out the correct placement for the clips maybe have the groves machined into the axels I am not sure what would be a better solution.
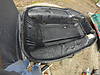
I finally have the time and the parts to continue on this project. it took a good couple months to order and get everything from Muddox since they were in the middle of the big move when I ordered parts. I had ordered new bearing cages since I run tracks in the winter and the original owner didn't have any and that's probably why they broke an axle. Also ordered a new splined axle bearing flanges, new inner and outer bearings 18 total and a muffler. I was able to use the motor and trans out of my 1999 max 2. below are a few pictures, this is my first rebuild so feel free to comment or add suggestions.
Looking good man. The tubs and top look to be in great shape. I always loved that Green. I've got a Max II rebuild coming up soon. I also use locking collars, they never fail me.
I'm curious where you found this machine for sale? There was a guy named Beale that had one for sale a while back. Hopefully you got that one as it seemed like it had low mileage but needed an axle. I think he was in Bowdoinham Maine.
Anyways, good luck bud and thanks for posting the photos.
I bought it from Sgtlane up in Maine about 6 months ago. the only reason I kept it because the body and frame and drivetrain was in such good shape and my older one needed a complete rebuild. I figured it would be a better idea to rebuild the newer of the two.
Looks like it's coming together nicely, had you not been first, I'd have been second and running it at Ashtabula this weekend.
Hope everything works out good with it. Looked really clean when posted, good deal for anyone sgtlane posted.
Ok more progress finally after the wiring issues, the kill switch wire fell off under the shroud while putting it back together so I couldn't turn off the motor. I installed all the chains and the motor then ran it for about 10 min to make sure all the chains were lined up.
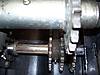
I had an issue on the left side at the center sprockets where the chain was so close it intermittently was rubbing on the tub. When I was taking it apart I found some pieces of wood stuffed under the frame around the center of the tub I guess this had always been an issue. no idea how to solve this so I put Teflon spacers under the center frame rails for now to see if the tub goes back into shape where the sprockets wont rub. is this a frequent issue with these? I find it hard to believe that they would let a design stay like this over the years and not add more clearance space for the chains and sprockets. below is a picture of the center sprocket installed.


 Reply With Quote