Modified Max II Engine cover
The one thing that has always driven me nuts about a Max II is having to open the entire body to work on anything rearward of the Jack Shaft. I've had a solution in mind for a while and a freebie body scored from another member finally allowed me to do it. There are lots of possible ways to do this, but I wanted the machine to remain as close to stock looking as possible.
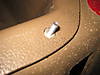
With the stock access hole, about the only things you could do were change air filter or check oil 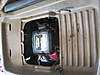
The first step was to cut the entire rear section over the engine out of the donor body. I cut this as far as possible to the outside of the upper lip 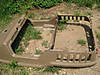
Then it was time to cut the actual body of the machine. This cut was made on the inner edge of the upper lip 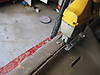
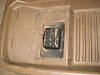
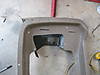
This shot shows how much more room there is to get in there with the modified cover 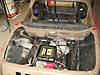
Once both pieces were cut out, I laid the piece removed from the machines body inside the donor piece to transfer all the holes and slots (hard to see in the pic but it's in there). 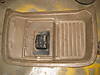
 Once the holes and slots were cut, I laid the cover in place to check for fit, and drilled the mounting holes
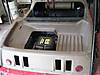
I wanted to use 1/4 Turn fasteners, but couldn't find any long enough. Instead, I used 1/4-20 bolts run up through the body. The donor piece has 1/2" holes that sit down over the nuts. The new cover will be held down with a fender washer and Wing Nut on each of the bolts 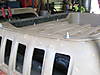
Once the mounting was done, I took the cover off to final trim, and mounted the exhaust duct to the donor piece 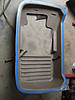
now I have he option to open the small cover for engine servicing, but I can remove the big cover to adjust/ lube chains and to clean the machine, without having to open the body
I still need to pick up some shorter bolts, and 8 wing nuts, but here is what the final product looks like. I may try running some edge molding around the donor cover to see what that looks like 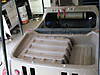
A well regulated Militia, being necessary to the security of a free State, the right of the people to keep and bear Arms, shall not be infringed.


 Reply With Quote


