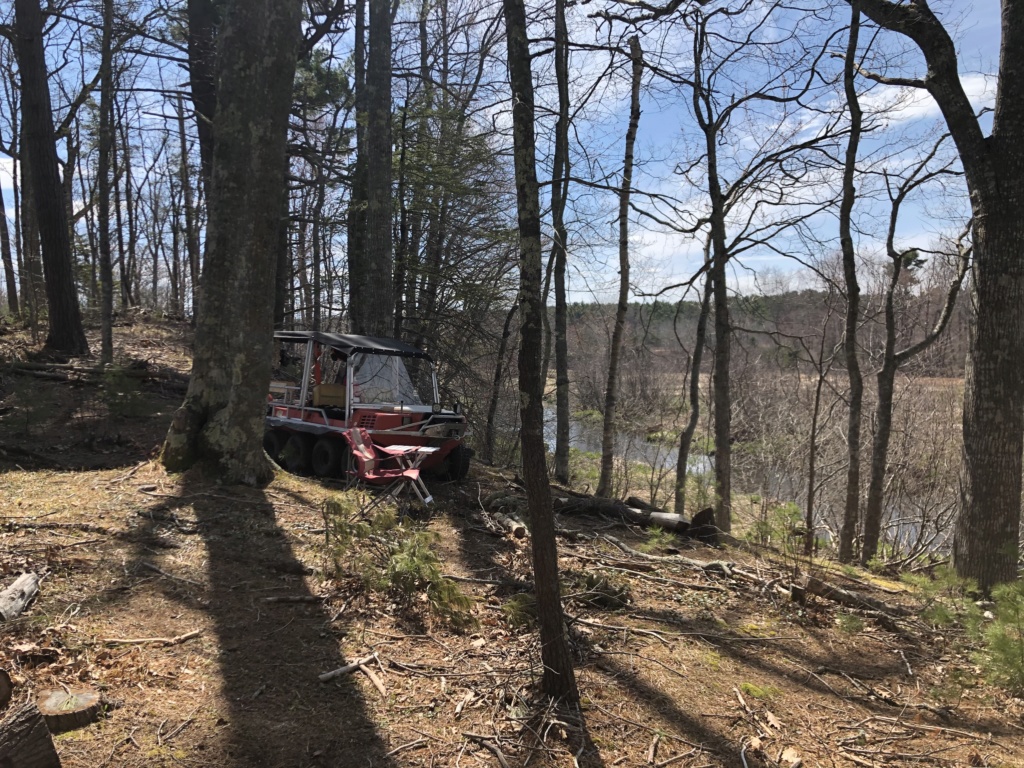
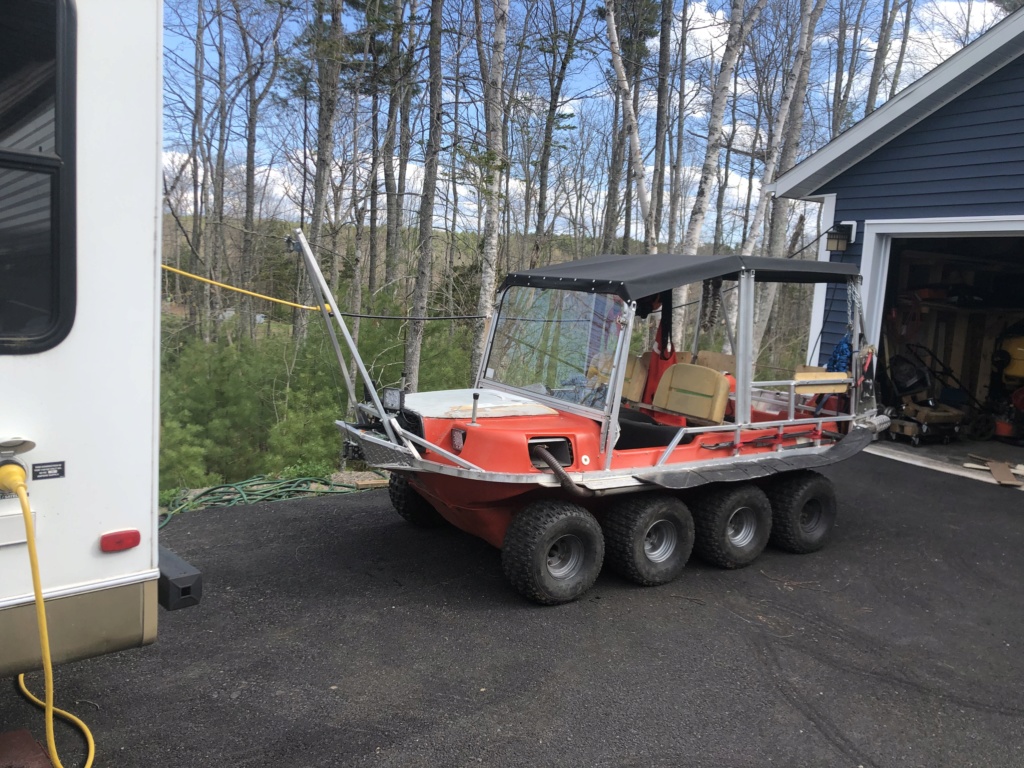
Project: Argoceptor

  1. Welcome to 6x6 World.

    You are currently viewing our boards as a guest which gives you limited access to view most discussions and access our other features. By joining our free community you will have access to post topics, communicate privately with other members (PM), respond to polls, upload content and access many other special features. Registration is fast, simple and absolutely free so please, join our community today!

    If you have any problems with the registration process or your account login, please contact us. Looking forward to seeing you in the forums and talking about AATVs!
+ Reply to Thread
Page 11 of 15 FirstFirst ... 9 10 11 12 13 ... LastLast
Results 101 to 110 of 148

Thread: Project: Argoceptor

  1. #101
    Well, with the the dash design beginning to be formalized, I'm going to have to run wiring soon. So, time to start building the "power section":


    New deep cycle AGM marine battery, bought for this purpose. The tray is just the floor with "stops" welded on either side. The hold down is just a steel strap bolted through the floor. The floor section is bolted down to the Argo frame. The "tray" will get a layer of rubber for a bit of abrasion and vibration damping, although an AGM is vibration resistant by design.

    The power wire to the front is a 2/0 gauge welding wire, with the end lugs crimped and soldered. It currently goes to the starter solenoid, which will double as a lug point for the winch power. Ground will be the Argo frame and I'll just put a short 2/0 gauge jumper from the batt neg post to the frame, then a ground jumper to the solenoid and ground jumpers where needed to make the power path. The Pos cable currently is directly to the batt Pos post, but I'll get a "mega fuse" to put between the battery and feed wire. Prob a 60A fuse. Enough to take the entire load of what I have planned, but small enough to blow quickly should there be a short in the feed wire. Highly unlikely with a plastic body, but better safe than sorry.

    The charger you see in the pic will be permanently mounted in the battery compartment. It's a sealed marine charger for AGM batteries and intended to be permanently mounted. It's been sitting around and doing nothing for a year or so now, so might as well just leave it in the Argo.

    There will be a mini ATO fuse box in the dash under an open-able panel that will provide switched ACC for various systems. I chose one with 10 circuits and built in blown fuse indicators.

    That's it for today, tomorrow I'll work on the ground circuit and fabbing the dash.

    One PITA I did notice today was there seems to be fluid on the power pack tray. Looked like it was red when I touched it. Only thing that could possibly be is that someone, at sometime, filled the transmission with transmission fluid instead of 80w90. I was pretty sure it was empty when I had it out, but it can't be anything else. The PITA is now I have to pull the transmission back out to check for leaks that I might have missed. That is not going to be fun. Fingers crossed it's just a seal or gasket and not a cracked case.....

  2. #102
    Well, crap on a cracker.

    I finished wiring up the battery and hit the key: click click click.

    Solenoid is working, but not turning over the engine.

    So I short the power cables and you can hear the starter rolling over, veeeeerrrryyy slooooowly.

    Crap.

    Now I have to try and get the starter out. Has to be a fairly easy fix as it started just fine when it was taken apart last year. Maybe I'll try a jumper cable to the engine block first to make sure the ground path is good.....

  3. #103
    Good news!

    The starter problem turned out to just be a ground issue. Once that was determined, I made a 4 gauge cable ground from the engine to the frame ground. I was planning to make a dedicated large gauge engine ground anyways, so no big deal.

    On to building the dash panel:


    Not a bad beginning. I've only got a 3 foot sheet metal brake, so I have to do it in two sections and weld it together. That's not problem, as the center section where I will join it will have a "pod" where the tach/speedometer/info center will go. That will cover the joint completely.

    I'm going to hinge the bottom and use brackets at the top. That way, I'll be able to remove a few screws on the top surface and swing the whole dash down to access to the components/wiring.

    Only hitch in the "hinging scheme" will be the control sticks. I have to decide if I want to remove the brake rods to the sticks and pivot them down when I need to get behind the dash, or the part behind the sticks will have to stay up while the rest pivots down. I'm leaning towards disconnecting the brake rods every time as it will be hard to make the dash look good with a seam/split on either side of the control sticks. Once the dash is built, it won't have to be opened up again unless something breaks/shorts.

    I'm undecided on leaving the dash shiny checker plate or painting it a duller color.I've had larger shiny bits in car dashes before and it's absolutely blinding when the sun hits it. Semigloss black or maybe the same "dark steel" paint (looks like a darker silver) that's going on the wheel rims....
    Last edited by great white; 05-19-2019 at 05:34 PM.

  4. #104
    Coming along nicely:


    Finalize the fit of the main panel today and build the instument “pod”.


  5. #105
    Dash mostly built:


    Still have some welding to do and finish a few bits like end caps, but that essentially it. Still trying to decide if I should paint it or leave it shiny.

    I decided to hinge it at the top:


    Not the best access for working inside the dash, but it’s not bad either. And, I don’t have to do anything with the control sticks when I need to work inside the dash. It was the best compromise IMHO...
    Last edited by great white; 05-20-2019 at 09:13 PM.

  6. #106
    There we go:


    Beginning to look like something now....

  7. #107
    Hey Great White I'm just taking a little break for doing my pm's on my hdi and hopped on the forum to see whats happening and have to wonder if you have easy access to the plugs, chains,chain ways, and grease fittings? I find the Argos are like funnels in that every leaf from every tree you rub against goes in the tub.

  8. #108
    Quote Originally Posted by beagle man View Post
    Hey Great White I'm just taking a little break for doing my pm's on my hdi and hopped on the forum to see whats happening and have to wonder if you have easy access to the plugs, chains,chain ways, and grease fittings? I find the Argos are like funnels in that every leaf from every tree you rub against goes in the tub.
    Yep, anything and everything ends up in the bottom of the tub. It’s a major PITA.

    For the plugs, I have two hatch doors beside the battery.

    The rear aluminum floor lifts right out to expose everything. The front is still the oem plastic floor. The engine bay is about the same as oem, except that now I don’t have a battery tray welded to the frame on the rh side.

    Overall, I’d say access is no worse than OEM, maybe a little easier.
    Last edited by great white; 05-21-2019 at 08:24 AM.

  9. #109
    Under the weather today, some kind of stomach thing, so I didn't get much done:


    Pulled the sticks off and cut down the handle lengths, installed the key in the dash and popped in the Lanyard/kill switch. I wanted a lanyard kill switch in case I get tossed from the rig on a bad bounce or roll. I've been tossed off an aluminum boat and a jetski before (catch and edge or bad wave) and lanyard kill switches have saved my bacon each time, so I'm sold on them anywhere there's a chance of being separated from a running machine.

    I also took the Honda Foreman switch-gear apart and rewired the switches to work for the purposes I have in mind for them.

    The kill switch is a particular PITA since the Kohler needs a "make" signal to kill the engine and the Honda switch is a "Break" switch to kill. To make it work the way I need, I'm either going to have to come up with something creative with the switch itself or simply use it to trigger a relay.

    The relay seems to be the easiest way to solve the issue, so I'll probably go that way.

    Coles notes: the switch will turn on the relay, the relay will pull ground off the terminal when powered and allow the Kohler to run. It will basically be "fail-safed" to not let the Kohler start with power off.

    Should the fecal matter hit the fan out in the woods somewhere, I can just pull the engine connector and the Kohler will run just fine. I just won't be able to kill the engine without providing a ground.....

  10. #110
    Hey! Doesn't this look familiar:


    That's from the 2019 Aurora model.

    What I bought for my 87:


    Buy it from Argo? Hundreds of dollars.

    Buy it from Ebay? 29.99, shipped.

    Sure, the gauge face is different and it's probably got a little different programming for the LCD info, but that one hell of a markup for a made in China generic part.

    I’ve got no problems with a company making profit, but fair profit. These assholes in the world today only interested in saueezing 100/200/300 percent profit out of everybody need to be drug out into the street and shot! There’s no honor or integrity in doing business like that, only rampant greed at the expense of your fellow man. Like I said, i have no problem with someone making some profit on something, the world would collapse without profit. But there’s fair profit and then there’s outright thievery!

    People wonder how China got so powerful in manufacturing? These assholes running companies and finding the cheapest, worst sweatshop places to make things as cheaply as possible and mark them up like its made out of gold. Assholes. China is not the problem here, it the North Amercian companies hell bent on driving down thier costs and making unfair profit that drives China’s manufacturing success! We’re doing all this to ourselves!

    Friggin' Argo is no better than any of them. Nothing is anything special from those jokers except the body and the transmission and they expect you to pay 30-40 grand for a new one.

    Bastards.

    Sorry, got off on a rant there...
    Last edited by great white; 05-22-2019 at 09:29 AM.

+ Reply to Thread

Posting Permissions

  • You may not post new threads
  • You may not post replies
  • You may not post attachments
  • You may not edit your posts