That's a heck of a road trip! I thought 700 miles was a heck of a trip to pick it up! OK, I'm in....Originally Posted by Noel Woods

Maybe we could find a nice riding place mid-way. Some place new and exotic. Hmmm....


That's a heck of a road trip! I thought 700 miles was a heck of a trip to pick it up! OK, I'm in....
Count me in too!
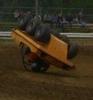
"Looks like you have a problem with your 4 wheeler........you're missin' two wheels there"
How do I fix my Super Swamp Fox frame?????
.... I don't....
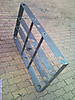
The old frame was a bit rust-scaled, and I didn't (at all) like the way the original frame was put together. The overall idea was adequate, but poorly executed. I want to incorporate several upgrades, including new, more robust chain adjusters, transmission cradle, engine mount and general reinforcements. This is just the skeleton that's been tack-welded together while I sit on my garage-stool and think about it a bit more.
I'm still pondering too

Nice work. Did you use a plasma cutter to cut the steel?
I went with 3/16" mild steel for the perimeter; outer and inner frame rails. I'll likely go with 1/8" or so to complete the "C" channel on the inner and outer frame rails. I searched and searched for a local fabricator willing to bend-up channel for the frame rails I wanted, but came across a lot of whining and complaining from several independent and commercial contractors. Effit. I'll build my own.
Thanks! I had the local steel supplier cut it to length (roughly) , then just used hole saws for the axle holes and cross tubes. Everything else was done with a 4 1/2" grinder, a hack-saw and a few pints of home-brewed IPA. Forgive me if a couple of the (hic!) angles are off.....
Last edited by hydromike; 05-01-2011 at 08:50 PM.
hi ,
Some advice for building a ssf chassis .
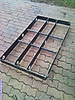
As u will notice in the pics of mine the chassis was replaced .The chas that was in the machine was badly twisted and was most definitely not the original .
The ssf uses a flex chas , current makers do not use this design they use a rigid style
eg argo ,max etc
Original chas is outer rails 5 inch x 3/4 1/8 thick
inner rails 4 1/2 or 4 3/4 x 1 1/4 1/8 thick
2 x tube cross members 1 5/8 3/16 thick location 9 iches in front of midlle axle and 9 inches to the rear
the issue u will have is space for the chain and tensioner in the lower tub
WIDTH IS CRITICAL i have used max 2 tensioners f and rear
Redesign chassis
rigid design requires reinforcing
inner rails 5 inch x 1 1/4 x 1/8 high tensile /strength steel
outer rails 5 inch x 3/4 x 1/8 high strength steel
use 4 x tube cross members 1 5/8 5/32 or 3/16 thick location 4 3/4 inches either side of mid axle and the same distance from the front and rear axle
If u use the 1 5/8 tube and it is spaced further away from the axle when then chain tensioner operates the chain will rub . [this is using 24 tooth sprockets no 50 ,26 tooth would improve this ] [my chassis cannot use 26 tooth etc ]
original rear and front angle steel ""cross member "" change these to c channel 5 inch x 1 inch [ cut windows in these for sprockets to protrude thru ]
To use the above i have used original axle distances 26 3/4 front and 27 inches rear
The bearing housings are cast 4 bolt outer 72mm x 1 1/4 Use smaller inner housings for 62 x 1 inch bearing . Why? so u can retain the axle with a bolt .[requires a step in the axle .
If u use a full box chass total length will be critical ,mine only just fits by 3/16 inch
tomo
I've duplicated the overall dimensions of the original frame (length, width, axle spacing), so fitment won't be an issue as far as physically getting the steel to fit inside the fiberglass body. My 1 3/4" cross-tubes (original on my machine) have been placed in their original location, so chain-rub on the cross tubes shouldn't be a problem. I have plans on using threaded-style chain adjusters all around the machine. On such a heavy machine, I'd like shy away from the Max II style adjusters. On a moderately-beefed Max II, I've seen a couple new adjusters blow out completely (more than once) when reversing. (Hi Tom!) It's happened on a couple 16hp machines, too. The 'Fox can only get heavier....
I've retained the 62mm 3-bolt flanged style inner and outer bearings. My inner and outer frame rails are all 5" x 3/16" plate, and I'm welding 1" flat stock to the top and bottom of each rail to form a "C". I did this same thing on my Max VIII project (sigh...), and it turned out well. I'm going to make new axles, new sprocket tubes, etc. for this machine, so apart from simply fitting the the frame into the body, the rest is irrelevent. I like the idea of retaining the axle with a bolt a-la' Max II and IV. I'll add threading my axles to the list of things to do....
Additional reinforcements to the frame will have to come as I start laying out the rest of the internals. I just know that I'll want to move stuff around about a hundred times if I weld it in now....
HI,
The manufacture of a 3 piece c channel personally i would not recommend it . WHY A folded piece will allways be stronger . This is not to say it cannot be done BUT..The distortion and or stress will be applied to chassis unevenly . The stress will concentrate on the welds ,which is never a good thing . Refer to a qualified welder for ways to get around this .
The chasis that i removed was a 3 piece and was real badly twisted
As to why u chose to go with a three piece design because many sheet metal shops were not interested i can completely understand . After u find one they will then assume 1/8 tolerance on folds is fine NOT............The tolerance must be 1/16 inch period ..
Only pilot holes can be drilled in the flat steel prior to folding 1/8 smaller . Holes that are close to the fold will distort the fold etc .Holes stretch and can go oval shape .
The max 2 type adjusters have only 2 faults really
The bi metal spring does loose tension [cheap to replace ]
As the above spring holds the ratchet engagement ,this is the other fault .For bullet proof operation a clamping bolt or lock bolt would be ideal .
U made mention that your cross tubes were 1 3/4 mine are 1 5/8.
The timber in the floor i removed . Do u intend on reusing the timber idea ??
If u r going with new axles sprockets etc have u considered taper lock style which only require key ways to be cut in axles and the bonus is quick and easy install with almost the strength of spline type
cheers
tomo
Last edited by Tomo; 05-03-2011 at 02:19 AM.
... and 1 1/2" axles will always be stronger than 1 3/16". The line needs to be drawn somewhere, and I've had great luck using both welded C-channel and plain-Jane 3/16" plate as frame rails on my Attex Chief. I understand that bending a piece of channel would be stronger, but at some point the next step up is futile. Why not go with double 60 chain all around? It just doesn't need it.
It's cheap to replace, but every time you snap past the ratchet detents, the entire "ratchet" setup has lost a little bit of its holding power. To each his own; I just don't like 'em. I know that they're MUCH easier to adjust, but they definitely need a locking bolt, as you say. At that point though, you're practically at a Unistrut setup, like on Hustlers (which I like a great deal....)
I've not committed to the idea, yet. I don't like the idea of a big piece of lumber in the bottom of the machine, regardless of thickness. It just seems so ephemeral. I don't know in what other direction I'd go. A piece of thick HDPE would be nice, but it would have to be riveted in place, and I don't like the idea of a bunch of rivets on the bottom of the machine when you can't countersink them well enough. I'll have to do something, though; the long span of the fiberglass on the bottom makes it a bit flimsy. Did you just cut the wood out and stick with the fiberglass? I'm open to other ideas....
The idea didn't cross my mind yet, but I'm definitely going to look at it as an option. I would have loved to go with splined axles, but it's cost prohibitive right now. Max II and Max IV splined axles are way too short for the 'Fox, unfortunately.
 Posting Permissions

 Reply With Quote