Figured I better start posting pictures of this build and the mods I plan on making.


Figured I better start posting pictures of this build and the mods I plan on making.

I like your pictures. Thanks for posting. Which kind of blue paint did you use for the BS shroud?
Blazer Blue Enamel ( spray can )
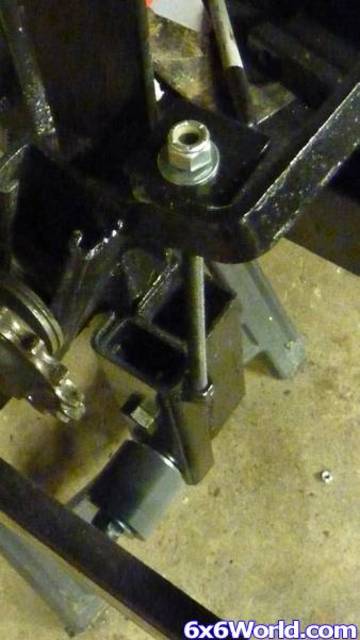
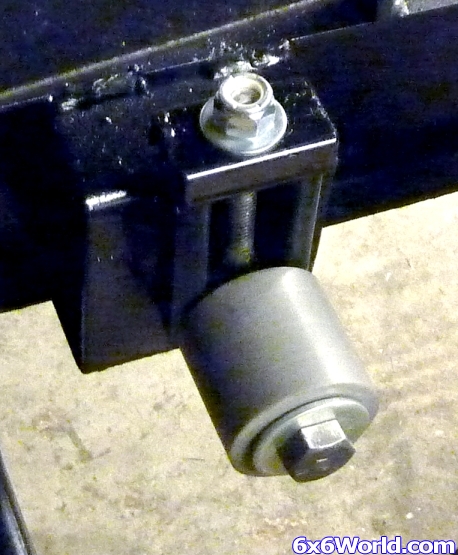
Finished my rollers and the upper adjustment attachments. This particular one below was a real pain to adjust. Not no more.
Last edited by zoood; 12-29-2011 at 12:24 AM. Reason: add photo
Great idea! Simple, yet very effective.
"Looks like you have a problem with your 4 wheeler........you're missin' two wheels there"
Do you have a ball bearing inside the roller or is it just the ID of the roller?
No ball bearings. The roller material is Oil-Filled UHMW Polyethylene. Self lubricating. Just the ID of the roller.

Last edited by zoood; 12-30-2011 at 08:34 AM. Reason: add picture
I do not know what is make or buy because ATVs are not my area of expertise. A lot of talented folks with mad skills on this forum.
Did you make the roller or is it a stock part?
I made them. I had a machine shop (cause I dont have a lathe) drill out the centers of the rollers and cut then to the length I needed. I bought the roller material ahead of time. I picked up the copper pipe at Lowes. I also hammered a 3/8" socket, 3/8's drive through the opening of the roller. This widened the opening enough to allow the copper pipe to slide in and allow the roller to turn on the pipe. Smooth fit and just enough to allow free rotation of roller on pipe.
What I noticed about the Hustler was how easily a 1" high tsunami can come over the hood and soak the hell out of ya. So I'm hoping that the dashboard I'm building will curve a lot of that.
I have a shrinker / stretcher tool here that allows me to form the angle aluminum I made to the contoured surface.
Rivits were use to secure the dashboard anchor.
Red arrows point out the dashboard anchor.
Blue arrows point at the new edge cut-out of the original dashboard
Face of original dashboard is covered with aluminum.
The dashboard is finished!
Where the dash edges would come in contact with the aatv's surface. Rubber "U" channel was adhered.
Formed aluminum strips in long angles and then bent them to form 3 triangle braces. Reinforced the triangles with flat triangular shaped aluminum and riveted them together.
I about finished populating the side panel. Though not pictured. the winch directional switch is being mounted to the left of the key switch. Each switch enables either the head lights, the engine compartment fan or the bilge pump.
I decided to go with a bad lands 2000LB winch that can be relocated to the front or the rear of the ATV. I had cut into the bumper and incorporated the receiver in the bumper tube. I had also added angle iron cross braces at the bumper mounting brackets to the tub.
I had also mounted an engine compartment fan in top right rear quarter.
zoood
 Posting Permissions
 Reply With Quote