i am rebuilding an amphibious snowmobile these days if anyone is interested in seeing it, let me know here i will do the pics and progress thingy for you


 Crackpot Cruiser


i am rebuilding an amphibious snowmobile these days if anyone is interested in seeing it, let me know here i will do the pics and progress thingy for you
He who has not cruised the back country in a 6x6 , has not lived life to it's fullest
A Mans level of mechanical education directly corresponds to the level pain suffered while getting it

Im interested!Sounds cool.

I love anything with tracks! Let's see it!
1983 Hustler 945-HK 627cc Vanguard
1982 GMC K-10 Sierra Classic Suburban 6.2 Diesel
2010 Chevy Silverado 1500
1974 Honda ATC 70
1986 Honda ATC 250ES Big Red
There is no Z in Diesel!!
Me too, me too... :-)
Crackpot Cruiser
ok, sounds good, i'll put some pics up as i go along
He who has not cruised the back country in a 6x6 , has not lived life to it's fullest
A Mans level of mechanical education directly corresponds to the level pain suffered while getting it
Cool thanks!Originally Posted by Robinhood02

Crackpot Cruiser
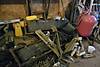
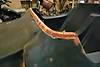
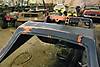
here are a few pics of the tear down and starting on the body repairs
all torn down
all the undercariage parts piled up
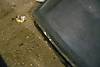
some shipping damage that will need touch up
the spiderweb cracking here is from taking a hit and will have to be ground completely down thru the jel coat to the fiberglass below then refiberglassed to get rid of the spiderwebing so it will not show up again in the new paint
He who has not cruised the back country in a 6x6 , has not lived life to it's fullest
A Mans level of mechanical education directly corresponds to the level pain suffered while getting it
Crackpot Cruiser
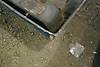
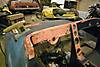
the repairs
once you have the area ground down thru the jel coat to the fiberglass under it, make sure you size your patches before you apply the resin
after the resin is done
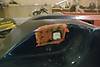
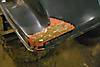
filling old windshield mounting holes
some mount holes on the deck lid need to be filled because i don't have the cargo rack that came on the unit from the factory
preping the dash and console for repairs
He who has not cruised the back country in a 6x6 , has not lived life to it's fullest
A Mans level of mechanical education directly corresponds to the level pain suffered while getting it

This is going to be a great thread. Thanks for taking the time to upload photos and explain them all.
Crackpot Cruiser
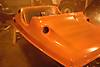
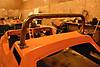
here are some more pics of the progress
this is of the top with the base coat complete and once dry will be wet sanded with 200 grit for top coat
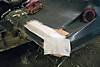
some damage on the tub where the front steering and skiis bolt on, the damage was previously repaired by someone but not as nice a job was done so i did a finish coat of fiberglass cloth
this is repairs to some more of those spider web cracks from the tub taking a hit
and some minor damage of the lip of where the top and tub join
this is the wet sanded and top coated top i will be painting the interior black and will be spraying the black on the top and tub at the same time
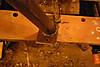
I decided i didnt like how high my head stuck out above the machine with no roll bar so i cut down an old rusty Max II bar to about 12" tall and here i am welding the mount plates to it
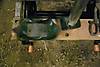
i wanted to have rubber mount gasket to prtect the paint on the body so here i used spray paint to give me a pattern and it will be cut out and hopefully fit well
here i fitted it to the body and drilled the mount holes
He who has not cruised the back country in a 6x6 , has not lived life to it's fullest
A Mans level of mechanical education directly corresponds to the level pain suffered while getting it
 Posting Permissions
 Reply With Quote