You are currently viewing our boards as a guest which gives you limited access to view most discussions and access our other features. By joining our free community you will have access to post topics, communicate privately with other members (PM), respond to polls, upload content and access many other special features. Registration is fast, simple and absolutely free so please, join our community today!
If you have any problems with the registration process or your account login, please contact us. Looking forward to seeing you in the forums and talking about AATVs!
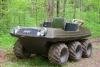
Needed something to do during the pandemic this winter so I decided to make some tracks. They're something I've wanted for a few years now. I take care of a small parking lot adjacent to a swamp and got tired of getting stuck with just tires as I pushed snow into the swamp. Defidently a bit of a learning curve to do, and was a little overconfident at the start. I managed to finish them right as winter is ending, so the real test will have to wait until January next year but at least hopefully I will be ready.got cocky with the tire guides and they bent almost instantly. Added in a reinforcement to make them stronger. No I know why they are like that on other designs
New tire guide design worked great but I only used 1 row of bolts to attach the grousers to the belts so on turns they decided to pivot on the bolts and drive themselves up the tires. Again found out the hard way why other designs use 2 or more bolts per side of the grouser. Marked , drilled and bolted a second row. The offset of the bolts is to give them the most distance appart to stop the twist. They hold together good now but I have only tested them on bare gravel parking lot and packed sled trails so far. They are definitely agressive and dig into the gravel so they should work well when snow flies next year
Cant wait to see how they do in the mud, musket and water!
Tec specs:
14.5" wide total
14" grouser from 1×1/8 angle with chamfered ends for turning
2.5" belt width
5" grouser spacing
5/16 main bolt and lock nut
1/4 secondary bolt to stop the track from twisting
1×1/8 flat steel for tire guides
33 grousers per side
not a critiqu but you may want to bend those tire guides a bit more at the top and away from the tires. Tires flex on these machines due to skid steering anddistort even with tracks on. I maybe wrong but just to be on the safe side. also I have had tracks on and gotten a large stick caught in between the tracks and tire, also causing distortion.
the pic of the tracks on the machine, look at the guides that are at the rear tire the one that is just at the tire not musch flare/ it could be me and I'm looking at a 2D pic. they do look aggressive and should provide good traction.
Sweet job. Going to be building a set of tracks for the machine I have once I finish work on my bike resto. Hoping my design works out. Love these machines. Your machine looks mean with the tracks you built.
I did end up bending them out closer to 45° just to help funnel the tires into the guides easier. Now in playing with tire pressures trying to find a balance... currently all at 7 psi so the bumps are a little bumpy lol
Probably around 100 hours give or take but a bunch of that was messing around with the design and going back to fix problems. Also did all the work with a hand drill, angle grinder, and a mini stick welder. A chop saw and a drill press would have shaved a few hours off for sure! Materials were around $1000. Bolts aren't cheap!


 Reply With Quote