Briggs Vanguard custom exhaust

  1. Welcome to 6x6 World.

    You are currently viewing our boards as a guest which gives you limited access to view most discussions and access our other features. By joining our free community you will have access to post topics, communicate privately with other members (PM), respond to polls, upload content and access many other special features. Registration is fast, simple and absolutely free so please, join our community today!

    If you have any problems with the registration process or your account login, please contact us. Looking forward to seeing you in the forums and talking about AATVs!
+ Reply to Thread
Page 1 of 2 1 2 LastLast
Results 1 to 10 of 12

Thread: Briggs Vanguard custom exhaust

  1. #1

    Briggs Vanguard custom exhaust

    Well I finished my exhaust tonight and here is the info on what I did:

    the pipe I ordered from this site


    Exhaust Header U-weld Kit - BMI Karts and Supplies - Home

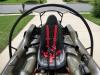
    With 2 of these kits I had all the bends I needed to make my exhaust in the size I wanted. The price was decent for mandrel bent tubing from what I've seen. I made the pipes 16 inches of 1 " O.D. pipe. I did this based on what the mower racing guys recommend. Actually they recommend 12 to 15 inches but 16 worked easier on my machine to get the exhaust to exit evenly. After the 1 " pipe I opened it up to 1.25" O.D. pipe for around 12 inches to exit the machine. The flanges I ordered direct from Briggs Part #692074 this should work on most Vanguard engines.

    I had a local welder weld it for me. One note here I tried to have it welded off of the machine but it is next to impossible to get everything correct without tack welding it while on the machine. My first attempt ended up horrible I had to buy more flanges and if you look close the pipes are a little to the right of center because of what I had to cut off. Oh Well live and learn!

    I finished it off with 2 RLV silencers for 1 5/16" for modified engines these can be purchased on any Kart racing website. To clamp them on I used 2 piece split shaft collars in 1 3/8" and these worked better than I hoped. I then used a standard ratchet clamp to stabilize them together.

    I may attach a metal brace to the engine if it needs it

    Mike
    Attached Images

  2. #2
    Here is a video of it


    Mike

  3. #3
    Join Date
    May 2007
    Location
    Kings Mountain, NC
    Posts
    7,788
    Mike, that sounds awesome! Thanks for the write-up, pictures, and video. What more could we want

    Could you tell any difference in performance? Also, how much louder would you say it was than the stock exhaust?

  4. #4
    Join Date
    May 2007
    Location
    Kings Mountain, NC
    Posts
    7,788
    Mike, I hope you don't mind but I copied your first two posts to the article section. It will be a good "how-to" to have.

  5. #5
    Join Date
    Jun 2007
    Location
    Tulsa, OK
    Posts
    1,725
    You bought some nice materials.. are those the least restrictive/loudest of the 2 RLV models? A lot of time piecing that stuff together. I know, mine was. I'd like to try different designs if I had tubing, bending, and welding abilities. Maybe someday. Did you take those split rings out of the exhaust ports? Wonder if it's time to drill the main jet a couple thousandths and richen it up a tad. I wouldn't run it long or hard with the cooling shroud and tins off.

  6. #6
    Roger,

    Yes it was a lot of time trying to track down what I wanted down. I wanted to do this part of my modification first because of the fabrication required. everything else is just order and put it on. My goal in the coming year is to learn and equip myself for welding.

    The RLV's I used are the least restrictive and therefore the loudest that they make. The "naked" engine look is only temporary, maybe if I were naked I could get some more speed out of the max! .

    By the split piece do you mean the piece inside the exhaust port? I didn't know they could be removed. What purpose does it serve? If removed I guess it would open up the exhaust a little bit?

    I'm going to put it back together this week and run it a bit then read the plugs. I'll let you know what I find as far as the richness. If it's running lean I might get some more info about fixing the main jet.

    Mike,

    Yes it is louder than the stock muffler but there is a definite increase in power. It's louder but not objectionable. It kind of sounds like a tame Harley.
    I will say that the muffler that came with the Max when I bought it was special ordered from Tard Hand mfg.com. It was specially designed with reverse axial flow to DE-rate the power of the mighty 16. So it's not surprising that I'm seeing an increase in performance.

    Now to be P.C. I'm not making fun of anyone with special needs or disabilities its just that "Tard Hand" has now become a commonly used term on this board.

    Tard Hand - term used to describe a person who builds / constructs / designs or take action without the use of forethought, esthetics, or consideration to logical and otherwise safe engineering (Myself included)

    Mike

  7. #7
    Join Date
    Jun 2007
    Location
    Phoenix,Az.
    Posts
    1,629
    Great Job! I'll bet it sounds awsome, I did the same thing to my Attex w/ 1" mandrel bends, only I joined them with a collector I made cause I couldn't find any. Now if anyone hears you comming they'll get the hell out of your way!
    Attached Images

  8. #8
    Whipper,

    Did you use 1' I.D. or O.D? Your pipes look bigger than the ones I used. I'm sure that engine has the need. That thing's gotta breathe!!

    Mike

  9. #9
    Join Date
    Jun 2007
    Location
    Phoenix,Az.
    Posts
    1,629
    Quote Originally Posted by micmac View Post
    Whipper,

    Did you use 1' I.D. or O.D? Your pipes look bigger than the ones I used. I'm sure that engine has the need. That thing's gotta breathe!!

    Mike
    Oooops, I just went to check my pipes and they are bigger. They're 1 1/8" I.D. Good eye.

  10. #10
    Roger,

    I put everything back together today. I removed those split pieces as you recommended thanks for the tip.

    Mike

+ Reply to Thread

Posting Permissions

  • You may not post new threads
  • You may not post replies
  • You may not post attachments
  • You may not edit your posts