t-20 bracing

  1. Welcome to 6x6 World.

    You are currently viewing our boards as a guest which gives you limited access to view most discussions and access our other features. By joining our free community you will have access to post topics, communicate privately with other members (PM), respond to polls, upload content and access many other special features. Registration is fast, simple and absolutely free so please, join our community today!

    If you have any problems with the registration process or your account login, please contact us. Looking forward to seeing you in the forums and talking about AATVs!
+ Reply to Thread
Results 1 to 6 of 6

Thread: t-20 bracing

  1. #1
    Join Date
    Nov 2007
    Location
    West Central Louisiana near Toledo Bend Reservoir
    Posts
    1,059

    t-20 bracing

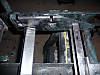
    I have a relatively easy method of bracing the t-20 in a Hustler or MaxIV (easy doesn't necessarily mean quick). It is a 4 bolt design and I did this on my 950 while restoring it, because I was going to run a split shifter, and I knew that the cheesy stock system would not hold up to the strain of a split. This requires removing the t20 and replacing it a few times to be sure of fit, clearance, and for welding. This is what I did:
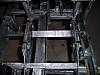
    cut 8 pieces of 1/8" x 1" x 1" angle iron 1" long,(1/4" x 1 1/2 x 1 1/2" angle can be used for more strength) then drill a 25/64" hole in each piece, located so a socket or wrench can get on the nuts/bolts that will be used. The key is to stay as close to the other web as possible, if you get to far out you will lose strength. Then cut 2 pieces of 1/4" x 1 1/2" flat bar 10" long, these are fitted to bolt on the top, where the shift diamond keepers bolt up,and 3/8" holes for these bolts are drilled. These holes are offset from center, so check for proper fit/clearance, when done correctly, bolts placed in the angle pieces (in the next step) will hang close to the front/back of the t20 housing. Weld 4 of the angle pieces, "throat" up, flush to the lower inside corners of the flat bars. Then weld the other 4 angle pieces to the frame/transmission channel, throat down, so that a 3/8"x6"(or longer) bolt can be dropped into the holes in the top angle pieces,passing through the bottom pieces, and a locknut snugged up. When you install the flat bars the angle pieces will face the center of the tub, and you will need bolts long enough to make up the 1/4" thickness of these plates, use blue loctite and tighten to spec. Set the transmission in place, but do not tighten the 4 stock mounting nuts(bolts) at the bottom of the t20. Drop the 4--3/8"x6" bolts into the holes you drilled in the angle pieces and snug a locknut onto the long bolts. Tighten these ONLY enough to pull the t20 down snug, and then tighten the four stock mounting nuts/bolts. You will not have to worry about the transmission moving again...ever!

  2. #2
    Join Date
    Jan 2009
    Location
    North Mississippi
    Posts
    158
    Pictures, please. I'm at a good point on my project to put this to use.

  3. #3
    Join Date
    Jan 2009
    Location
    North Mississippi
    Posts
    158
    Is this along the lines of what you are taking about for bracing?
    Attached Images

  4. #4


    "Don't worry my Dad's a TV repairman, he has an excellent set of tools..I can fix It"

  5. #5
    Join Date
    Jun 2007
    Location
    Central NJ
    Posts
    1,470
    There are a number of variations of the Hustler frame. My 80's vintage Hustler has just a "U" plate welded to the center spine to hold the trans. I hold the trans in with a steel strap with a stud welded on each end like a very large muffler clamp and bolt it through the trans hold down plate. The clamp is 1/8" X 1" wide and lays on the middle seam of the trans.

  6. #6
    Join Date
    Nov 2007
    Location
    West Central Louisiana near Toledo Bend Reservoir
    Posts
    1,059
    I got a few pics of the bracing method I described above. This is a fairly simple design and holds with no movement of the transmission after they are installed. I used steel locknuts on them. Follow the instructions in my description, and don't overtighten, just snug them down until you can't turn the long bolts by hand.
    Attached Images

+ Reply to Thread

Posting Permissions

  • You may not post new threads
  • You may not post replies
  • You may not post attachments
  • You may not edit your posts