


So I wanted to do some upgrades on Lil Blue. I got several flush mounted LED lights in and the 1st set was too small and the 3rd set was just right. Here are the pictures of what the process look like.

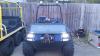
So I wanted to do some upgrades on Lil Blue. I got several flush mounted LED lights in and the 1st set was too small and the 3rd set was just right. Here are the pictures of what the process look like.
Last edited by CBass; 03-06-2020 at 01:42 PM.
Hold My B..R and Watch This!!!
Cory, You are going to show me up.
Tail light work
I got tired of loosing tail light covers, so I wanted to try some flush mounted ones. These mounted easy also. I used the outside bolt hole from the original light to line it up with the template. Once it was cut I mounted, wired, and sealed it just like the headlights. Doing all 4 took maybe 1 hour start to finish with 2 beers.
Last edited by CBass; 03-06-2020 at 02:52 PM.
Hold My B..R and Watch This!!!
Head lights
I love how there was no cutting involved with these lights. I just drills the 8 holes for the mounting screws then used just a little bit of sealant along the backside edge of the light to keep sand and mud from getting wedged between the light and tub. Wired right into the old headlight wires.
Last edited by CBass; 03-06-2020 at 02:47 PM.
Hold My B..R and Watch This!!!
I sure hope not.Originally Posted by Deedeelin1

Hold My B..R and Watch This!!!
thanks cory...i'm going to order the 4'' headlites , easy project and they look good. johnboy va.
nice
Thanks for the info, I have been looking for a headlight swap. I ordered a set.
cory..i must have ordered the wrong ones for the headlites..i got the 4'' . it's the 6'' ones , right ? johnboy va. i'll use the4''s somewhere else
JohnBoy, That’s the way to do it, tell Ruth you bought the wrong ones and she will say well buy the right ones. Pretty soon you will have more lights then me. Cory can tell us what time to line up and we will all turn on our lights, this sounds like a great gathering. If I am not mistaken Corys light change colors I love that effect.
 Posting Permissions
 Reply With Quote