-
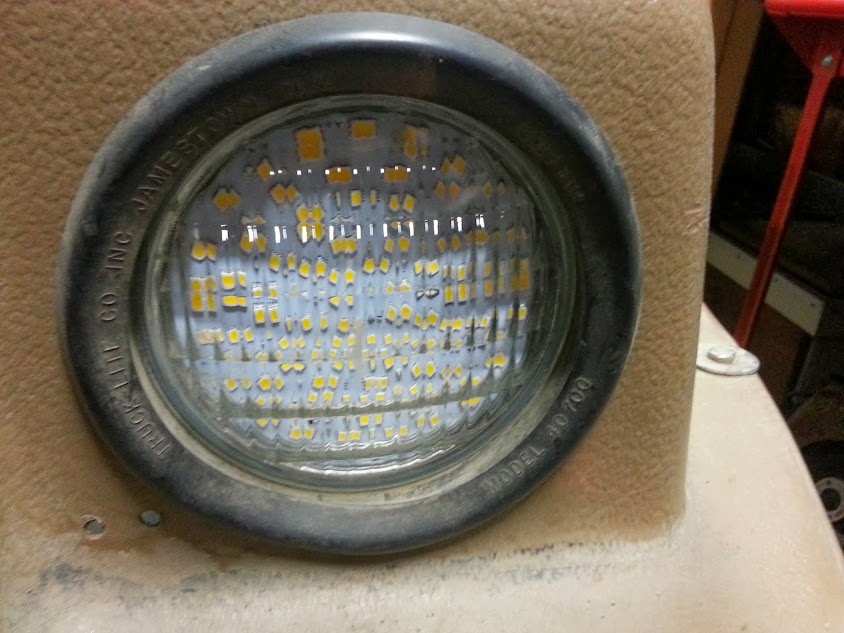
Thank you Adondo for all of those pictures detailing your work, good stuff. I really appreciate the close-ups too, I could see the manufacturer and model number of the Headlight Ring. I now have some on the way from eBay. Just bought a 1993 Max II and both headlights were knocked out with no rings to be seen. I like those LED headlights you installed and may do the same. Thank You! Mogger -
New tires!! The local Les Schwab's prices amounted to about $15 more than ordering them online, and because I bought from them, no mounting charges. The machine had dry-rotted Goodyear Rawhides that were worn down to nubs.
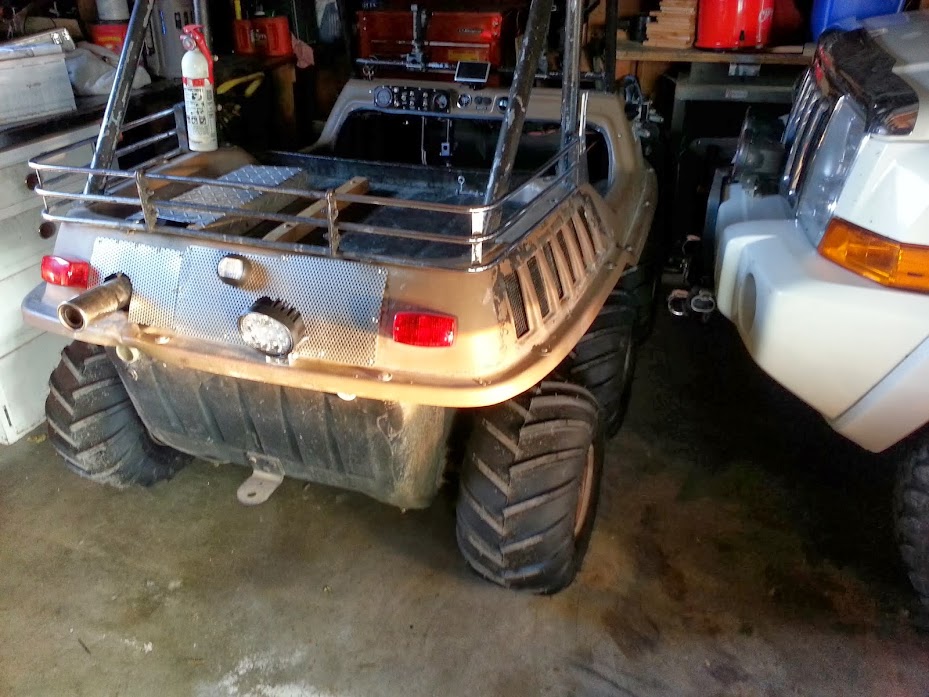
I consider it 98% finished and ready for the trails/water now. The recently installed LED rear flood and marine nav lights makes it into a completely LED converted ride. All lights on, including the upper light bar that lights everything up front within a half mile takes less power than the original running lights. The small white light in the center is a marine stern light.
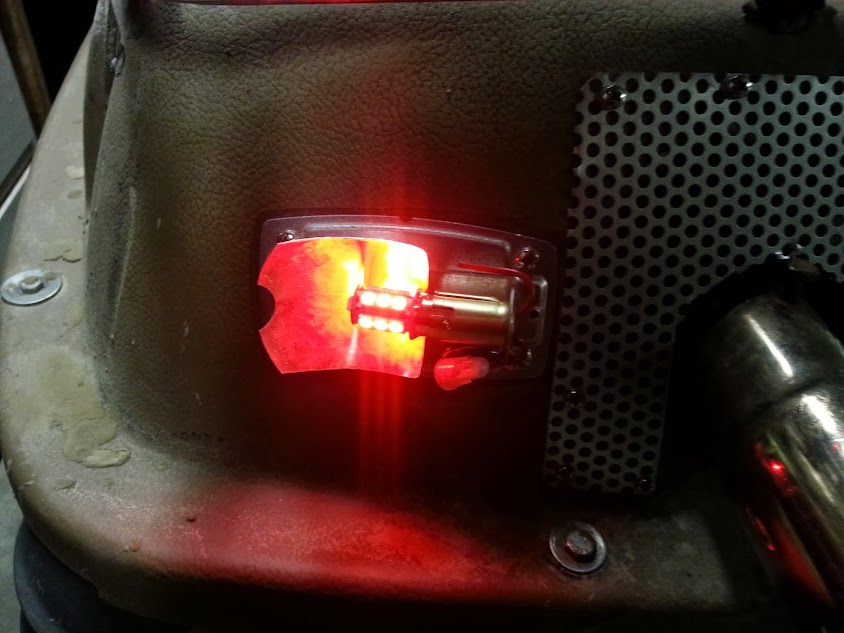
The port side marine navigation light.
The wooden rail that keeps the plastic storage locker box from migrating around. That crappy muffler cover is the last 2% of getting my little rebuild done. I'll have the local metal shop make a nice one with 3/16" aluminum diamond plate soon. I'm thinking of having it made with a double layer so the top surface isn't a frying pan. My cool air ducting helps that though, as the heat's blown out the port side vents now. ON EDIT: after looking at photos here and elsewhere on the 'net, I'm thinking someone made this nifty rear engine cover. It's fiberglass, and I'm not sure if it's a kit, or fabricated from something else. It's nice though, as the entire engine and T-20 can be accessed pretty easy.
 Last edited by Adondo; 12-05-2013, 04:46 PM.
Leave a comment:
-
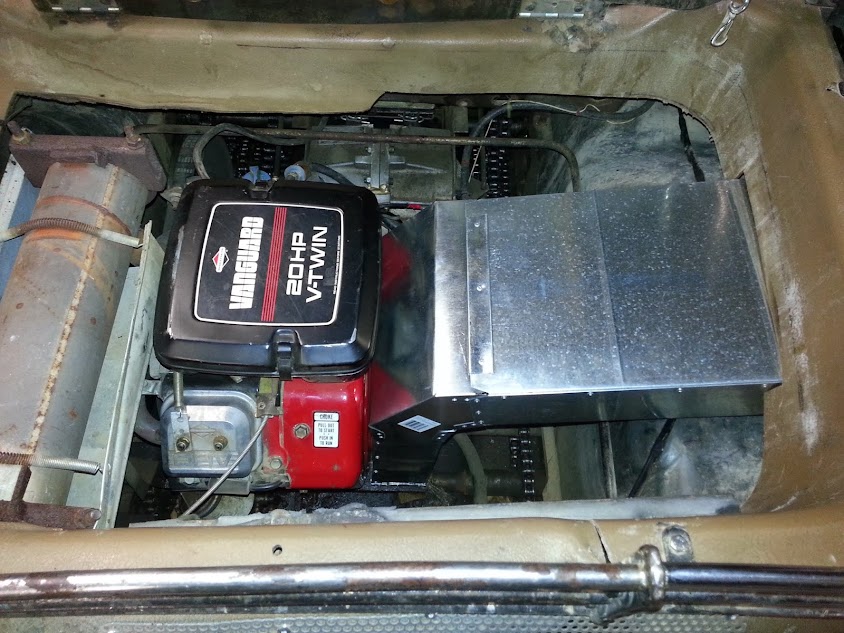
One more photo. This was a test fit before the springs and bungy. The duct angles up at about 15 degrees toward the Max's side vent. The slip fit of the 90 degree elbow allows the tilting.
Oh yes, the local Les Schwab Tire store has a set of Carlisle AT101's on the way. New skins SOON!Leave a comment:
-
DUCT!!
Built a cool air intake duct over the weekend. It works nice too, running around the property, and leaves were sucked up against the outside grill, so it works. Now, hot air exits forcibly from the left side grill because the tub is now getting pressurized. Before, heat would more or less leak out everywhere. So far, I've been out playing in 40 degree temps, so having the engine rehash hot air in the hull hasn't been a problem.
The engine grill removed.

The lower piece sandwiched between the grill and engine shroud. The duct is flat 4x12. I fabricated an end cap from extra tin, and used 1/8" rivets. It looks crappy because I bent the edge by hammering over the edge of the bench. My kingdom for a sheet metal brake.
Upper piece made with length of 4x12 and 90 degree flat elbow. I used rivets everywhere to make it solid. I even used rivets on the snap together seam so it can't rattle apart.

The joint slips together, and in a normal job of running ducts in a house, it would be taped shut forever. In this case, it's held together with springs hooked to stainless steel P-clamps riveted to the duct. That way, it comes out fast and easy for servicing the rig when needed.

Notch cut in the side plastic, and a bungy holding it in place. The bungy hooks to P-clamps bolted in place. The bungy cord and springs allow movement and float of the duct between the engine and hull.

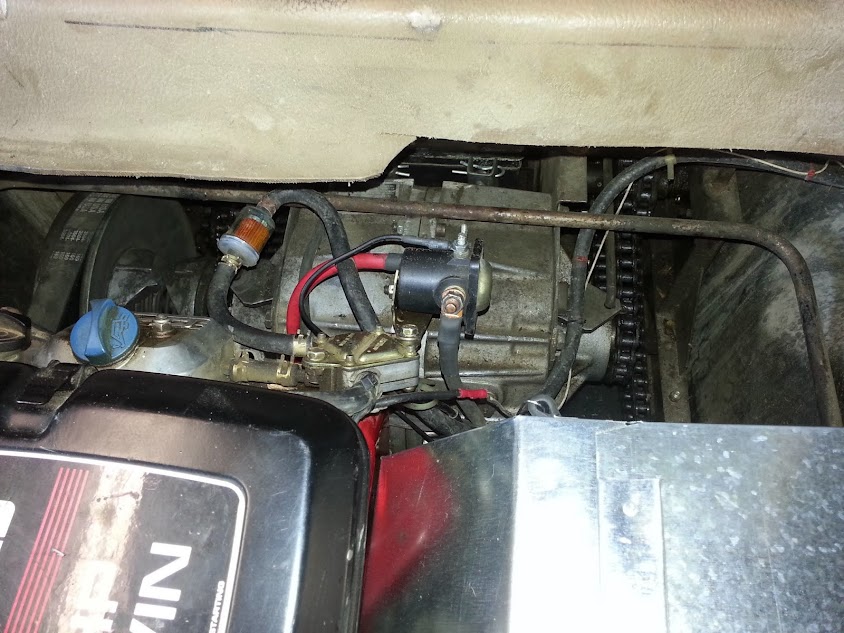
Relocated and redone starter solenoid. The wiring was crappy, the battery cable was more than halfway frayed apart. I had #2 welding cable left from the Jeep winch, so that's a new leader to the starter now. No more Mickey Mouse connections.
The duct against the right side vent grill. It moves a lot of air. The raw edge of the duct is covered with wiring split loom, then duct taped on.

Leave a comment:
-
Got the WWII surplus light Friday, then worked over the dash. Now, it's complete. Replaced that intermittent key switch too.

And, turned on. I can't figure out what the weird reflection is by the volt meter. I probably should've painted the dash panel with flat black instead of the gloss engine paint I had on hand. Oh well.

An edge view to better show the aircraft surplus "push to test" light.

I also drilled the dash and mounted a nifty eBay gimbal type pitch/tilt meter. It was only $6.49. I sawed the mounting base off, then used silicone to mount it.

And, the old "meep meep" horn from my Yamaha road/dirt bike. I'd replaced that with a "real" horn nabbed from my Jeep which was replaced with air horns. I wanted the bike to sound like a large sedan coming at someone, and it worked. (I used it to commute to work for a couple of summers before selling it) The "meep" horn is pretty loud mounted right there in the open.

I finished a piece of 2x2 pine with linseed oil and bolted it to the engine cover with stainless bolts. That now keeps the storage box from migrating around. So, it's ready for the sand dunes. All I need now is some decent weather. Now that it runs great and idles, (Rebuilt carb) I'll have to take it back out into the lagoon again, and get used to being on water. There are sand dunes at Moses Lake which includes sand islands in a huge reservoir and swamp areas. It's about 90 minutes drive away. I'm ready now!!Leave a comment:
-
I like the light up grade. these LEDs have come along way recently. I have some on my dirt bike for night rides and they are sweet.
Looks like your ready for some funLeave a comment:
-
Yes, he is a fluff ball alright. I'm always threatening to swish him around on the floors for use as a dust mop.Originally posted by rodp View Post
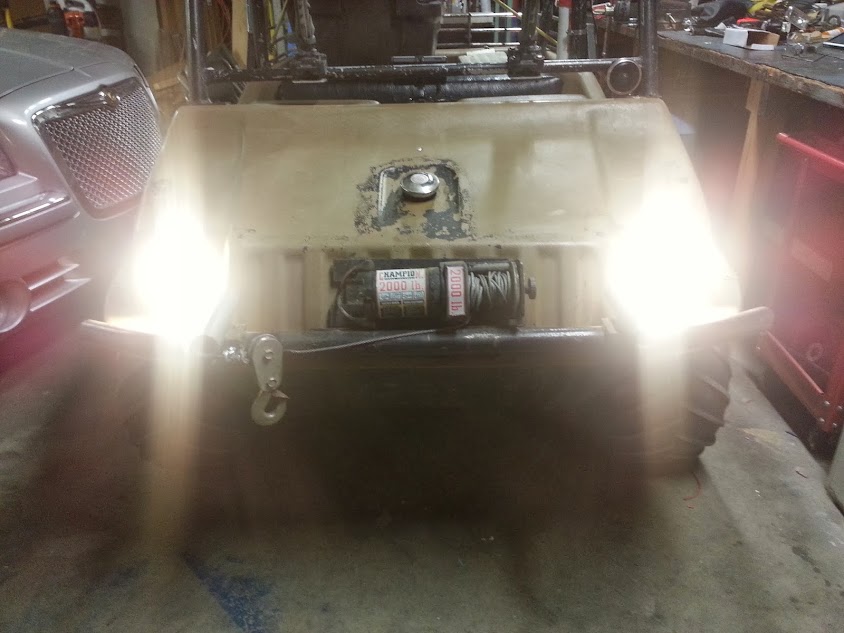
Got the rear light LED's last night. They're every bit as bright as the original bulbs, but with only about 1/10th the current draw. In fact, now, with the new LED headlights turning them on just barely moves the ammeter needle. I can just detect a little movement is all, so the entire current draw of the running lights is less then one of the original headlight bulbs.
The new taillight "bulb" in and the cover not reinstalled yet.
A closeup of one of the 9 watt PAR36 "bulbs" in the headlight ring.
Output is about the same as the original sealed beam 35W headlights, but only 18 watts total instead of 70 watts. The color temp is 3500 degrees K so they even look like the original bulbs when on. You can also get higher K such as 5000K for a whiter light. The total draw for the running lights is now only 19 watts (about 0.5W each for the rear lights) vs. the original 85 or so for bulbs in all fixtures. That leaves a lot more charging for the battery and/or power for other accessories.
Leave a comment:
-
I'm waiting for one last piece from eBay. It's a military aircraft surplus "press to test" indicator light with a machined knurled knob. The things cost about $60 new. I decided to replace the Schuck's Auto Supply (cheapo) power on light with a cool looking aircraft panel version. I have labeling done now, I had to buy a white lettering on black cartridge for my label maker, so that's done now, and looks good. I already have the new Ace round key switch to replace the intermittent one. I'm waiting on the light so I only have to pull the dash and remodel it once.
I've added a flag for sand dunes, as they're required and a good idea. The flag will be almost 9 feet off the ground on the 6x6.
I added an eye bolt so my dog can be harnessed in.
I still need to add a wooden runner to keep the storage box from migrating around. It tends to "walk" back and forth. The box itself weighs next to nothing - it's plastic, but holds a lot of stuff. It's nice for a day's ride to have lunch, coffee, coat, gloves, hat, too kit, camera stuff, drinking water, etc. along. It also makes a good seat to sit on while parked. Here's a shot of the box doing what it always does: turns somewhat sideways.

Jack's seat belt. The front is sheepskin padding.
 Last edited by Adondo; 11-13-2013, 08:58 PM.
Leave a comment:
-
Thanks for posting the exhaust pics for me. I am in Afghanistan and dont get on here to often or otherwise I would have responded with a thank you sooner. Awesome light bar I will be getting theses for sure.
Again thank you for the pics
LarryLeave a comment:
-
Yeah, those things are mind blowing bright. Check 'em out: Totron Lights - LED Light Bars, LED Work Lights, HID Work Lights, HID Driving Lights, Off-road Lights
They're perfect for off-road machines because their current draw is low for the massive light they produce. It's also daylight white due to their broad spectrum. You can't miss animal hair or fur such as deer, racoons, house cats, etc. by the road, and halogens just don't bring them out. HID's are much the same way, you see things that are semi-invisible to "hot wire" bulbs.
Also check out their gallery page. Customer Photo Gallery of Totron Products The White Jeep is mine. (Bottom of the page) Notice the lit up Stonehenge too! It's a replica near Maryhill Washington. When I get some worthy pix, I'll submit the 6x6 to them for posting.
I have more LED's on the way. (Good ol' eBay) The taillights will be converted to LED and I have a set of PAR36 'bulbs' coming as well. That way, the running lights (head & tail) will only be around 2 amps verse 8 for original bulbs. It's not like there's a lot of alternator power available from a Vanguard.
Oh yeah, the stupid key switch I had laying around for years has gone intermittent. I have an Ace round key switch coming to replace it. (There's a virtual parade of stuff coming from eBay right now. ) If I mess with the key, the switch goes on/off, and I don't want to get stranded somewhere. (The fuel solenoid goes with it) The real irritation is I have to drill out the key switch hole now because the new switch is 3/4" instead of 1/2". The only 1/2" switches I could find are all in China, which can take a month to get.
Last edited by Adondo; 11-07-2013, 01:34 PM.
I have an Ace round key switch coming to replace it. (There's a virtual parade of stuff coming from eBay right now. ) If I mess with the key, the switch goes on/off, and I don't want to get stranded somewhere. (The fuel solenoid goes with it) The real irritation is I have to drill out the key switch hole now because the new switch is 3/4" instead of 1/2". The only 1/2" switches I could find are all in China, which can take a month to get.
Last edited by Adondo; 11-07-2013, 01:34 PM.Leave a comment:
-
I think I've finally got the toy ready for the trails!
Last night, got the LED light bar installed. There's nothing quite like blasting 10,000 lumens of light forward!
The Totron 30 inch, single row, 120 watt combo spot/flood bar installed on the roll cage.

Looking towards it.

From behind it.

From the driver's seat. The neighbor's tree is 345 feet away. How do I know that? I was playing with a new range finder this summer. Notice my truck sitting on blocks in the front, it's easier to get the 6x6 on/off with the truck raised up in front.

The relocated choke. I had some engraved legends left over from a boat rebuild/overhaul a few years ago, so I used one for the bilge pump.

Leave a comment:



Leave a comment: