
 Tweet
Tweet
So while cleaning up my chains after this year's first hunting trip, I found a couple of issues...
I heard a noticeable "clunking" sound while up north. While in the bush I attributed it to several stiff chain links. I worked them as free as I could and managed to finish up the hunt.. While removing the chains to clean them, I naturally dropped half the master link in the bottom, so I gabbed a magnet to pick it up. I grabbed it and a half moon piece of metal. After scratching my head as to where it may go, I found where it actually came from. Apparently a couple of years ago, when I replaced the chains from the 2nd to the 3rd wheels (first single 60), I went with the cheaper route on chain (verified by receipts) and the rollers had split. Upon checking, I lost 5 rollers.. I checked and I musta done both sides with the same chain.. I'll be replacing them with the heavy duty chain that I used when I did the remainder of the chains (Tsubaki)..
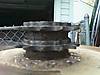
Then after I pulled the front chain, the sprocket looked a little shinier than the rest. I looked at it, and each set of teeth are about as wide as my son's mountain bike gears.. After going through the maintenance books, I pulled the axle (what a fun one that is) and removed the sprocket - it's toast... I'll be ordering one tomorrow, and was wondering:
1) What may have caused this? I thought I read somewhere that this sprocket is supposed to be floating, to help with chain tension. Is that true? If it is, should I even bother re-installing the set screw?
2) Should I order a new idler shaft? The teeth don't look damaged, but I don't want to get stranded in the middle of no where.
3) The bearings look good and I should know better tomorrow morning when I clean up the axle. I didn't damage the seals when I took the axle out. Do I need to look at replacing any of them while I'm at it? Are any of them a "one shot" deal?
TIA....
I heard a noticeable "clunking" sound while up north. While in the bush I attributed it to several stiff chain links. I worked them as free as I could and managed to finish up the hunt.. While removing the chains to clean them, I naturally dropped half the master link in the bottom, so I gabbed a magnet to pick it up. I grabbed it and a half moon piece of metal. After scratching my head as to where it may go, I found where it actually came from. Apparently a couple of years ago, when I replaced the chains from the 2nd to the 3rd wheels (first single 60), I went with the cheaper route on chain (verified by receipts) and the rollers had split. Upon checking, I lost 5 rollers.. I checked and I musta done both sides with the same chain.. I'll be replacing them with the heavy duty chain that I used when I did the remainder of the chains (Tsubaki)..
Then after I pulled the front chain, the sprocket looked a little shinier than the rest. I looked at it, and each set of teeth are about as wide as my son's mountain bike gears.. After going through the maintenance books, I pulled the axle (what a fun one that is) and removed the sprocket - it's toast... I'll be ordering one tomorrow, and was wondering:
1) What may have caused this? I thought I read somewhere that this sprocket is supposed to be floating, to help with chain tension. Is that true? If it is, should I even bother re-installing the set screw?
2) Should I order a new idler shaft? The teeth don't look damaged, but I don't want to get stranded in the middle of no where.
3) The bearings look good and I should know better tomorrow morning when I clean up the axle. I didn't damage the seals when I took the axle out. Do I need to look at replacing any of them while I'm at it? Are any of them a "one shot" deal?
TIA....

Comment