
 Tweet
Tweet
picked up an old 6x6 couple weeks ago, my first one and decide to do some work on it. tried not to do stupid modifications and customizations but in fact did a lot  who cares as long as I'm having fun.
some pictures of my progress,may not in order, sorry
first day, simple clean up
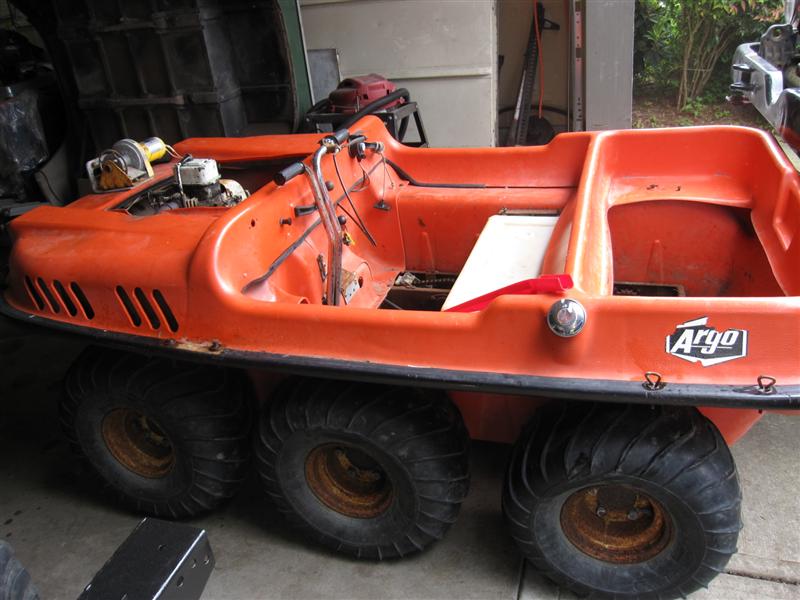
oh160, kicks strong than I expected, compression is as good as new, I'm lucky.

taking it apart on first day,


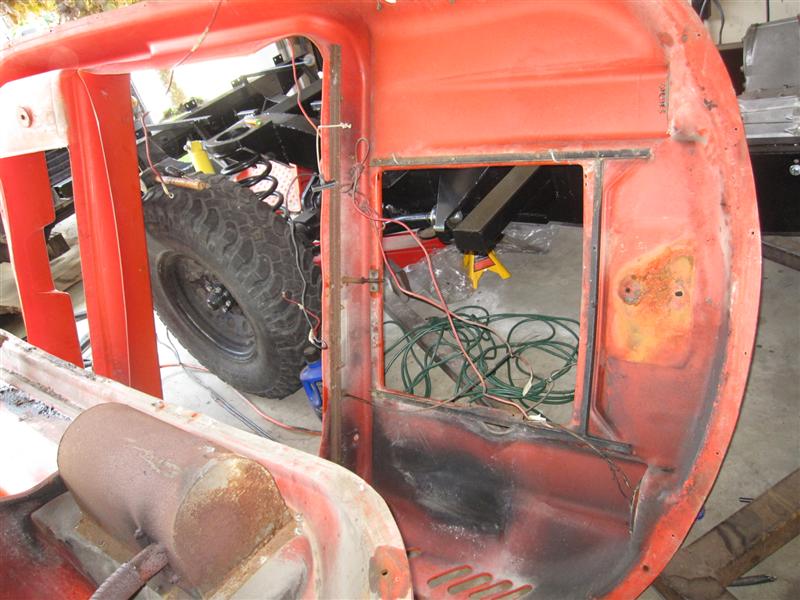
you can tell these early ones have some heat ventilation problems, exhaust surrounding areas got wrapped bubbled. have to do something about it.
PO/POS(previous owners) put some huge hinges on the firewall and a pretty advanced throttle control mechanism. I'm stupid so I need something simple and straight forward.

removed all attachments then a good pressure wash

made a seat support, also use it to reinforce the tub.

used some thin metal sheet to reinforce/seal bubbled area under the exhaust.

first thing came to my mind was to put on a bilge pump, just in case
bought one from Wmart along with hoses and through hull fittings

cut off wrapped hood and put on some metal mash


painted bottom with some truck bed liner, and inside with por15 (what was I think, its plastic not steel, but the result is good, both stick well, will see if its last and I'll report it back)


new handle grips. I tried to install a pair of plastic boat seats (you can see the green seats under the grips), actually tried a couple of them, not of them are fit. either too wide or too high, not comfortable to me.

pressure washed engine, put in some synthetic oil, adjust tappet, and painted it.
still waiting for my cab and fuel pump rebuild kits, Canada post is on strike right now hope they get what they want and I get my stuff sooner...


some hypoy-c for the tranny

put engine back on, also added a piece of aluminum sheet on the wheel well to deflect some heat, don't know if it works.

my bracket for the pump and mounted it


made a floor support bracket.

bought some 1/8" ABS sheet to make a new front footwell and dash.

a new throttle assembly, donated by a friend.

more front floor supports

cardboard muckup of the new footwell and made a nice diamond plate front floor


extended the shift and made a L shape shifting gear. the old one was too close to the front panel and hurting my hand whenever I shift.

bought some grilling mat from Costco to cover up THAT area (don't know what is called, but you can see from above pic)

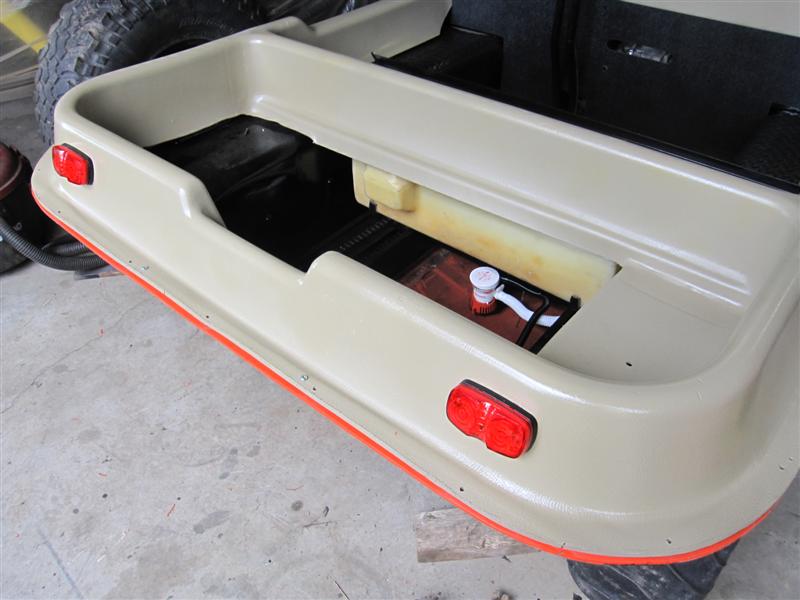
bling bling, LED tail lights

redone the whole wiring and installed some fuse blocks


all new cables, new starter solenoid.

cleaned the fuel tank and put it back in

another view of my shining starter rely.

loom the tail lights and bilge pump wire, keep it clean

tail lights

I drilled some holes on the exhaust housing to reduce heat quicker

my fuel hose channel

my argo only came with a piece of plywood. as I motioned early, I can't find a proper seat so have to make my own bench seat.

I used some garage floor foam as the base layer, then add 3" memory foam and wrapped in black vinyl. very comfortable.


rewired ignition switch, had some weird problem before.

more blings, one is for lights, one is for bilge pump, the other two reserved for later on

my clean wiring, sort of

making a bench seat back support, not done yet


made a hitch receiver today

to be continued...
who cares as long as I'm having fun. some pictures of my progress,may not in order, sorry
first day, simple clean up
oh160, kicks strong than I expected, compression is as good as new, I'm lucky.
taking it apart on first day,
you can tell these early ones have some heat ventilation problems, exhaust surrounding areas got wrapped bubbled. have to do something about it.
PO/POS(previous owners) put some huge hinges on the firewall and a pretty advanced throttle control mechanism. I'm stupid so I need something simple and straight forward.
removed all attachments then a good pressure wash
made a seat support, also use it to reinforce the tub.
used some thin metal sheet to reinforce/seal bubbled area under the exhaust.
first thing came to my mind was to put on a bilge pump, just in case
bought one from Wmart along with hoses and through hull fittings
cut off wrapped hood and put on some metal mash
painted bottom with some truck bed liner, and inside with por15 (what was I think, its plastic not steel, but the result is good, both stick well, will see if its last and I'll report it back)
new handle grips. I tried to install a pair of plastic boat seats (you can see the green seats under the grips), actually tried a couple of them, not of them are fit. either too wide or too high, not comfortable to me.
pressure washed engine, put in some synthetic oil, adjust tappet, and painted it.
still waiting for my cab and fuel pump rebuild kits, Canada post is on strike right now
hope they get what they want and I get my stuff sooner...some hypoy-c for the tranny
put engine back on, also added a piece of aluminum sheet on the wheel well to deflect some heat, don't know if it works.
my bracket for the pump and mounted it
made a floor support bracket.
bought some 1/8" ABS sheet to make a new front footwell and dash.
a new throttle assembly, donated by a friend.
more front floor supports
cardboard muckup of the new footwell and made a nice diamond plate front floor
extended the shift and made a L shape shifting gear. the old one was too close to the front panel and hurting my hand whenever I shift.
bought some grilling mat from Costco to cover up THAT area (don't know what is called, but you can see from above pic)
bling bling, LED tail lights
redone the whole wiring and installed some fuse blocks
all new cables, new starter solenoid.
cleaned the fuel tank and put it back in
another view of my shining starter rely.
loom the tail lights and bilge pump wire, keep it clean
tail lights
I drilled some holes on the exhaust housing to reduce heat quicker
my fuel hose channel
my argo only came with a piece of plywood. as I motioned early, I can't find a proper seat so have to make my own bench seat.
I used some garage floor foam as the base layer, then add 3" memory foam and wrapped in black vinyl. very comfortable.
rewired ignition switch, had some weird problem before.
more blings, one is for lights, one is for bilge pump, the other two reserved for later on
my clean wiring, sort of
making a bench seat back support, not done yet
made a hitch receiver today
to be continued...
 so now whats the next project? i could send you one of mine if your gettin bored and just need somthin to keep ya busy


Comment