
 Tweet
Tweet
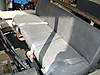
A few people on the forum have asked me about the suspension seat that I built for my Max IV. I used the original front seat frame , and just built some brackets onto the front of it. I did this first because I wanted to find out if my suspension idea worked as planned , before building a ' one off seat frame '. My suspension, bench seat works just as I hoped it would!! I,m very happy with the results , but I,m still planning on making some minor changes when the weather gets warmer. I can though , give you an idea of what my first trial mock up looks like. I will do this with a word picture.
I have,nt put up any pics of the suspension bench seat that I built for my Max IV yet, because its still just a crude mock up. This original mock up works great, but the angle of the front seat tilt still needs to be lowed. This means I,ll have to fabicate two new metal brackets to lower my seat springs. I plan on changing the original mounting brackets that hold the two seat springs in place.
I can paint you a word picture though.
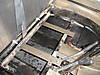
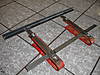
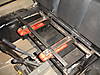
The first thing that I did to make my suspension seat, was to remove all of the screws that were holding the bottom front seat in place. When the bottom seat foam and wood base are removed , you,ll then see the elongated ,square angle iron that holds the front seat and wood base in place. I first went to home depot and bought a package of two medium sized door hinges. These two hinges were heavy enough to support the combined weight of myself , plus the seat foam and wood base. The next stop that I made was to a metal yard . There I bought some light gage , 2 inch , square metal tubing. The length of square tubing that I bought was the combined width of the four door hinges, plus a few inches more. I also bought a flat peice of 1/4 thick ,2 inch wide, metal strap, that was 36 inches long. When I arrived home I called JP cycles ( 1-800-397-4844 ) and ordered part number 8200010. This is two , 5 inch, harley , solo seat springs at $14.99 a pair.
JP cycles sells the Harley solo seat springs in lengths of 3 ,4, 5 and 7 inches tall.
How I made my trial mock up for my suspension seat:
1. Use a metal chop saw to cut off a length of square tubing that is slightly wider than one door hinge width
2. Weild this cut off peice to the front ,out side upper edge ( meaning side to side )of the elongated angle iron base ,and also along the tubular front down leg. You now have an " L " shaped weild. Next cut another peice the exact same width and weild it on top of the first weilded peice.. Repeat this same process on the opposite side. My reason for weilding one peice of square tubing on top of the other was three fold:
1. minimize the tilt angle of the bench seat
2. use more of the total length of the spring
3. By doing # 2 , this would result in a cushier ride.
3. Now weild a door hinge on top of the second peice of square tubing that you attached last. Duplicate this same process on the opposite side.
4. Now with both sides matching each other, position the front seat wood base so that you can attach the door hinges with wood screws. This process is a little tricky for only one person.
5. You will now have to decide on the drop down needed when you build the two metal brackets that hold the 5 inch springs. The angle of the seat tilt is up to you.
The closer you move the springs to the middle, front to rear and side to side, the less mechanical advantage the springs have, and the softer your ride will become. You will also need to position your seat that you attach to the hinges , so that it does,nt allow your back to rub against the front seat, back rest.
Driving an amphib with a suspension seat over rutted trails and over fallen logs makes a profound difference! With the cushion of the foam seat, and the springs underneath it, you hardly feel the impact.
Hope this helps
I have,nt put up any pics of the suspension bench seat that I built for my Max IV yet, because its still just a crude mock up. This original mock up works great, but the angle of the front seat tilt still needs to be lowed. This means I,ll have to fabicate two new metal brackets to lower my seat springs. I plan on changing the original mounting brackets that hold the two seat springs in place.
I can paint you a word picture though.
The first thing that I did to make my suspension seat, was to remove all of the screws that were holding the bottom front seat in place. When the bottom seat foam and wood base are removed , you,ll then see the elongated ,square angle iron that holds the front seat and wood base in place. I first went to home depot and bought a package of two medium sized door hinges. These two hinges were heavy enough to support the combined weight of myself , plus the seat foam and wood base. The next stop that I made was to a metal yard . There I bought some light gage , 2 inch , square metal tubing. The length of square tubing that I bought was the combined width of the four door hinges, plus a few inches more. I also bought a flat peice of 1/4 thick ,2 inch wide, metal strap, that was 36 inches long. When I arrived home I called JP cycles ( 1-800-397-4844 ) and ordered part number 8200010. This is two , 5 inch, harley , solo seat springs at $14.99 a pair.
JP cycles sells the Harley solo seat springs in lengths of 3 ,4, 5 and 7 inches tall.
How I made my trial mock up for my suspension seat:
1. Use a metal chop saw to cut off a length of square tubing that is slightly wider than one door hinge width
2. Weild this cut off peice to the front ,out side upper edge ( meaning side to side )of the elongated angle iron base ,and also along the tubular front down leg. You now have an " L " shaped weild. Next cut another peice the exact same width and weild it on top of the first weilded peice.. Repeat this same process on the opposite side. My reason for weilding one peice of square tubing on top of the other was three fold:
1. minimize the tilt angle of the bench seat
2. use more of the total length of the spring
3. By doing # 2 , this would result in a cushier ride.
3. Now weild a door hinge on top of the second peice of square tubing that you attached last. Duplicate this same process on the opposite side.
4. Now with both sides matching each other, position the front seat wood base so that you can attach the door hinges with wood screws. This process is a little tricky for only one person.
5. You will now have to decide on the drop down needed when you build the two metal brackets that hold the 5 inch springs. The angle of the seat tilt is up to you.
The closer you move the springs to the middle, front to rear and side to side, the less mechanical advantage the springs have, and the softer your ride will become. You will also need to position your seat that you attach to the hinges , so that it does,nt allow your back to rub against the front seat, back rest.
Driving an amphib with a suspension seat over rutted trails and over fallen logs makes a profound difference! With the cushion of the foam seat, and the springs underneath it, you hardly feel the impact.
Hope this helps
Comment