
 Tweet
Tweet
Glad you're making some progress on the machine, hadn't seen an update in a while was wondering how it was coming along. It looks a little rough but not so far gone that it can't be made to run again. Except for some of the cracks I see in the pics my last 950 was in similar shape but was brought back. There are some cool mods you can do to the machine if you can weld and since you're talking about building an engine mount I'm betting you can. One that I think would be best to do now, while you are fabbing the engine mount, is to brace the transmission. The nature of skid steering puts a lot of torque on the xmission mounts and there are plenty of horror stories on here about housings lost due to that. Do a search for t20 bracing and read up on it. The split shift is another good one but they are a little more complex to do on a hustler if you want to keep both shift levers under the driver seat. Glad to see things going well, hang in there!
-
DESTRUCTION is just a couple of vowels down the street from DISTRACTION -
Thanks! The upper body is definitely the worst part of the machine, I plan on picking up a plastic welder from Harbor Freight as soon as I can, then I can make everything on the body nice and sturdy again. As far as transmission bracing, I definitely think that'll be on the to-do list. Yesterday I found out that the left side transmission mount is already wallowed out a bit, so I really can't afford to leave it be. Speaking of wallowed out, I also should probably weld up my pinned axles before I'm having to replace them altogether. Split shifters would definitely be a convenient thing to have, I'll have to think about doing that.
I'm to that point where I'm really getting anxious about driving it for the first time, and I'll definitely try to keep this thread updated now that the project is really moving forward.Comment
-
OH, everybody on here who has ever done a restore can identify with being anxious for the first ride but don't be in too much hurry and omit something that could keep the first ride from being all the fun it could be. If the axle holes are wallowed out, definitely fix them while you're in the build mode. Chain tensioners are another issue , Hustler tensioners were known for not being the best feature on the machine and were almost impossible to keep tight. Once you have all those figured out and you're ready to install the chains here's a trick I learned. Hustler sprockets are not always exactly centered on the axle sleeves, which can cause excessive chain stress and premature stretch, or even break chains if not addressed and improperly adjusted. With the sprockets installed on the axles and the machine on blocks so they can be rotated, hold something stationary, for a pointer, close to the tips of the sprocket teeth. Spin each axle slowly and watch the sprocket if you see the tips getting closer to the "pointer" mark an arrow on the side of the sprocket from the axle toward the high spot. Repeat this on the corresponding sprocket. When you install your chains point the arrows in the same direction (I usually pointed them level toward the front). You've just clocked the sprockets. Repeat for each set of sprockets and then tension your chains. Usually even after going through all that you might still observe the chains getting tight then loose then tight as you roll the axles, this is due to them not being off center the same amount when welded up during manufacturing. There isn't much you can do about that but the process I just talked you through will have it to an as-good-as-you-can-get-it condition. I learned this trick after building some very unforgiving tensioners then popping a brand new chain.DESTRUCTION is just a couple of vowels down the street from DISTRACTIONComment
-
Yeah, I'm definitely trying to keep myself grounded and not get in a hurry, thanks for the words of encouragement there. I'm hoping we can get the machine over to my grandfather's place this weekend and get some of the welding done, we're having to borrow his welder since we don't have one. The machine actually came with the chains installed, but I have noticed the odd slack that you're mentioning, so I'm definitely going to follow your advice and get all the chains back out and properly adjusted. I'd hate to break a chain since I don't have the biggest budget for this project, at this point it's a blessing that I've even made it this far. I'll also probably have to break down and pick up a set of rollers for the tensioners, since the chain has eaten into most of them.Comment
-
After a bit of a break, some progress has been made. Last Saturday my dad and I got my new engine fired up for the first time on our "test stand", cut the plate steel we'll be using for the motor mount, and some other odds and ends. Still to do is clocking the sprockets/tensioning chains, getting fluid in the transmission, bracing the transmission, finalizing the motor mount, and welding up the axle pins. Then I should at least be ready for a test ride!
I do have a quick question though, I've never given the machine a good cleaning, and I've really been wanting to do that lately. My plan is to take out the chains (going to have to do it anyway when I clock the sprockets), spray everything down with degreaser/dishsoap, then rinse with the hose and dry with a leaf blower. So my question is.. Is a T20 case waterproof enough to stand up to garden hose pressure? Or do I have to get it out of the machine before I do my cleaning?Last edited by TravisW; 04-04-2016, 01:21 PM.Comment
-
The T20 case will be fine to spray down with the water hose. You don't want to sit and just focus a stream of water at the plungers or up under the diamond shifters for any extended period of time but hitting those areas for a brief period won't hurt.Comment
-
That's great to hear, thanks! Can't wait to get it squeaky clean now.Comment
-
Seems like every time I post my to-do list gets longer, but I can't complain because I'm still making progress.. slowly. There hasn't been a whole lot of progress lately, mostly due to needing parts and not having the funds. I've been doing what I can though, I started plastic welding my body since I had some scrap plastic and my grandpa happened to have a soldering gun with a spade tip, so it's been nice to see some of the ugliness taken care of. I still have a long ways to go on the upper body, but the tub is only a crack and two small holes away from being water-worthy! Aside from that I picked up some linseed oil, paint thinner, and black spray paint with my last round of parts. So it shouldn't be long until the body is full of color again and the rims are a nice flat black. I know I'm forgetting other things I've gotten accomplished on the machine but they'll have to wait until my next post if I can remember them.
Now to the mechanical side of things, in one of the last test fits of the engine I came to the realization that my belt is too long, the new engine is much longer than the Kohler and because of that has to sit a lot further forward in the machine. I did some searching and found a thread where someone pointed out the Quality Drive Systems Baja SAE catalog from 2009 for finding belt sizes by using center-to-center distances on the clutches. But their reference chart is for 700 series clutches, which my driven is, but my primary is a 94c Duster. The only difference I've been able to find dimension-wise on the two primaries is the diameter, mine is 7.5" and a 700 series is 7.25", the belts for are both 1-3/16" top width. So my question is will the chart more or less match up with my clutch setup? Even if I can just use it for a ballpark estimate that would be good, considering I have 6 to 8-ish inches of wiggle room in the engine compartment.Comment
-
Call Roy at quality drive systems. He knows his stuff and is glad to help.Comment
-
A real easy way to get you close to the right starting length is to simply measure it with a flexible (fabric) tape measure. Put the belt that's too long on the machine, make sure it fits well on the two clutches by just holding it by hand or putting a couple zip ties around it (between the clutches, so it's squeezing the belt tight on the two clutches. At this point, you can take the tape measure and figure out how long the actual belt needs to be by essentially "making" the belt with the tape measure. I loop it around the bottom of the clutches (over the top of the zip-tied, too-loose belt) and then pull it tight on the top and get the measurement. Make sure the engine is moved the entire way forward in its adjustment before you do it. You can add a 1/4' to a 1/2" in the measurement just to be safe. I do this each time I put a custom machine together, since I'm not smart enough to use the center-to-center/pulley diameter method.
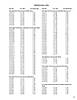
Here are links to a couple pictures showing excerpts from the Dayco belt catalog with dimensional data and part numbers. Make sure you get the right top width, too. There's a .pdf of this in the brochures section, but I can never download it correctly.
 Last edited by hydromike; 05-23-2016, 09:19 AM.sigpic
Comment
-
Thanks hydromike, that makes things very straightforward from this point on. Now I can get the belt taken care of and focus on getting everything finalized.Comment
-
More questions.. I have a gentleman interested in the old Kohler that came in this machine, he asked if any transmission came with it, which I am letting the primary clutch and belt go with it, so all he needs to find is a secondary. Then I thought about my current secondary it's obviously a 2-stroke clutch, and it needs a new spring. So I'm wondering if just swapping the spring to one from a 4-stroke 780 will suffice, or if I'd be better off finding a proper 4-stroke driven clutch? I think I remember reading somewhere that the ramping on the cams are different between 2 and 4 stroke, but I'm not certain I'm remembering correctly. Also, I'm having trouble finding what driven Comet matched up to the 94c from the factory, some places I've found that it's the 90d, some people mention running a 40 series secondary, then there's the option of just finding a 4-stroke 780 series clutch. Anyone have opinions on that issue?
So if it would be best for me to get a 4-stroke secondary, my plan is to let my current secondary clutch go with the engine, that way he has a complete transmission system for whatever his project is, then I can find myself a proper secondary. What are your guys' thoughts?Last edited by TravisW; 05-27-2016, 12:16 PM.Comment
-
I just realized how long it's been since I posted in this thread, that's partly due to PC issues that kept me down for a couple months, but that situation is thankfully all cleared up now.
A few weeks ago I finally got my engine mounted with the help of my dad, it's not pretty but it works, so that allowed me to measure for and find a belt, I ended up going with a Dayco HP3017 which is a half inch longer than what I measured using hydromike's method. I could have probably also used a Carlisle UA428 which was right at the measurement I took, or a Dayco HP2026 which was in the middle of the two, but was an ever so slightly wider belt, and I didn't want to take a chance on that. But I plan on making a new, nicer looking motor mount at some point, and I'll definitely add adjustability, so I'll most likely have a lot more options for the belt when I get around to that. Along with mounting the engine I re-pinned the axles as a temporary deal until it gets splined axles (probably a few years away) got the chains back in and properly tensioned, changed fluid in the transmission, installed a red clutch spring and got the throttle cable in.
At that point I was ready to test drive, but it was already dark and not having lights around the property or headlights I decided to wait to drive it and just test it on blocks. So I fired it up, adjusted idle and such since this was only the 2nd run of this engine, then put it in gear and tested it out, everything worked great, both forward and reverse, so I shut it off and my dad and I started cleaning up tools and such, a little while later we came back to find oil dripping from the passenger side output shaft and upon closer inspection I found that the oil seal was all kinds of twisted and warped, it also started leaking from the center of the cases later on.
Now I'm in the process of rebuilding the transmission. I have it torn down and have gotten a parts list together, I'll be getting all the seals, a couple output shaft bearings since one is completely rusted frozen and the other has a few rough spots, and two shift pins since mine aren't in good shape, one even fell out somewhere between my test run and disassembly of the transmission. The first thing I found upon inspection was a sludgey buildup in the bottom of the case presumably from water getting in somewhere in its life, but for a 40+ year old unit I kind of expected that. Thankfully other than the rusted bearing, the only other rust is very minor surface rust on the drum and band surfaces, and that all wipes off with a rag. All my gears have all the teeth intact, no visible damage and no rust, even the teeth on the shift collars don't have very much rounding on the edges, and the bushings and washers are in great condition as well. The overall condition of this transmission is way better than I could have hoped for, which is a great thing considering the cost of parts for these units.
On a side note.. I did find two rectangular pieces, similar to the size of the input shaft key that appeared to have a round piece coming off the top at some point, but after looking at exploded diagrams and part lists for the T20 I couldn't find anything that looks anything like those pieces, I found them sitting underneath the shifter, shift collar, and output shaft if that's any clue to what they could have been. I'm not too concerned about them because there's literally no place for them to go in the transmission, couple that with the lack of documentation and I really doubt they were meant to be in there in the first place.
I won't say I'm close to a test drive since every time I've said that in this thread I've been delayed by a few more months, but I will say that things are looking good for this project.Comment
-
As far as the rectangles , they are your missing shift dogs. I have one in mine as well.
Should you buy new diamond shifters....sigpic
My new beer holder spilled some on the trails - in it's hair and down it's throat.
Joe Camel never does that.
Advice is free, it's the application that costs.Comment
-
Ah yeah, after looking at the diamond shifters with the broken pieces I can see that's definitely where they went... Would it really be necessary to buy new shifters seeing as the new ones don't even have the shift dogs? Other than the pins and dogs my shifters are in good condition.Comment

Comment