
 Tweet
Tweet
I wanted to install a suspension seat in my Max IV, as the ride can get a bit rough on some of the trails that I frequent. I've researched different options for a while. I've seen how other members installed their seats, but I wanted an installation which used the factory seat mount holes in the frame. I figured that the factory seat mount locations on the frame were already pre-engineered by RI, so why try to re-invent the wheel? I also figured that I could reverse the mod at anytime. So, here is my solution:
I bought some 15 guage 1" square tubing and some 2", 1/8" thick angle iron. The bottom of the factory seat, where it mounts to the frame, is fabricated from 1" angle iron. With my materials in-hand, I first took one length of square tubing, cut it to size and then cut it diagonally with a cut-off wheel. This process left me with two 1' angle irons. I then cut the additional 1" tubing into four approximately 6" sections.
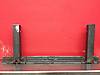
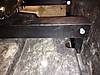
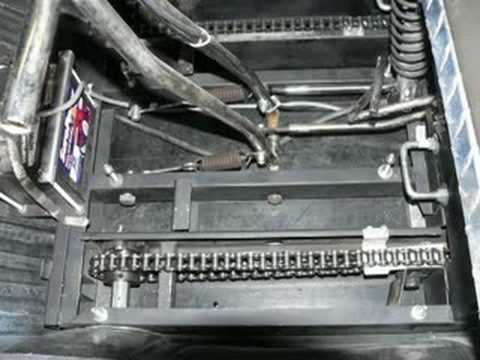
There are holes in the factory floor board for the seat poles to pop through to the frame. I located the pre-cut 1" square tubing on the 1" angle iron so the tubing would exit through stock locations in the factory floor. Then I welded the tubing to the 1" angle irons. Here is a photo depicting the fabrication. Forgive the sloppy welds and be glad that I don't do this for a living.
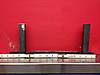
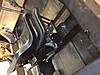
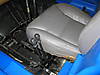
Then, I "fabricated" the angle iron seat mount. Like I said before, I used 1/8" thick, 2" angle for the angle iron seat mount. I wanted something that would not flex under a bouncy load (me in the seat). You [I]might[I] get away with a smaller thickness, but I didn't have the time or the will to experiment. There are factory holes pre-drilled in the aftermarket suspension seat. The suspension seat was around $100 from Tractor Supply. Seems to be well made. It's also fully adjustable. It has a seat slider (just like a car) and you can adjust the seat back angle. The spring in the seat is also adjustable by turning the adjusting knob. Here is the seat with the angle irons attached:
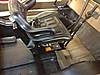
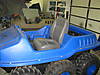
The next issue was access to the sprockets and chains. Because I'm weld-happy, I had originally intended to weld the seat angle iron to the 1" square tubing uprights. The problem with my plan was that it would be impossible to lift the floor board after the seat installation was complete. My 19 year old nephew, who knows almost nothing about fabrication, came up with the solution: Why weld? Just use bolts. He was right. Here is the final install after paint:
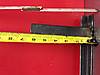
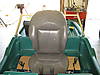
Final thoughts. As built, the seat is about the right height. But I might cut the 1" square tubing even lower than its present 6-1/8" height. I could probably squeak another inch or so out of it.
Because of the design, all that is needed to reverse this mod are two 1/2" wrenches and 5 minutes of wrenching.
I hope this thread is helpful to someone. I've learned virtually everything I know about these machines from this site and its knowledgeable members, and I'm glad to finally be able to share some (I hope) useful information. Uncle Vin
I bought some 15 guage 1" square tubing and some 2", 1/8" thick angle iron. The bottom of the factory seat, where it mounts to the frame, is fabricated from 1" angle iron. With my materials in-hand, I first took one length of square tubing, cut it to size and then cut it diagonally with a cut-off wheel. This process left me with two 1' angle irons. I then cut the additional 1" tubing into four approximately 6" sections.
There are holes in the factory floor board for the seat poles to pop through to the frame. I located the pre-cut 1" square tubing on the 1" angle iron so the tubing would exit through stock locations in the factory floor. Then I welded the tubing to the 1" angle irons. Here is a photo depicting the fabrication. Forgive the sloppy welds and be glad that I don't do this for a living.
Then, I "fabricated" the angle iron seat mount. Like I said before, I used 1/8" thick, 2" angle for the angle iron seat mount. I wanted something that would not flex under a bouncy load (me in the seat). You [I]might[I] get away with a smaller thickness, but I didn't have the time or the will to experiment. There are factory holes pre-drilled in the aftermarket suspension seat. The suspension seat was around $100 from Tractor Supply. Seems to be well made. It's also fully adjustable. It has a seat slider (just like a car) and you can adjust the seat back angle. The spring in the seat is also adjustable by turning the adjusting knob. Here is the seat with the angle irons attached:
The next issue was access to the sprockets and chains. Because I'm weld-happy, I had originally intended to weld the seat angle iron to the 1" square tubing uprights. The problem with my plan was that it would be impossible to lift the floor board after the seat installation was complete. My 19 year old nephew, who knows almost nothing about fabrication, came up with the solution: Why weld? Just use bolts. He was right. Here is the final install after paint:
Final thoughts. As built, the seat is about the right height. But I might cut the 1" square tubing even lower than its present 6-1/8" height. I could probably squeak another inch or so out of it.
Because of the design, all that is needed to reverse this mod are two 1/2" wrenches and 5 minutes of wrenching.
I hope this thread is helpful to someone. I've learned virtually everything I know about these machines from this site and its knowledgeable members, and I'm glad to finally be able to share some (I hope) useful information. Uncle Vin


Comment