
 Tweet
Tweet
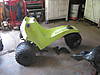
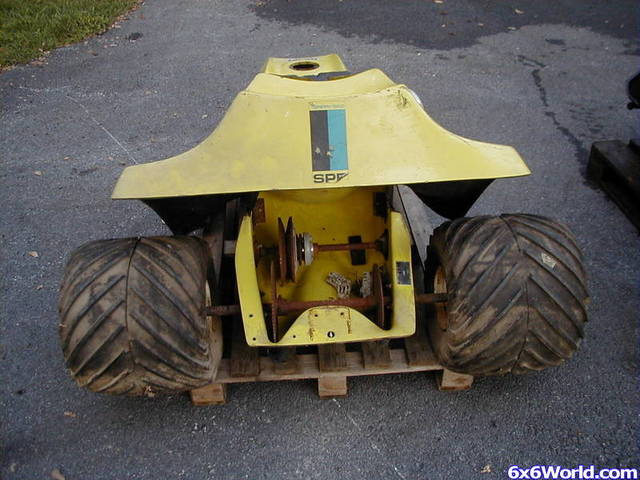
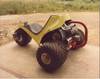
After months of constant begging, I finally conceded to take a Tri-Cart project off Hydromike's hands  In truth, he probably got sick of me asking for updates on the project finally turned it over to me. I picked it up last weekend at the Porkslap Jamboree, and it has been in pieces tied to the roll cage of my Hustler ever sense due to some travel and medical issues. Yesterday, I got it off the bigfoot and into the shop.
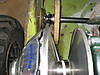
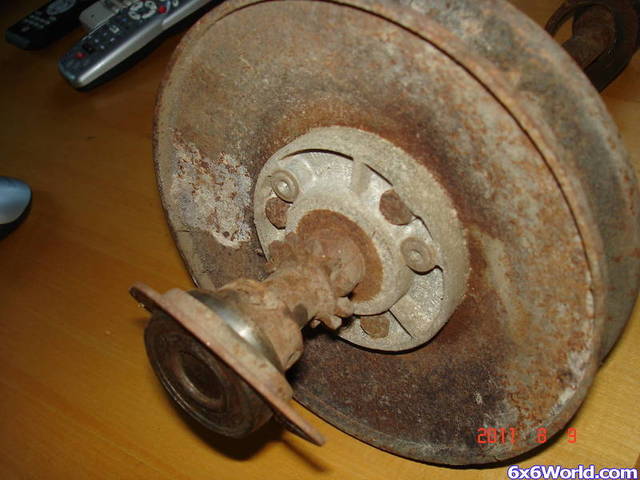
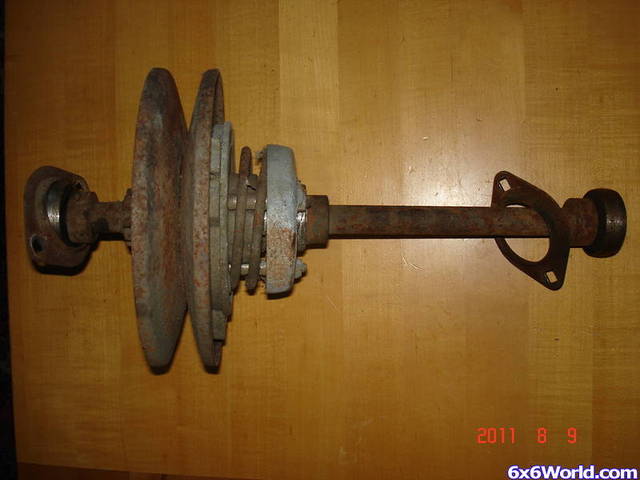
This machine had been badly damaged by (presumably) a broken chain, and Mike had already done a great job of repairing the fiberglass body. My first order of business was to locate and drill the holes for the rear axle bearings. once those were done it was pretty easy to have the machine a roller again.
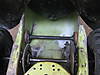
The seat has been trashed, repaired, and trashed again... "repairs" have been made with every material one could imagine. After grinding all of the repairs away from the backside, I laced the cracks together with stainless wire, and applied the same mix of ABS Goo, and Fiberglass cloth that is holding my 8x8 Attex together. once it dries, I will grind all the fiberglass, sheet metal and bondo from the front side and apply the Glass/ Goo treatment there as well. Hopefully once finished it will look ok and hold up well.
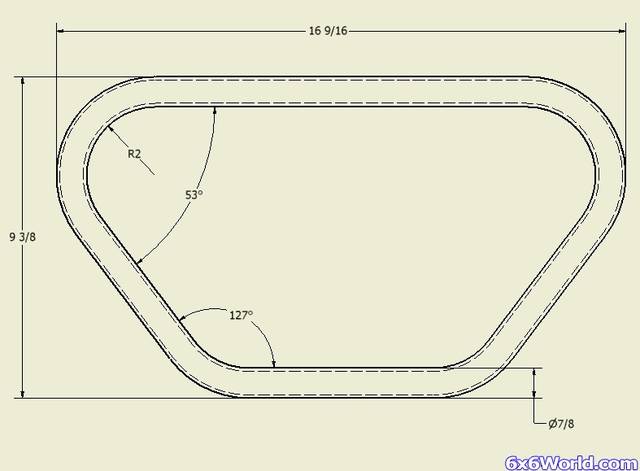
The next hurdle will be the Jack shaft. It is absent from the machine. I need to look at some pics in the gallery to confirm my ideas,but I don't think it will prove too hard to build one. I have a secondary clutch on the way so the only major part to locate is the actual shaft ( local bearing house) and sprocket. (need to find out the tooth count and chain pitch for the jackshaft sprocket) the sprocket for the rear axle is in pretty rough shape so I would like to replace it too.
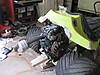
I have an 11HP Briggs that I had prepped for the build, but it may end up being too tall. This machine will end up far from stock, and certainly won't be a period correct restoration... If the body needs to be trimmed a bit to fit the engine that I have It won't break my heart. The briggs is electric start with a charge circuit. I plan to have the start and kill buttons mounted in the handle bar ends...
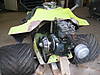
Rear tires are both TOASTED. Beads are torn. I am hopeful that I can vulcanize some rubber in place to keep the exposed bands from puncturing tubes. If that works, I plan to drill a second valve stem hole on the inside of the rim and use 2 tubes per tire (due to the tremendous width of these tires)
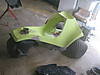
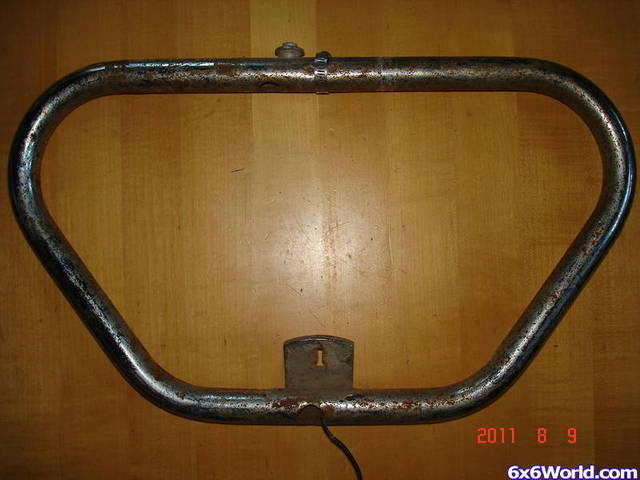
The handlebar and one of it's clamps were also missing when Mike got the machine. I plan to fabricate them tomorrow so I can see if my ideas for controls will work, or if I need to go back to the drawing board.
I'm already scheming on how to get this machine to Busco in the fall along with the three amphibs that will be on the trailer

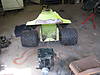
In truth, he probably got sick of me asking for updates on the project finally turned it over to me. I picked it up last weekend at the Porkslap Jamboree, and it has been in pieces tied to the roll cage of my Hustler ever sense due to some travel and medical issues. Yesterday, I got it off the bigfoot and into the shop. This machine had been badly damaged by (presumably) a broken chain, and Mike had already done a great job of repairing the fiberglass body. My first order of business was to locate and drill the holes for the rear axle bearings. once those were done it was pretty easy to have the machine a roller again.
The seat has been trashed, repaired, and trashed again... "repairs" have been made with every material one could imagine. After grinding all of the repairs away from the backside, I laced the cracks together with stainless wire, and applied the same mix of ABS Goo, and Fiberglass cloth that is holding my 8x8 Attex together. once it dries, I will grind all the fiberglass, sheet metal and bondo from the front side and apply the Glass/ Goo treatment there as well. Hopefully once finished it will look ok and hold up well.
The next hurdle will be the Jack shaft. It is absent from the machine. I need to look at some pics in the gallery to confirm my ideas,but I don't think it will prove too hard to build one. I have a secondary clutch on the way so the only major part to locate is the actual shaft ( local bearing house) and sprocket. (need to find out the tooth count and chain pitch for the jackshaft sprocket) the sprocket for the rear axle is in pretty rough shape so I would like to replace it too.
I have an 11HP Briggs that I had prepped for the build, but it may end up being too tall. This machine will end up far from stock, and certainly won't be a period correct restoration... If the body needs to be trimmed a bit to fit the engine that I have It won't break my heart. The briggs is electric start with a charge circuit. I plan to have the start and kill buttons mounted in the handle bar ends...
Rear tires are both TOASTED. Beads are torn. I am hopeful that I can vulcanize some rubber in place to keep the exposed bands from puncturing tubes. If that works, I plan to drill a second valve stem hole on the inside of the rim and use 2 tubes per tire (due to the tremendous width of these tires)
The handlebar and one of it's clamps were also missing when Mike got the machine. I plan to fabricate them tomorrow so I can see if my ideas for controls will work, or if I need to go back to the drawing board.
I'm already scheming on how to get this machine to Busco in the fall along with the three amphibs that will be on the trailer

 I should be able to provide you with any dimensions, photos, sketches or sprocket tooth counts, etc. of any original items that you need. Regarding the seat shell, dkesonset recently had an interesting repair done on his. Maybe he'll chime in here and describe it better than me, but basically he took it to a Line-X bedliner franchise and they repaired it, then applied 1 coat of their material to bottom side and 2 coats to top side. He said it fits and looks great. The concern was that the thickness of the material would affect the fit to the body, but apparently it was a non-issue.


 . I'm pretty sure that the drive chain is #35 (3/8" pitch) and big sprocket is 80 teeth. I will confirm tonite. The sprocket in your photos doesn't appear to be the original.
Comment