Announcement

Collapse
No announcement yet.

Joe's 252 Colt Trail Machine "Gadget"

Collapse
X
 
  • Filter
  • Time
  • Show
Clear All
new posts

  • #61
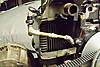
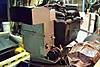
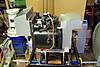
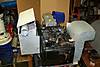
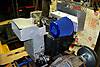
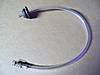
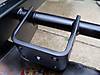
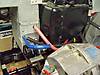
    Thanks for the compliment,Jeff. Got a few minutes so I will elaborate a little more. Heck,that's what these build threads are for anyhow. This is where I get a lot of my ideas. The remote oil filter mount is a "by product". I haven't seen an oil cooler system (OEM) for a Kohler M-18. I guess I could have modified the oil filter adaptor on the block to accept two threaded fittings as opposed to the filter,but,then how do I put the filter back on? However,Kohler does market this "Remote oil filter kit" which has a small plate that replaces the filter mount on the block and provides two 1/8" npt ports for fittings and a new mount to accept the filter. I bought a used (remote oil filter) kit on ebay and just the "radiator" part of a cooler system for another Kohler engine family. I will just route the plumbing to include the radiator in the loop. And hey,getting the filter where it's a little more accessible can't hurt. I'll try to remember to get a pic of the little do-hickey that goes on the block and post that too.
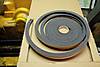
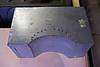
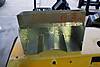
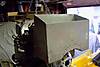
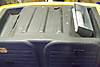
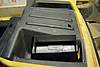
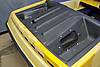
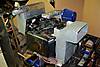
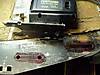
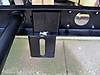
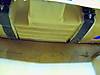
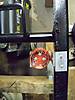
    The "seal" for the fresh air intake plenum to the engine is just material purchased from McMaster when I installed one on Gizmo. It is actually 1" thick and I cut it down to aprox 1/2" for this application. Need only to install the little radiator in the plenum and one more bracket and then it's on to the hot air/exhaust ducting! Here is the seal material,


    Joe.
    sigpic

    Comment


    • #62
      Here is the adaptor that provides threaded ports in place of the oil filter.


      I mounted the heat exchanger in the plenum. Used machine screws to facilitate removal for cleaning,etc.,should the need arise.


      I wanted to get the oil sentry switch,that I am adding to this engine,out of the path of the hot air from the engine. I terminated it with a tee so I can install the switch and also a fitting for an oil pressure gage to mount in the dash.


      Slowly but surely,I'm gettin there.


      Joe.
      sigpic

      Comment


      • #63
        Another productive weekend!

        Pretty much finished the ducting. Here's the exhaust duct.

        ,,

        The pair.


        It all fits! This is the brunt of the ducting design/fabrication/installation. All that is left is some trim work to snuggle the intake up to the opening in the cover and cap off the exhaust.

        ,

        The intake duct can be seen hiding behind the screen.


        Movin' right along.

        Joe.
        sigpic

        Comment


        • #64
          Now that's some quality work there.......very nice, Joe! It reminds me of the factory Attex Tomahawk duct work like they used on the Tecumseh OH160 blower housing.
          "Looks like you have a problem with your 4 wheeler........you're missin' two wheels there"
          sigpic

          Comment


          • #65
            Thanks again,Jeff! This one is going real nice. Guess it has something to do with that "learning curve" that is out there somewhere. The really nice part is I've been using all stuff avail and have not been buying much of anything (septin' some beer). The duct came from the dumpster at work and I sure got my $$'s worth outta that piece! Hydromikes Chief was the inspiration to duct the hot air and muffler together and out.

            Joe.
            sigpic

            Comment


            • #66
              Over the last few weeks I've been working slowly,but surely,on the plenum to go from the air filter to the flange on the carb. Lack of free time,compounded by I want to do a really nice job sealing this thing up,have been holding this build up. Had to "Apollo 13" an air filter with a 3" round outlet to a 3" x 4" rectangular aluminium duct. This required opening a can of DG sweet potatoes. I'll post some pic's soon.

              Joe.
              sigpic

              Comment


              • #67
                As promised in my last post,here are some pics of the air ducts I've been working on. They still need a little trim work to really tweak them in but,are fully functional as is.


                Joe.

                sigpic

                Comment


                • #68
                  Lookin' good Joe! Is the sweet potato can behind the air filter?
                  sigpic

                  Comment


                  • #69
                    Originally posted by hydromike View Post
                    Lookin' good Joe! Is the sweet potato can behind the air filter?
                    Yep,the filter is clamped to it. Worked like a charm. The potatoes weren't too bad either,Laurie said I have to eat them if I want the can. .

                    Joe.
                    sigpic

                    Comment


                    • #70
                      It's been a while since I updated this thread. Camera still AWOL,no pics. Making some progress. The body is now a roller with the old (not the build) frame in it. The build frame is being striped back down. It will make one more trip to the shop for a little welding,primarily addressing the chain adjusters. After that it's a matter of touching up some paint and placing it into the body to begin assembly. Both metal tanks I got with the Colts are damaged,one has a huge split on the seam and the other a zillion pin holes in the bottom from rusting. I installed the fuel tank brackets from a Chief/Superchief (the one with the alum plate on top that holds the poly tank) and am pleased with that installation. The poly tank cleaned up/out real nice and I was able to reuse the the OEM brass fitting with the piece of spring on a length of Tygon tube to make a new dangler for fuel pick up. I still would like to clean up the body,inside and out,before final assy. Been having some decent weekends,weather wise,here and have been busy enjoying some of the things we wait all fall,winter and spring to do. This one won't make the Sept. 2013 ride at Ashtabula but I would really like something else in the "build bay" this winter.

                      Joe.
                      sigpic

                      Comment


                      • #71
                        Hi Joe, looks like the project is moving along great. Can't wait to see the finished machine and will it make Busco in October? Hope to see you guys then.

                        Lewis
                        Life should not be a journey to the grave with the intention of arriving safely in an attractive and well-preserved body, but rather to skid in sideways , cigar in one hand, whiskey in the other, body thoroughly used up, totally worn out and screaming "WOO-HOO, what a ride!!!"

                        Comment


                        • #72
                          Thanks Lewis! I'm hoping to have it assembled and out of the garage before winter. ( I want to start building my Hustler! ). IDK about Busco this fall we'll see.

                          Camera surfaced,here are a few recent pic's


                          Joe.
                          sigpic

                          Comment


                          • #73
                            Gave the upper an acetone wipe down. Looks a little better,far from perfect yet acceptable to me. I'll try to get a pic tomorrow and post it. Latest progress is,

                            Slots for engine mount


                            Upgrades to the chain tensioner mounting brackets


                            Joe.
                            sigpic

                            Comment


                            • #74
                              Had some time this week to work on the Colt. Got the poly fuel tank installed.


                              The dash is coming together.


                              The chassis is coming together


                              The bilge pump is installed.


                              And the oil cooler/filter lines are being roughed in.


                              Joe.
                              sigpic

                              Comment


                              • #75
                                Looks good Joe. Nice work on the ducting. Looks like it should work great!

                                Comment

                                Working...
                                X