
 Tweet
Tweet
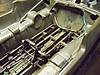
As mentioned in the end of the thread Joe's 252 Colt Trail Machine "Gadget" ,the only way to properly rebuild these older "tossed around" machines is to completely disassemble them. Why was this not done originally? I want to be as accurate and informative as poss so bare with me. I type slow,think even slower .
.
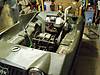
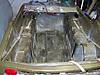
Had my Argo for a while before I discovered a "group ride". This was at "The Ledges". It was there that I got involved with this bunch known as "6x6world" members. After one trail ride my daughter Lyndsey said "we ride with these guys from now on Dad,got it?" It was right about then when I got the "bug" for a second AATV. That's when I bought my first Hustler 880. My oldest son Andy and I had it completely disassembled within about a week. Then,after about 3-4 months I came to the conclusion that I was in wayyyyyyy over my head and still didn't have a clue as to what to do first.For reasons beyond my control,the clock began ticking and I wanted to get a second machine on the trail asap. My goal was to have it ready for April of the following year (it's August now). So,one Sept day I went to Waterford,PA and had an Attex project follow me home.

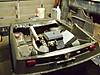
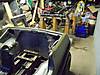
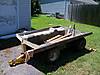
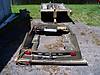
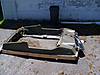
This one was being readied for service when I got it and figured it was my best bet to get something running asap as a lot of things were already addressed.
out of time,to be continued
.Had my Argo for a while before I discovered a "group ride". This was at "The Ledges". It was there that I got involved with this bunch known as "6x6world" members. After one trail ride my daughter Lyndsey said "we ride with these guys from now on Dad,got it?" It was right about then when I got the "bug" for a second AATV. That's when I bought my first Hustler 880. My oldest son Andy and I had it completely disassembled within about a week. Then,after about 3-4 months I came to the conclusion that I was in wayyyyyyy over my head and still didn't have a clue as to what to do first.For reasons beyond my control,the clock began ticking and I wanted to get a second machine on the trail asap. My goal was to have it ready for April of the following year (it's August now). So,one Sept day I went to Waterford,PA and had an Attex project follow me home.
This one was being readied for service when I got it and figured it was my best bet to get something running asap as a lot of things were already addressed.
out of time,to be continued
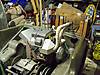
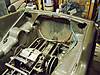
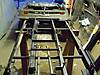
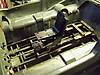
 . I still spent a LOT of time fussing with things like the brake discs on the trans,reinforcements for the trans mounting,all things I wanted to shore up to prevent breakdowns. Most of which were not to my satisfaction because I just could not "get at " the work due to something in the way,no clearance,etc,etc. Just too darn cumbersome to access the frame when it's stuffed down in the tub. I was quite impressed with how the Heim joints took some slop out of the sticks,though
 .
.

 MUSCA TUR BOTA then eh?

 Pics would be cool
Comment