Announcement

Collapse
No announcement yet.

Dan67's Hustler 950 Rebuild

Collapse
X
 
  • Filter
  • Time
  • Show
Clear All
new posts

  • #16
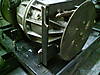
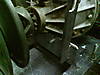
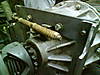
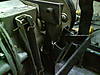
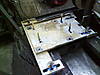
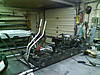
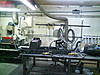
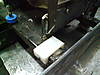
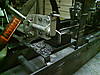
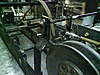
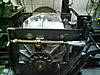
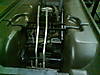
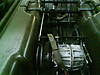
    The frame, tubs, T-20, and a few other parts are at the fabricator's shop. It should be there about 3 weeks. It is not a priority job for them, a dime won't hold up dollar job. I should have had my camera with me but I'll stop in from time to time and see the progress on it and photograph it as it evolves. I pressure washed it really good and when we got it there we started inspecting the frame and found about a dozen small cracks all over the frame. The plan is to reinforce the weak side rails with heavier stock. I'm really looking forward to getting it back.

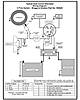
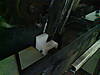
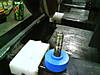
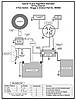
    In the meantime, I need to order some bearings, locking collars, and 3-bolt flanges. I'll call Buffalo Bearings tomorrow. Are these the right part numbers for bearings?

    Outer Bearing: HC 206-19 R3 62mm OD, 1-3/16" ID, Triple Lip Seal
    Inner Bearing: SA 205-16 52mm OD, 1" ID

    Does anyone have a number for the flanges and locking collars for the Hustlers?

    Comment


    • #17
      Those look to be the correct part #'s (they're the same ones listed in my thread...). The locking collars come with the bearings, but I don't know about the flanges.(Hope someone else does, I need some too!)

      Good luck with your conversion, looks great so far!!
      1983 Hustler 945-HK 627cc Vanguard
      1982 GMC K-10 Sierra Classic Suburban 6.2 Diesel
      2010 Chevy Silverado 1500
      1974 Honda ATC 70
      1986 Honda ATC 250ES Big Red

      There is no Z in Diesel!!

      Comment


      • #18
        Originally posted by Dan67 View Post
        Does anyone have a number for the flanges and locking collars for the Hustlers?
        The outter flanges are the same ones as the 62mm Max II ones.
        "Looks like you have a problem with your 4 wheeler........you're missin' two wheels there"
        sigpic

        Comment


        • #19
          Update

          Bearings and ANSI 50 chain connecting links ordered. New 23hp Vanguard will be here Friday. Unable to get thru to RI to get new flanges ordered today, I'll try again tomorrow. I need to get 1 more switch, and plenty of wire to wire the electrical. New engine bay fan, lights, bilge pump, and so on.. Stuff is gonna be crazy the next few weeks.

          Comment


          • #20
            AWG Wire Size?

            I have all my switches, wire loom, marine grade aux power port, and a lighted voltage meter. I plan to wire it with a toggle switches for: Front Light, Backup Light, Engine Bay Fan, Bilge Pump, Power Port. What gauge wire should I use? The fan pulls the most at 4.7 amp, all the others are 3 amp and under. I was thinking of using 14 AWG wire from Jegs JEGS Performance Auto Parts - Holley - Billet Specialties - Edelbrock - MSD - Moroso - Mr Gasket

            Comment


            • #21
              Update

              It has been a busy week for me at work and I was unable to get any more accomplished. The engine did arrive late Friday evening.


              I got the new shop press assembled and pushed off the old bearings and the 2 frozen lock collars. Made a temp work bench from 2 saw horses and an old door. Started using the mini-parts cleaner to clean up allot of parts that I will reuse.


              I feel lucky I was able to get just 1 day off this week. But some bad news, our AC died and I had to replace the outdoor unit. That ate up allot of funds I was going to use on the rebuild. Right now I might have to reuse the old Runamuks for a bit longer. It looks like it might not be until the spring before I will have the funds for new tires now.

              On a plus I think I found several good wiring diagrams for the Vanguard engines.
              Last edited by Dan67; 07-16-2011, 08:15 PM.

              Comment


              • #22
                Originally posted by Dan67 View Post
                I have all my switches, wire loom, marine grade aux power port, and a lighted voltage meter. I plan to wire it with a toggle switches for: Front Light, Backup Light, Engine Bay Fan, Bilge Pump, Power Port. What gauge wire should I use? The fan pulls the most at 4.7 amp, all the others are 3 amp and under. I was thinking of using 14 AWG wire from Jegs JEGS Performance Auto Parts - Holley - Billet Specialties - Edelbrock - MSD - Moroso - Mr Gasket
                14 awg is good for 15 amps, 12 awg for 20 amps, and 10 awg for 30 amps. I typically use #12 for headlights, #10 for the starter solenoid, and #14 for the smaller loads (fans, taillights etc.). Be sure to have the proper sized fuses for each wire and put the fuses as close to the battery as you can, you don't want to have an electrical fire.
                I don't want to go fast, I just want to go anywhere.

                Comment


                • #23
                  Originally posted by kunzmm137 View Post
                  14 awg is good for 15 amps, 12 awg for 20 amps, and 10 awg for 30 amps.
                  These "suggestions" are from the National Elecrical Code book table 310.16, 90 degree C. insulation, ambient air temp. of 86 deg. F., 3 or less conductors in a conduit.

                  The amount of current a wire will carry depends on MANY factors, for example, the same table says #14 wire is actually good for 25 amps before derating factors.
                  The biggest thing you have to worry about is voltage drop. With a 12V battery if the wire drops 2V that means the devise has only 10V to work with. Larger dia. wire has less resistance and less voltage drop.
                  #16 wire should be big enough for anything but the winch or the starter motor. Solenoids draw very little.....they are simply a relay, that is thier purpose.

                  Comment


                  • #24
                    Originally posted by thebuggyman1 View Post
                    These "suggestions" are from the National Elecrical Code book table 310.16, 90 degree C. insulation, ambient air temp. of 86 deg. F., 3 or less conductors in a conduit.

                    The amount of current a wire will carry depends on MANY factors, for example, the same table says #14 wire is actually good for 25 amps before derating factors.
                    The biggest thing you have to worry about is voltage drop. With a 12V battery if the wire drops 2V that means the devise has only 10V to work with. Larger dia. wire has less resistance and less voltage drop.
                    #16 wire should be big enough for anything but the winch or the starter motor. Solenoids draw very little.....they are simply a relay, that is thier purpose.
                    Ok, I should be fine with 14ga wire. I was concerned about wiring the lights, bilge, aux power outlet, key and toggle switches, and fan.

                    Thanks guys.

                    Comment


                    • #25
                      New Parts

                      Got a nice mailbag today. New parts are here awaiting the frame to return from the fabricators. New bearing flanges for the outers. New throttle and cable. New hand grips. New red spring for the T-20 driven, next I'll need to figure out how I'm going to change it out. Stuff is slowly piling up around my desk. Wife already fussing about the clutter.

                      Comment


                      • #26
                        Update

                        Just another short update. Frame is still at the fabricators shop. Its taking forever but they are not charging me much for the work, they get to it when they can and stop for the big money jobs. I'm really hoping they can have it soon. So far they have beefed up the side rails a bit. raised the seat mount and added side supports from the frame to the body. New supports front and rear from the frame up to the body band. Still waiting on new bumpers front and rear, T20 top mounting, new engine mount, sub-frame for the engine cover/back seat. I'm hoping that a good chunk will get knocked out fast. I feel like I am running out of time. As soon as I get it back, frame, bumpers, band are going to get powder-coated. I am really getting anxious to get it all back together and running. I would like some time to test it before Fall Busco.

                        Comment


                        • #27
                          Update

                          Spent the morning at the fabricators shop. Got more accomplished and I can start to feel like I am past the halfway point on the metal work. I did take some pictures on my phone while I was there and I'd like to share the progress. T-20 mount is done, just some small tweaking is left. Engine mount was done this morning and just some minor tweaking is left. Need to adjust the shifter a bit so that it does not rub the body. Got new clevis ends for the spring easy shifters, will need to trim and re-thread the rods. Pretty much all that is left is the front and rear bumper and body band. And some chain guides to keep the chains from slapping the frame.


                          Feels good to see its making progress!

                          Comment


                          • #28
                            clutter?? women have a different view of what clutter, aka, junk really is.. my clutter/junk cost me 3 buggies...but it has kept her off my back about the other 7...(hope she doesn't read this, she thinks I only have 2, with some extra parts.....) great build by the way, I would love to see some pics of that shifter set-up to change a cable shifted model..
                            Originally posted by Dan67 View Post
                            Got a nice mailbag today. New parts are here awaiting the frame to return from the fabricators. New bearing flanges for the outers. New throttle and cable. New hand grips. New red spring for the T-20 driven, next I'll need to figure out how I'm going to change it out. Stuff is slowly piling up around my desk. Wife already fussing about the clutter.

                            Comment


                            • #29
                              That is a beefy build up Dan. Keep Pushing, can't wait to see the final.
                              Life should not be a journey to the grave with the intention of arriving safely in an attractive and well-preserved body, but rather to skid in sideways , cigar in one hand, whiskey in the other, body thoroughly used up, totally worn out and screaming "WOO-HOO, what a ride!!!"

                              Comment


                              • #30
                                Another Update

                                Spent the morning at the fabricators shop being a good helper and keeping the build moving forward. Seems that when I am not there they have been slacking off, and now the build is over budget and some mods have been cancelled for now. I'll finish off what I can, when I can. New tires are going to be on hold for now. All that is left is the body band and a simple front and rear bumper. I'm hoping that they can finish up by midday tomorrow and bring it back. Hopefully I can get the metal powdercoated cheaply, otherwise I'll grab the kids, a few brushes, and a can of pain and knock it out fast. I do have some more pictures today to share.


                                Hoping I'll have pics of it loaded back on my trailer coming home soon!

                                Comment

                                Working...
                                X