Announcement

Collapse
No announcement yet.

Joe's 252 Colt Trail Machine "Gadget"

Collapse
X
 
  • Filter
  • Time
  • Show
Clear All
new posts

  • JoeMeg
    replied
    Here is the adaptor that provides threaded ports in place of the oil filter.


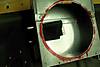
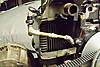
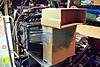
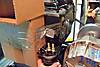
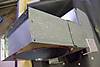
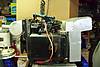
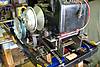
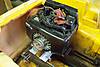
    I mounted the heat exchanger in the plenum. Used machine screws to facilitate removal for cleaning,etc.,should the need arise.


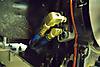
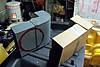
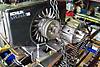
    I wanted to get the oil sentry switch,that I am adding to this engine,out of the path of the hot air from the engine. I terminated it with a tee so I can install the switch and also a fitting for an oil pressure gage to mount in the dash.


    Slowly but surely,I'm gettin there.


    Joe.

    Leave a comment:


  • JoeMeg
    replied
    Thanks for the compliment,Jeff. Got a few minutes so I will elaborate a little more. Heck,that's what these build threads are for anyhow. This is where I get a lot of my ideas. The remote oil filter mount is a "by product". I haven't seen an oil cooler system (OEM) for a Kohler M-18. I guess I could have modified the oil filter adaptor on the block to accept two threaded fittings as opposed to the filter,but,then how do I put the filter back on? However,Kohler does market this "Remote oil filter kit" which has a small plate that replaces the filter mount on the block and provides two 1/8" npt ports for fittings and a new mount to accept the filter. I bought a used (remote oil filter) kit on ebay and just the "radiator" part of a cooler system for another Kohler engine family. I will just route the plumbing to include the radiator in the loop. And hey,getting the filter where it's a little more accessible can't hurt. I'll try to remember to get a pic of the little do-hickey that goes on the block and post that too.
    The "seal" for the fresh air intake plenum to the engine is just material purchased from McMaster when I installed one on Gizmo. It is actually 1" thick and I cut it down to aprox 1/2" for this application. Need only to install the little radiator in the plenum and one more bracket and then it's on to the hot air/exhaust ducting! Here is the seal material,


    Joe.

    Leave a comment:


  • jpswift1
    replied
    Great innovations there, Joe. Those small upgrades are what make a good build, great! Looking forward to seeing this in person soon.

    Leave a comment:


  • JoeMeg
    replied
    More progress. Welded small bosses onto the pivots for the lat's to install grease fittings. I got the idea from this site. Saw another member did it.

    ;

    Made a "model" for a fresh air intake plenum. Eyeing up the remote filter mount.

    ;

    Seal installed.


    Making the real thing and beginning installation.

    ;;

    Joe.

    Leave a comment:


  • JoeMeg
    replied
    Had a few minutes last evening so I headed to the garage with a small piece of 100 grit paper. I was impressed at how quickly the material was able to be removed without much effort. Loading up of the paper didn't seem to be much of an issue and the little bit stuck in the paper shook right out. I then gave it a quick wipe with acetone. It doesn't look like one of Joe H's units but is a lot better than the chalky texture that many years exposure to the weather bestowed upon it. I originally convinced myself that this would be a knock down,drag out process (more so just as an excuse to procrastinate) and was about to settle for leaving well enough alone,until now. I'm going to look for one of those sponge sanding pad things with some 60-100 grit material on it and see how that fares on the upper body. As far as the lower tub,I'm stiil with Drew on the POWER tool idea,lol.

    Joe.

    Leave a comment:


  • JoeMeg
    replied
    Thanks Drew, I have a small Makita palm sander. I was thinking of doing as you suggest to try to remove some of the "dead" mat'l on the upper then give it an acetone wipe and see what happens. Didn't think of sending it into the lower tub to tackle this job. Perhaps a sheet of that abrasive mesh used in the drywall sanding tools instead of sandpaper for the crap baked into it.


    10-4 on the parts. I may be in Andover sat 5-18. I'll touch base with you when it's a little closer. Thanks for gathering the stuff up for me.

    Joe.
    Last edited by JoeMeg; 05-07-2013, 03:07 PM. Reason: Added a pic.

    Leave a comment:


  • amphibious drew
    replied
    Hey Joe. Try a small palm sander like a mouse with 80 grit on it. Do a quick sanding and then wash with acetone. There is no need for stepping down grit if you do an acetone wash which makes it a relativly quick process. Also, I have some parts for you at my place, but I will not be home this weekend as its mothersday.

    Leave a comment:


  • JoeMeg
    replied
    Thanks NCT. Got to learn the function of a Walbro WHG carb while installing a $6 rebuild kit and a $7 float. Runs real nice now. With this knowledge I anticipate good results from this engine.

    I need to make a decision soon about the lower tub. I have exhausted my limited skills using the search function to find info on painting ABS. The tub of my build is downright nasty and I have MUCH better things to do with my time than to attempt any further cleaning. So,it's paint it or leave it. If anyone has ANY input,I'm all ears.


    Engine mount is basicly done short of cutting slots in the mach frame cradle for belt adjustment. A battery box has been fabricated and located in the frame. I have a set of T's for the lat's in the electrolysis tank now. Need to make a small bkt to tie rear hitch thru body to frame. I will replace the fuel tank and do some of the dash switches and wiring with the mt tub upside down and with the front raised up. This is much eaiser than laying on my back in the mach reaching up.


    Joe.
    Last edited by JoeMeg; 05-07-2013, 09:09 AM. Reason: Added a pic.

    Leave a comment:


  • North Country Tough
    replied
    Yea Budster thats a fine lookin build you got going on there,them opposed Kohlers aren't as high tech as newer engines but they got the torque and stone reliable,had many of them in earlier Argo,s,and sometimes the complexity of this fuel injected Avenger I got is a P,I,T,A had it fail back a few miles the other day no fuel pump,turned out the terminals on the fuel pump relay "cube" got a little green,scraped them with the jackknife and away we went,cant wait to see the finished product super nice job your doing Joe.Cheers NCT

    Leave a comment:


  • JoeMeg
    replied
    The last "major" thing is the engine mount. Once that's bolted in it will be a downhill slide to completion.

    Working on building the engine mounts here. Good thing for lots of c-clamps,don't have enough hands,lol.

    ,

    This is one of the nicer favors I have done myself recently. Hey NCT,you commented on one of my pics "is a track next?" sorry I never replied,but, Yes,and here it is.


    Having the two units back to back like this is great. Really simplified the new engine installation.

    ,

    Joe.

    Leave a comment:


  • JoeMeg
    replied
    Starting to progress


    Joe.

    Leave a comment:


  • JoeMeg
    replied
    Well,the glassing and gooing of the lower body is now "complete". The last thing I did was close off the OEM drain hole in the back of the machine. Not sure where I want to re-locate the plug to,but I don't want it there. I'm assembling the frame in the basement. I'll try to get some pics tonite to post. It's just now warming to the point where all operations will be moving back out to the garage soon. Jeff,Drew or anyone else in the loop out that way,I could use an old,dead,garden tractor batt if anyone has one laying around and could arrange for it's trip to Meadville,it would be appreciated. I want to use it for fitting.

    Joe.

    Leave a comment:


  • JoeMeg
    replied
    Yeah Mike, isn't that the truth.

    Joe.

    Leave a comment:


  • Mike
    replied
    Originally posted by JoeMeg View Post
    Another productive weekend. Opened up my "PA" Colt's T-20. This is the 5th T-20 I have acquired and the 5th one I have taken apart. This is,by far,THE nicest one I've seen so far. There was very little "toothpaste" in the bottom of the cases,drums are in pristine condition,not a mark on any of the four. The bands have .030"-.032" of friction mat'l left. They measure quite evenly along the entire length of all four. The bearings feel and sound fine. Something was going on with the left side of the machine years ago because the sprocket is pretty shark finned,so the "MI" T-20's left output shaft will most likely get a new input shaft needle bearing and be put in service. Other than that,this trans will go back together with new oil seals,double o-ring plungers on the bottom (ring drum bands) and a quart of GM Auto-Trac II synthetic fluid. It should then provide many years of trouble free service. Pic's are on the home computer,I'll post a few pic's later.

    Joe.
    It's always nice when you don't have to do nearly as much work or spend as much money as you anticipated. Usually it's the other way around.

    Leave a comment:


  • JoeMeg
    replied
    Another productive weekend. Opened up my "PA" Colt's T-20. This is the 5th T-20 I have acquired and the 5th one I have taken apart. This is,by far,THE nicest one I've seen so far. There was very little "toothpaste" in the bottom of the cases,drums are in pristine condition,not a mark on any of the four. The bands have .030"-.032" of friction mat'l left. They measure quite evenly along the entire length of all four. The bearings feel and sound fine. Something was going on with the left side of the machine years ago because the sprocket is pretty shark finned,so the "MI" T-20's left output shaft will most likely get a new input shaft needle bearing and be put in service. Other than that,this trans will go back together with new oil seals,double o-ring plungers on the bottom (ring drum bands) and a quart of GM Auto-Trac II synthetic fluid. It should then provide many years of trouble free service. Pic's are on the home computer,I'll post a few pic's later.
    Nice and clean looking

    Just scraped the sludge out

    This is all the crud that was in both halves

    Worn out sprocket


    Joe.
    Last edited by JoeMeg; 01-28-2013, 11:01 PM.

    Leave a comment:

Working...
X