Announcement

Collapse
No announcement yet.

Joe's 252 Colt Trail Machine "Gadget"

Collapse
X
 
  • Filter
  • Time
  • Show
Clear All
new posts

  • JoeMeg
    replied
    The waiting is finally over. Jim,you didn't miss out on too much here
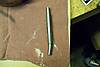
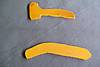
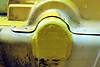
    Upon disassembly found the right side band anchor pin bent,

    I haven't a clue as to how we could do something like this,lol.
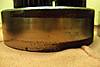
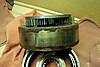
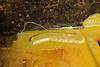
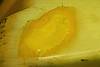
    The planet drum is a little rusted but not so bad that a brief session on the lathe won't cure.

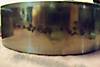
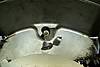
    Ring drum not as damaged but still needs cleaned up a little. Sorry for the blurry pic

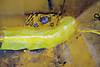
    This is the area of the band closest to the bend in the anchor pin,a little longer and ot would have rubbed all the way through. I pulled the "flake" off exposing the steel band in the pic

    Just another view of the planet drum.


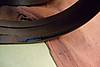
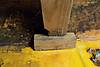
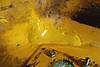
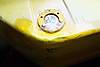
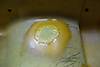
    Here is a pic of the case as a result of the bent pin.


    The left side is roughly in the same condition(less one bent pin).
    This trans will need;
    One new anchor pin.
    Two new bearings (they don't feel real nice).
    Seals (SOP).
    Drums turned on a lathe.
    Bands sent to Trans Crafters to be relined.
    A new right side case half if I can't repair the damaged boss for the anchor pin,yes,it appears the pin was ripped out of the hole,damaging it and bending the pin. WOW!

    For now i will leave the output shafts,shift collars, and diamond shifters in the cases and bolt them back togather to use as a light(er) weight model for fitting the engine,etc.

    Was kinda hoping to just re-use this one but it looks like I need to open up the "PA Colt" T-20 next and see about making one functional unit w/o purchasing anything(except seals) until the next one is required.

    Joe.
    Last edited by JoeMeg; 01-25-2013, 10:53 PM.

    Leave a comment:


  • JoeMeg
    replied
    Here are some pic's.
    Cut these "splices" from aprox. 1/8" thick ABS. Took the bottom one and buttered it up with some thick goo,then placed it on the crack that I glassed over previously. Then I glassed over the splice.
    ,,

    Soaked the T shaped pc in a jar of thick goo for about 16 hours,it was very workable. Waited a little more than two weeks before glassing over this and a similarly repaired corner.
    ,

    Took care of the muffler opening also.
    ,

    In preperation for the cold snap in the forecast I took the "MI" T-20 off of the cradle,or vice versa and brought it to the basement workbench. But not without first draining it. So,Jim,as promised I will do this one first. I got about 1/2 to 2/3 qt. of fluid out of it. The fluid was thin and free flowing even at about 35 -40 deg. it had a reddish/brownish color to it. No unusual odors,metal shavings or anything else in it. The shifters are free and move smoothly. They are not at all sloppy in their bores. When drawn snug,all four plungers protrude aprox. 1/4 to 5/16" out of the case. So,as of now it looks optimistic. Will most likely tear it down tue or wed evening.

    Joe.

    Leave a comment:


  • JoeMeg
    replied
    I'm going to take advantage of the 40-45 deg temps they are predicting for Saturday and get the garage warming up early. Should be able to hide out there all day and work on toys. Jeff,thanks again for the ABS and the floor pan,we'll figure out something for that soon. Drew,thanks for warehousing all the stuff for me til I chance to make a trip out. As mentioned a few posts ago,probably 1-26 or 2-2 will be next opportunity to head out.

    Brian,about the inner brg,can't decide if I'm more impressed with the determination of pounding the round peg into the square hole or by the shear confidence of leaving well enough alone for 3+ years.lol.

    Joe.

    Leave a comment:


  • amphibious drew
    replied
    Yeah Joe, like swift said he is coming down this weekend. We will working in a few machines on Saturday if you want to stop by.

    Leave a comment:


  • jpswift1
    replied
    Glad to hear this, Joe. The 6 wheeler hobby is a slippery slope, isn't it? I'm sure you know this by now, but for anyone new to the hobby reading this post, be aware that our addictions only get worse as time goes on. 
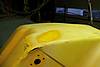
In fact, I'm looking for more AATVs online right now. Anyway, I have all the yellow ABS you want and I have your floor pan too. I'll have make sure everything gets to Drew's this weekend for you.

    Leave a comment:


  • JoeMeg
    replied
    Took full advantage of the 62 deg F temps in Cleveland,OH on Jan. 12, 2013. Yes,62! and partly sunny too! In order to access good welder(s),I need to take the mountain to muhamad,lol. The only transportation to and from work will be in my nice car with the back seats down,so,I wanted the frame to be free of crud to shed all over everything. Got the frame all cleaned,primed and painted. I will just remove the paint from the small area's receiving welds and touch them back up once complete. Spent the rest of the afternoon/evening using up almost all of my second batch of ABS goo. I believe I'm developing a "nitch" addiction to this part of the hobby (and it aint just from inhaling acetone fumes 
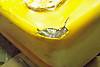
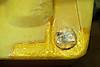
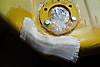
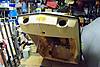
). I just can't seem to repair/reinforce/touch-up enough area's with this stuff,it really has potential. I'll get some more pics posted soon. Meantime,Amphibiousdrew, I could use a little more donor ABS if you have any avail or could maybe grab some the next time you see Jeff. I'm thinking about a trip to Andover next wkend 1-25/1-26 so Meadville trip will fit right in.

    Joe.

    Leave a comment:


  • racerone3
    replied
    also, hypothetically speaking, say you were at a ride and fragged an inner bearing.... and just imagine that you didn't have a correct replacement with you... I think you could probably pound a bearing with a spherical outer race into one of those flanges made for the flat race. I also suspect that if (and again hypothetically speaking) you got lazy and never fixed it, the machine would still be working just fine almost 3 years later... food for thought.

    Leave a comment:


  • JoeMeg
    replied
    Thanks Mike!

    Joe.

    Leave a comment:


  • hydromike
    replied
    Originally posted by JoeMeg View Post
    the "4 chain" frame in Giz uses the RRB spherical OD version with back to back flanges.
    Yup; You can press the bearings out of the flanges and install new ones. Most times, they seem to come out quite easily with a few taps of a hammer. As long as the new ones press (hammer) in snugly, you won't need any other special preparation on them. Don't get too ambitious about repainting the backside (inside) of the flanges too much during your restore. That little bit of paint makes a big difference in clearance. You might not have any issue, but just as a forethought......

    Leave a comment:


  • JoeMeg
    replied
    Thanks Mike! I can't figure out how to search for something like "inner bearing" or "inner frame rail",can only search out one word at a time. If that is the limit for the search func,I will certainly accept lazy over challenged

    Yes, I'm familiar with YA100RR, the "4 chain" frame in Giz uses the RRB spherical OD version with back to back flanges. Do we re-use the "6 chain" OEM inner flanges and just install new brg units in them? (figured I'd ask before I break). As of now,the unit of this type I'm finding is a Faf/Tor "LFST" series however,these have a 3 5/8" bolt hole spacing.

    I've heard the terms 1st. Gen Attex, 2nd Gen Attex (something to this effect) being used and was just wondering if this was some specific to the frames or what.

    Thanks for the compliment on the glass & goo. That stuff is super easy to work with and the results are impressive. I would certainly encourage anyone thinking about taking on this type of project to go for it! Repairing these ABS plastic bodies was my greatest intimidation but is turning out to be a very rewarding experience.

    Joe.

    Leave a comment:


  • hydromike
    replied
    Originally posted by JoeMeg View Post
    I would like to ask (to avoid using the search function that I am totally challenged by,lol), What are we using at this position for new bearings?
    Joe, you lazy bum.

    So on this frame we're talking about, you don't have the larger holes that allow the use of the two-piece pressed flange. You're going to use a one-piece stamped steel bearing flange that the bearing just presses into, correct? In that case, a Fafnir/Torrington YA100RR inner bearing (or equivalent) will do the trick.

    31H8UAk4zjL.jpg

    Note that it has a flat outer race, and set screws versus an eccentric locking collar.

    Originally posted by JoeMeg View Post
    Also,my original thought was a question about the frame "designations". What are the 1972 frame in 252 Colt and the one in Gizmo that has the sq. tubes and "holes" on the inner frame rails,being referred to as, Thanks,

    Joe.
    I don't know if this ever came to discussion in our monthly newsletter, but heck; I just call them a 4 chain or a 6 chain frame. Of course, the six chain frame with the round bars on the back is easily converted to a "4 chain" setup with the appropriate chain adjusters that you have on the frame here:


    Nice work with the goo-n-glass, by the way....

    Mike

    Leave a comment:


  • JoeMeg
    replied
    Been working on cleaning the chosen frame up a little. Starting to notice subtle differences from the frame in Giz. I took a peek last nite just to refresh my memory (that never did work too well). One is the diff between the round vs square tubing the rear chain adjusters are mounted to (Team Attex pointed that one out to me ). Another thing I noticed are no "big" holes on the inner frame rails where the brg flanges mount,just the two flange bolt holes. The OEM units are a flush mount type,1" bore with 3 1/4" bolt spacing. I would like to ask (to avoid using the search function that I am totally challenged by,lol), What are we using at this position for new bearings? Also,my original thought was a question about the frame "designations". What are the 1972 frame in 252 Colt and the one in Gizmo that has the sq. tubes and "holes" on the inner frame rails,being referred to as, Thanks,

    Joe.
    Last edited by JoeMeg; 01-08-2013, 10:24 AM.

    Leave a comment:


  • JoeMeg
    replied
    So now it's time for something a little more challenging. The left rear corner will be the first victim. The orig material is very thin in this corner from the forming process,it's no wonder it failed. I would like to cover it up and still maintain as much an outside radius as possible. Using an idea gleened from a fiberglass repair video (here's the connection to my Hustler build), I discovered the acetone does not affect plastic food wrap. I took a ball of shop towels and a piece of glad wrap and propped it up on the inside to "shore" things up.


    This is after 3 layers of glass cloth and abs goo


    This is the second repair,wish I'd of done this on the first but,hey,gotta start somewhere. This is the crack in the left front corner.


    I thought to clean it up a little and round it off a bit also.


    A suitable pc of glass cloth


    First layer complete


    Fixing up the rub thru from the clutch


    Stay tuned,lots more to come,

    Joe.

    Leave a comment:


  • jpswift1
    replied
    So far, so good, Joe. At least the bodies aren't as bad as the one on Drew's Colt that he built into a racer. Drew did a GREAT job patching that thing up, and it looks great. If you need more pieces of yellow ABS, I have a lot more.

    Leave a comment:


  • JoeMeg
    replied
    The latest undertaking has been lower tub repairing with glass cloth and ABS goo. Seems to be going quite well. If this stuffs bond is as good as it is easy to do,I should be in good shape.Upon giving this machine the once over when I received it,I was so intimidated by the holes in the lower tub that I bought the second one (the "PA mach") on ebay thinking it would be a better start. Turns out it was a whole lot more hammered than the "MI" body I'm working on now. This has been a great learning experience of which I see some knowledge aquired applying to my hustler build. There was a large crack in the bow so i leveled it off to patch it


    Joe.

    Leave a comment:

Working...
X