
 Tweet
Tweet
some more good looking well thought out work I like it. Yep, those bare feet are going to step on some hot welding slag one day and prove the value of shoes in a shop!
-
-
Lookin good. Lookin forward to the end result. When my daughter was that age shoes were optional as well.What it lacks in ground clearance it makes up for with traction.Comment
-
Well, it's been a couple of whirlwind weeks. I had a couple Saturdays that just got away from me. Today I was able to spend at least the afternoon in the basement on the Hustler.
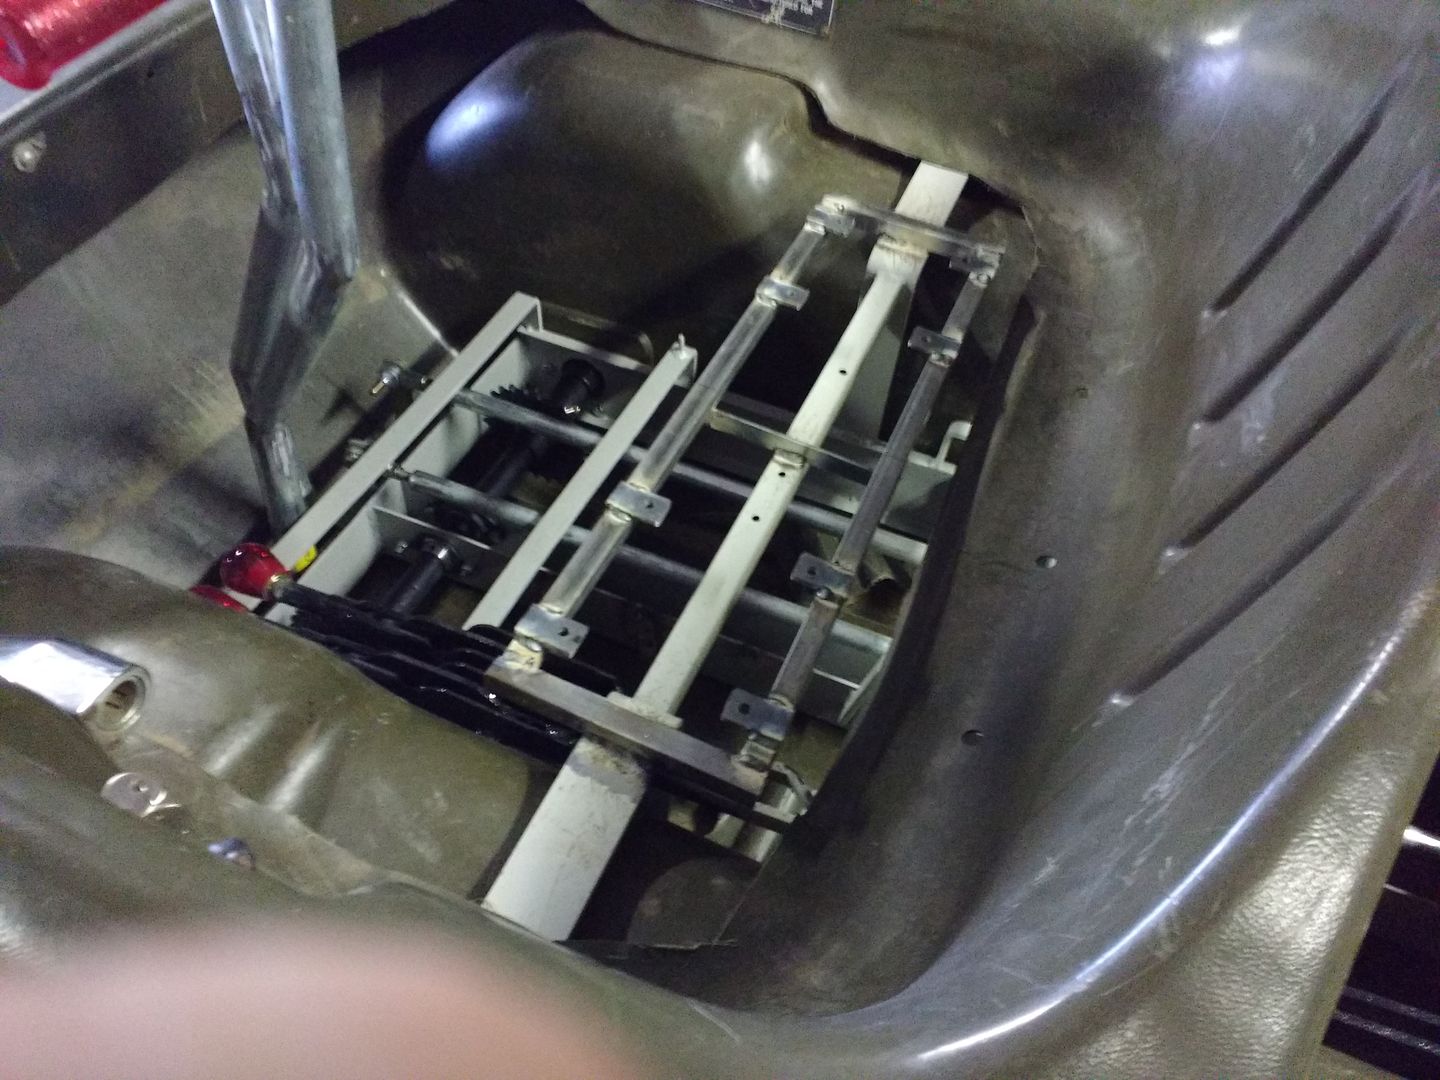
I had come to the realization last week that I was going to have to disassemble the frame mock-up as I had it and actually build the thing in the tub. I couldn't locate e seat brackets or build exhaust with just the frame. So, I did that.
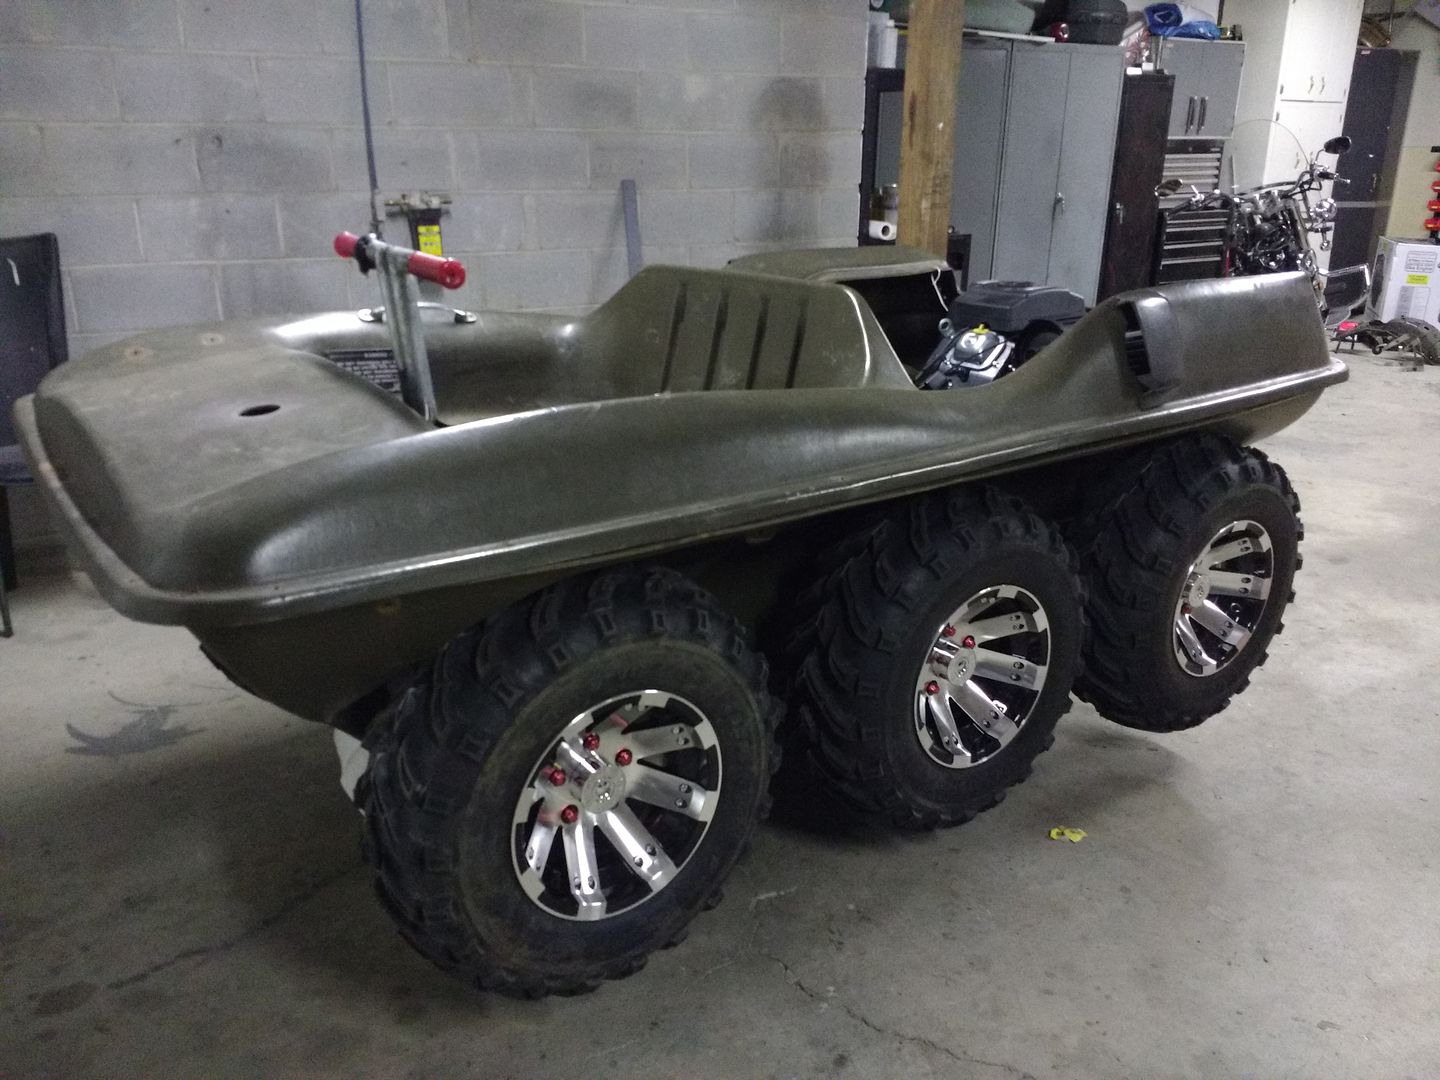
The tires are absolutely giant. The fronts scrub juuuuuust a bit when the bottom and top tubs are detached, but when they are bolted together I think the bottom will pull up towards the top half and not sag down as much. If I have to I'm not afraid to massage it with a heat gun and blunt object.
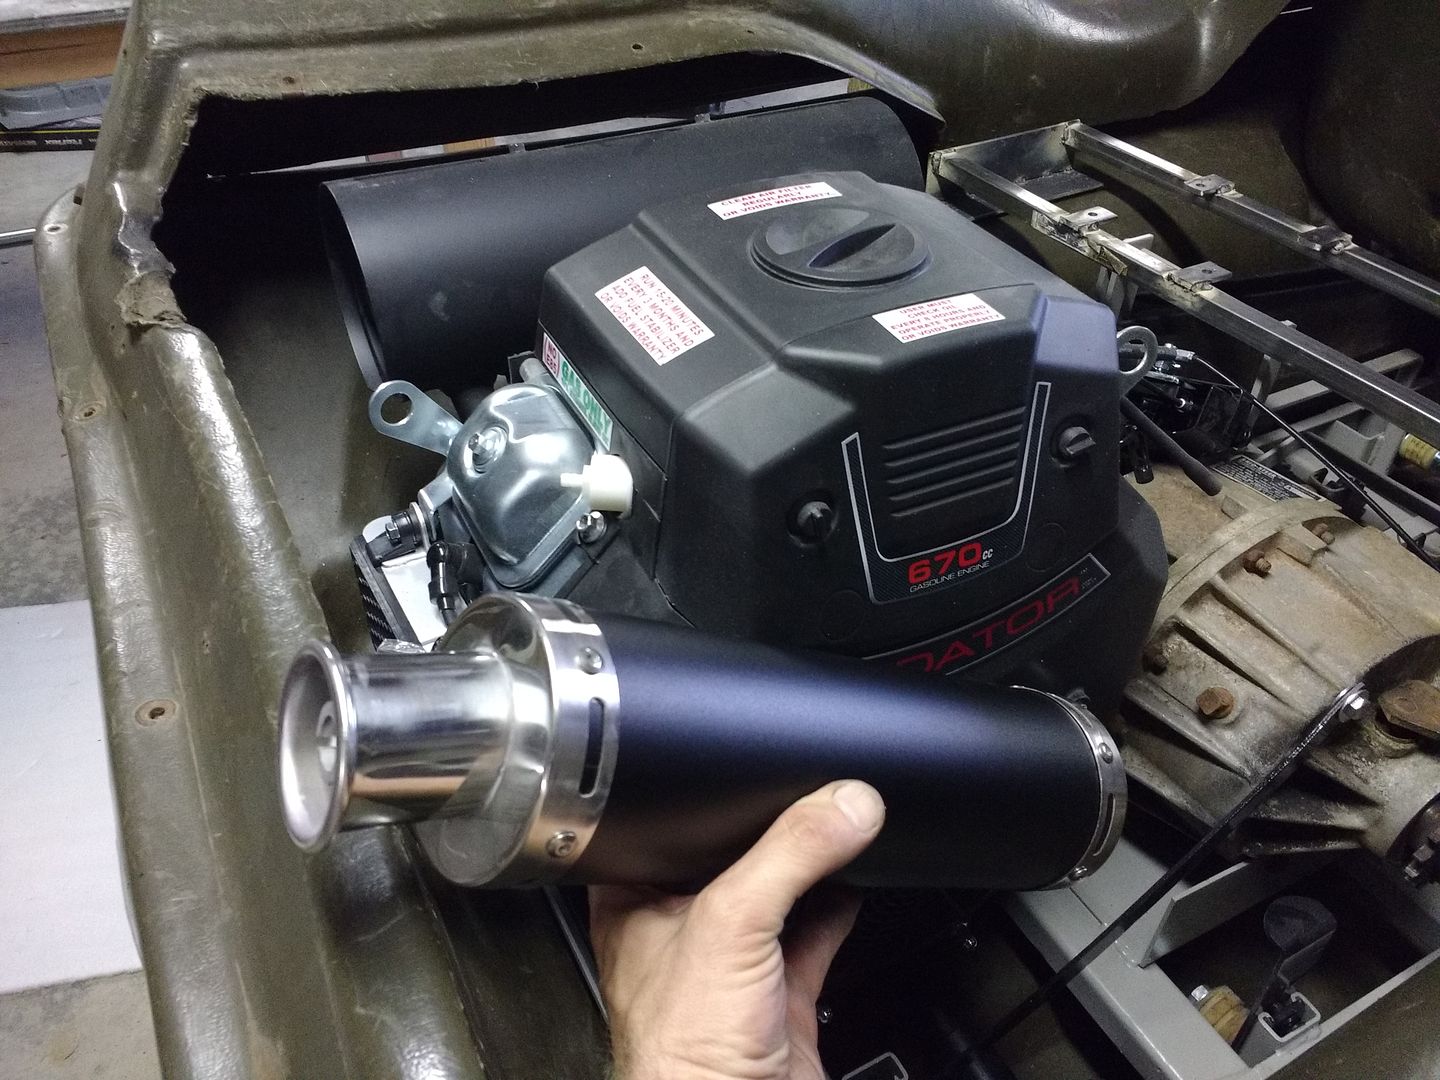
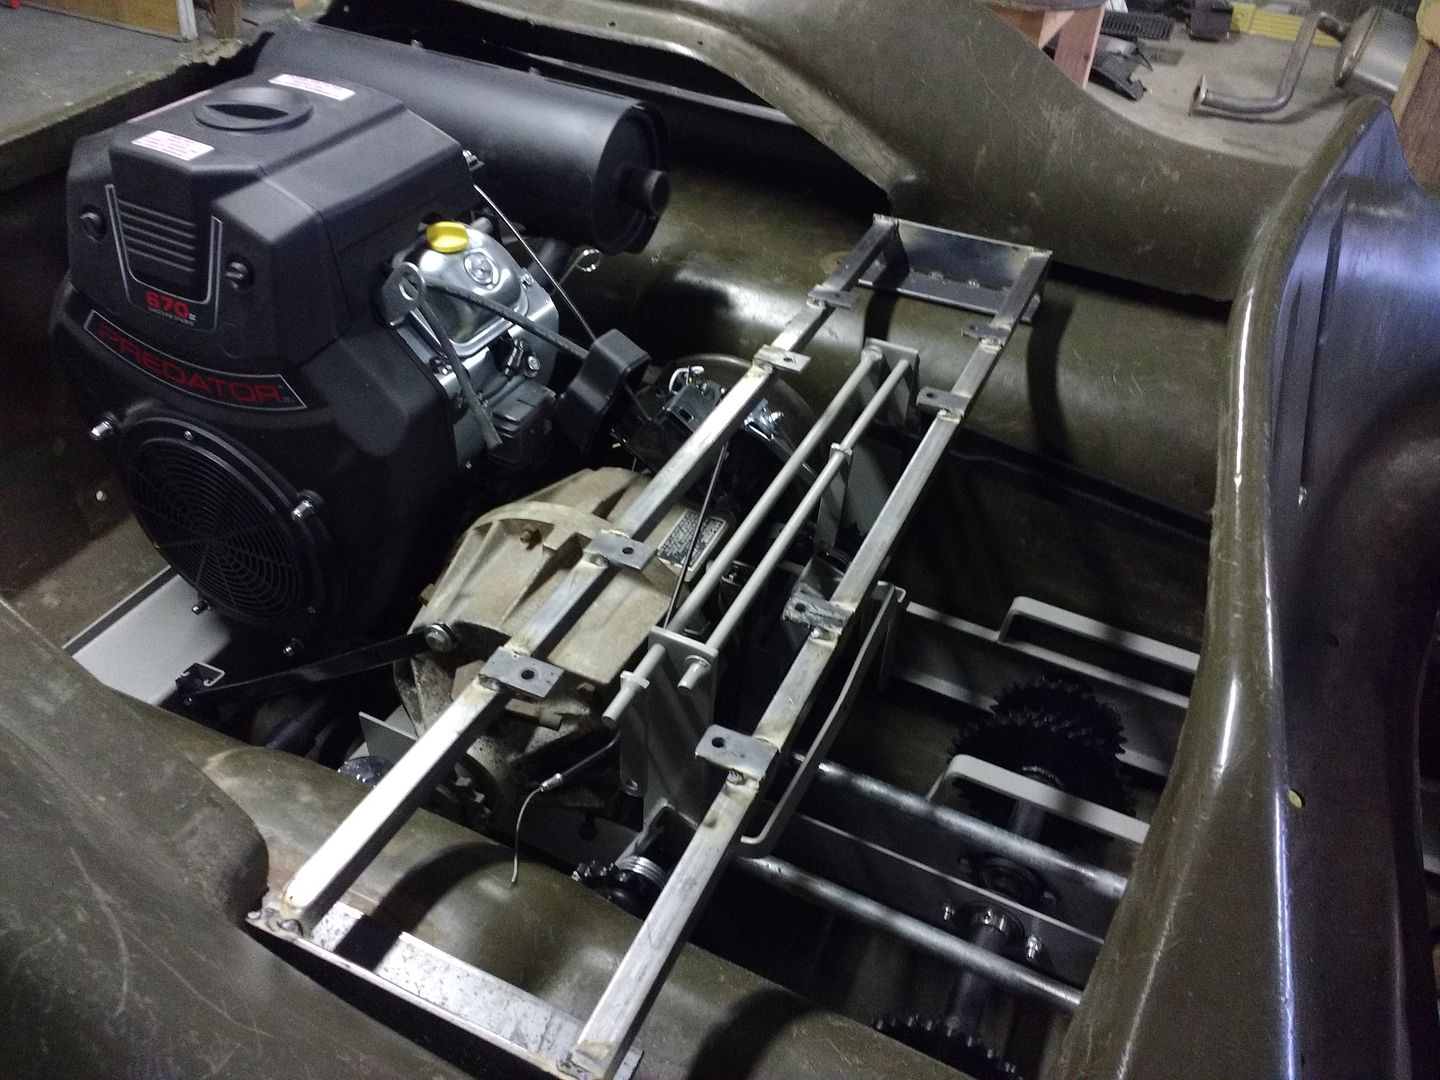
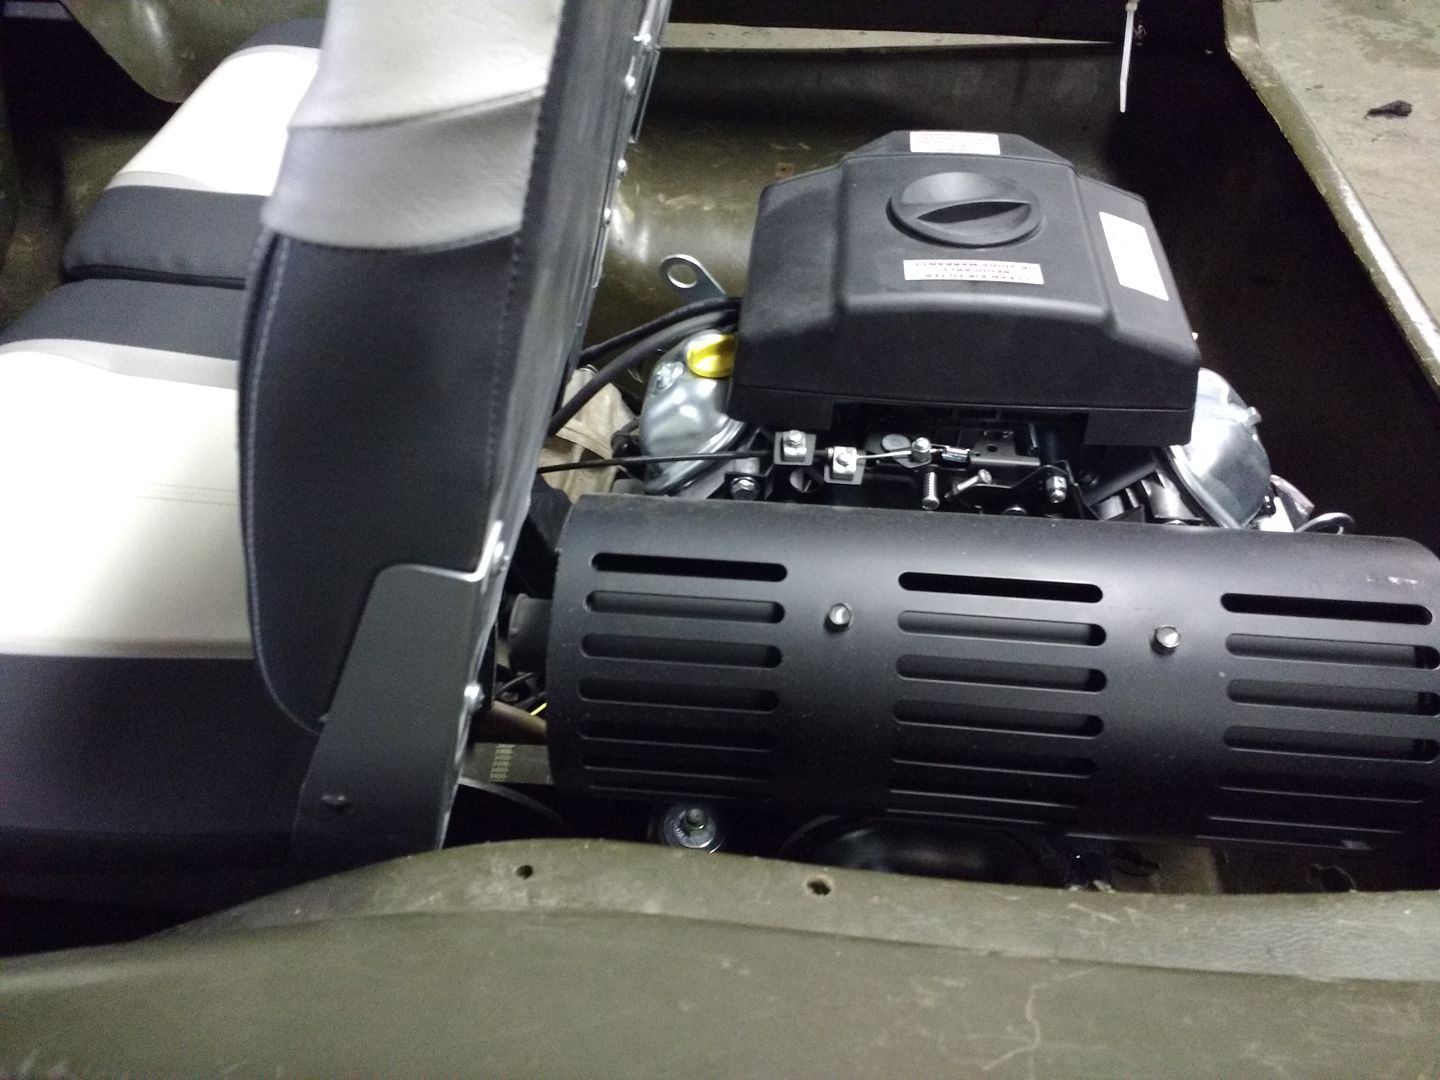
This week I came across some $25 scooter mufflers on ebay, so I bought a pair. My daughter and I were yelling into them and were very surprised at how quiet they are... haaaaha. Since the factory Predator pipe faces backwards, I was going to have to build *something* anyhow. Clearance with the back seats will determine whether I run them together on the crankshaft side or dual exhaust style with one pipe wrapped around the front of the engine. I'm thinking that keeping them both on the left side will be best since the top tub's plastic is already heat warped in that area and I can just cut the bad parts out.
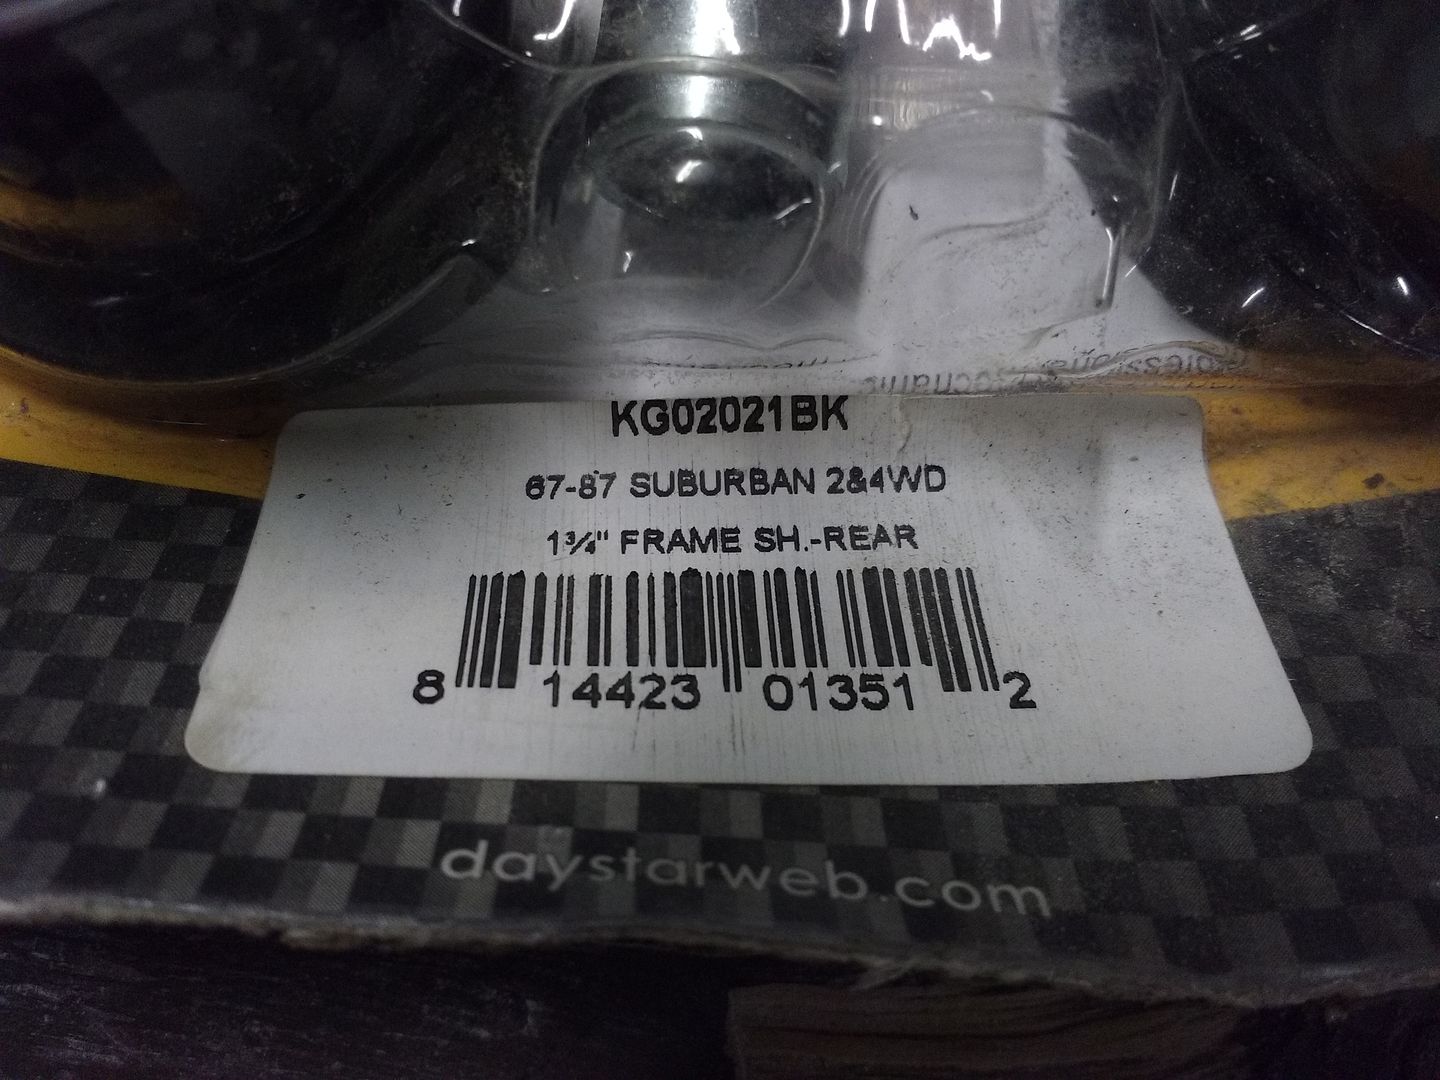
Also this week, I was going through my boxes of old project car parts to give what I had for a truck I sold, and came across these leaf spring bushings. Unless someone has a reason not to, I'm absolutely going to use these as chain rollers. Halve the metal sleeves, some grease, game on.
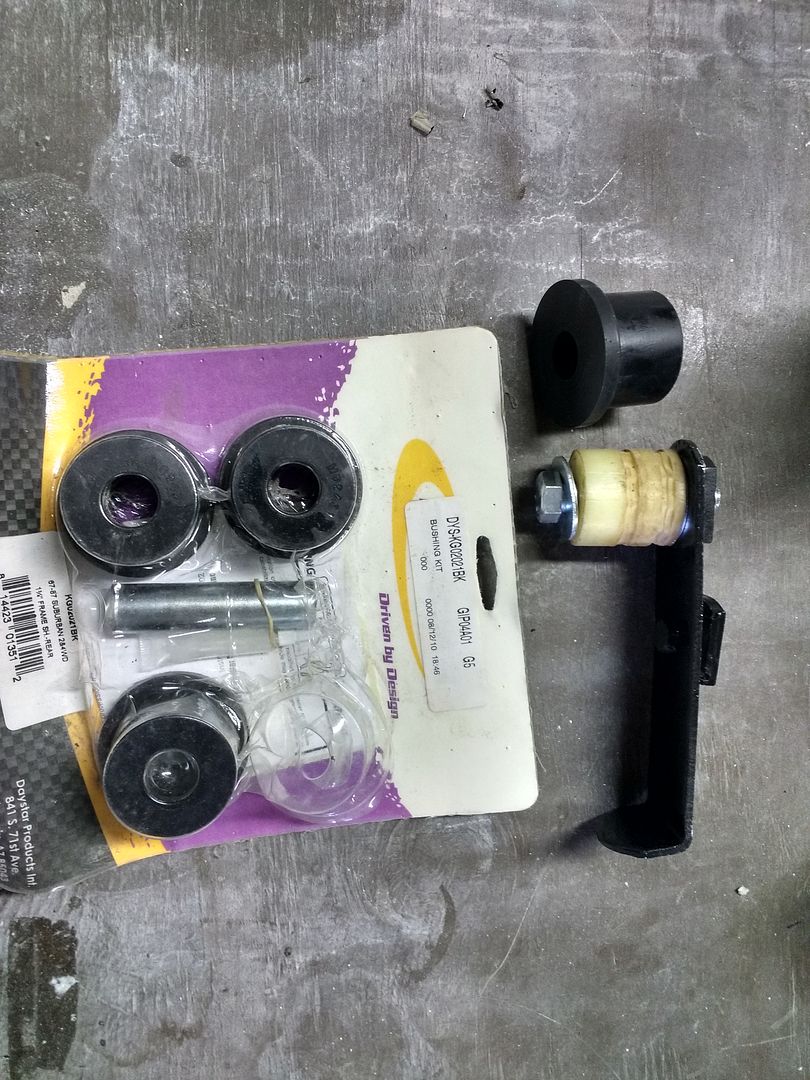
This is what the package is in case anyone else wants one.
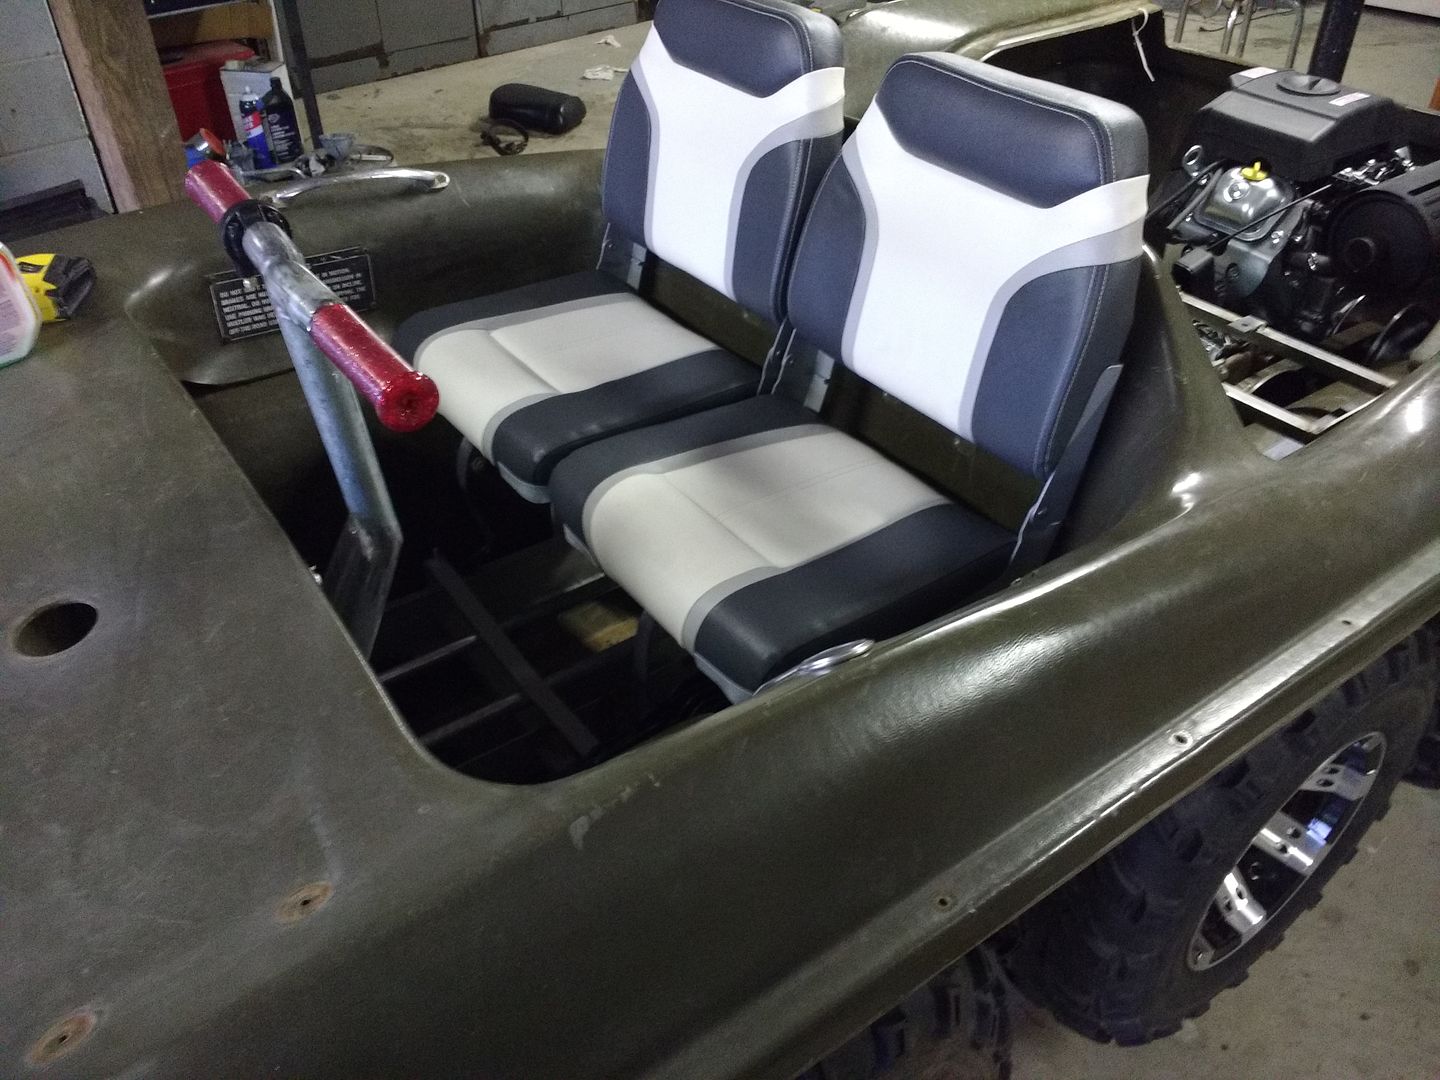
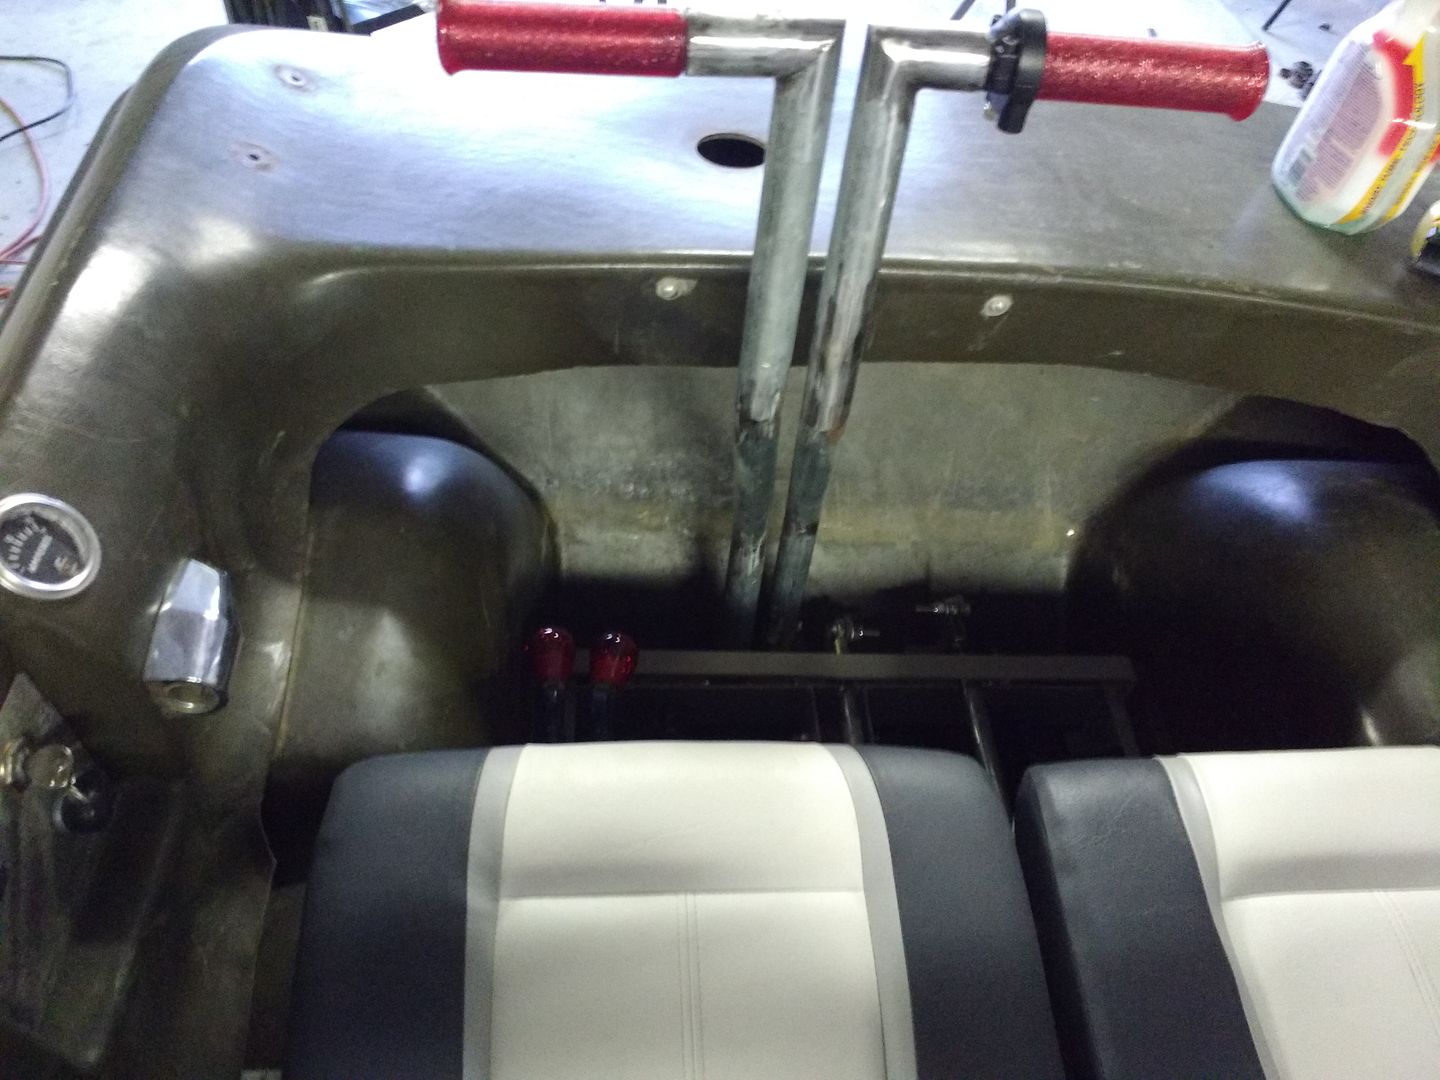
Today I was attacking the seat frames. I got these 4 fishing boat seats on a super sale so I was determined to make them work. A few sticks of square tubing and it was done. Making all the tabs was the most tedious part. The fronts are awesome. The back seats sit up on a hump on the right side, but I don't think it's noticeable enough to worry about it. The front bracket is welded on to the frame similarly to the original, but the back frame is bolted to the seats then bolted into the tub. It clears the moving parts with enough space to put some sort of floor under them as to keep children's feet attached to their legs. All in all, I really like the way it's coming along. I'm hoping to have it running *maybe* by the end of the Monday. I have to run up to Harbor Freight to get a tube bender early. I went there today to use my 25% SUPER SUPER coupon but then on the way to checkout realized it was ONLY for the 4th of JULY, not the whole weekend. Well dang.
PICS>
Plenty of room:
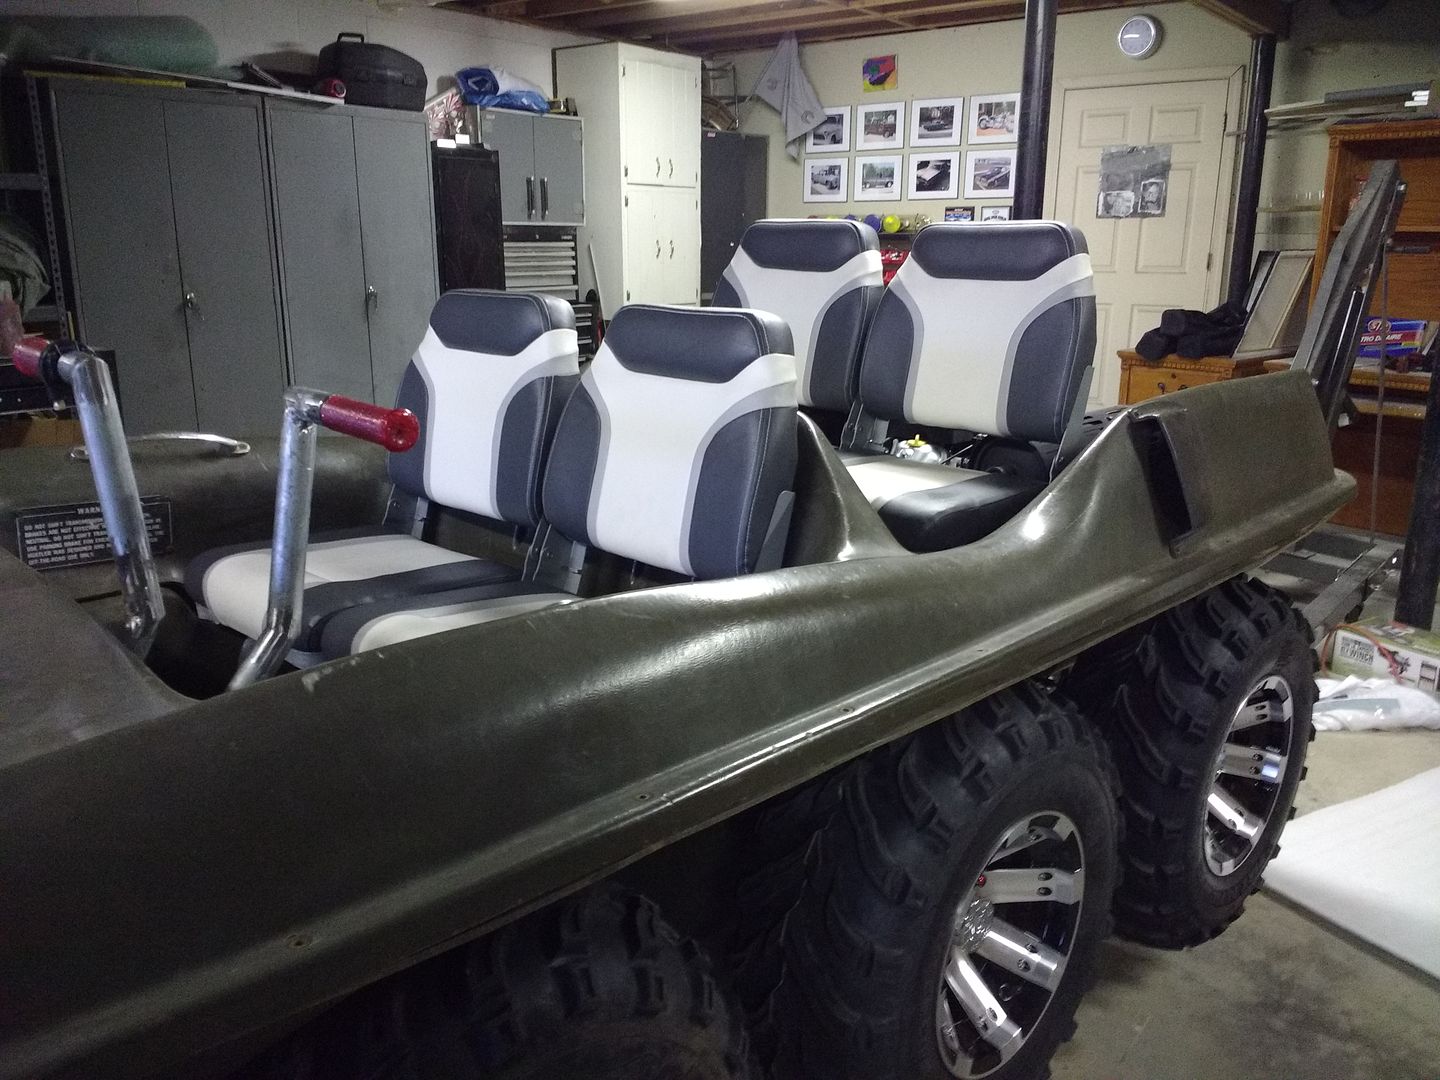
Yeah, that "clearance" is not going to work. Either the exhaust stays on the left side, or the backseat area is kids' legroom size only. As for now the backseat is still moveable.
After I get it running I'm going to have to fab a hood from scratch. I may just use a junked car hood from work and brace it around the edges to fit the Hustler hole. Next week! I have Monday off so I'm focusing on battery placement and wiring and then the exhaust. Fingers crossed!Last edited by SeanD; 07-02-2016, 10:14 PM.Comment
-
beautiful job, looking forward to a video of you and your daughter '' scooting along '' !! johnboy va.Comment
-
Very nice Hustler! I like the look with the wheels also!!! Can't wait to see some video, or maybe you can bring it to Busco Beach in October?!HUSTLEMANIAC and a HONORARY MEMBER of the
BIGFOOT ALUMNI
Comment
-
What is this Busco Beach? I keep looking for spots around me to dip it in water when the time comes. There is this really nice neighborhood with a really nice lake in it that I would love to terrorize.
Anyhow...
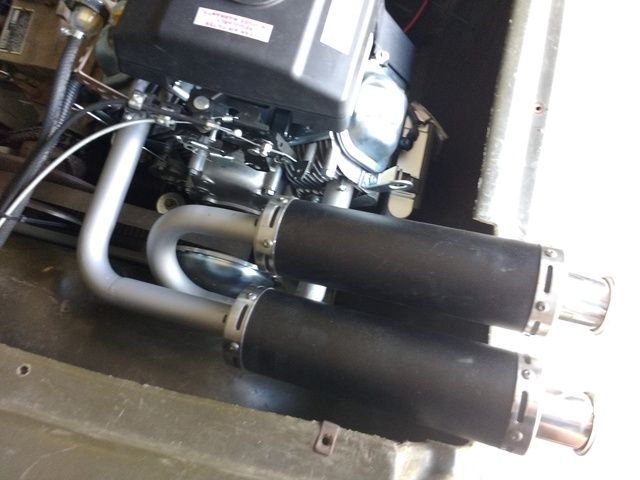
My HF pipe bender was a total SNAFU. It was more of a pipe folder-kinker-smoosher. I just caved and bought some mandrel-bent J's from Summit. So, now the headers are made. I'll wrap them later in black header wrap. All I lack now is oil and gas to at least start it. I finished all the engine wiring, ran the throttle and choke cables, and got 4 chains made last week. I had to order more chain and two idler sprockets -which showed up wrong- so that will be another day. If I can at least start it up and get it to move under its own power, then I can take it all down to paint it. I've already gone around it and filled a bunch of holes (like the PO's unnecessary amp meter hole in the tub) with the plastic from the exhaust hole I cut. Man, what a long and stanky process that is. I'm going to just epoxy the rest of 'em.

Comment
-
That exhaust looks nice, I would put some type of heat shield where it is near plastic now before it distorts it. Keep the shield off both the mufflers and the plastic.sigpic
My new beer holder spilled some on the trails - in it's hair and down it's throat.
Joe Camel never does that.
Advice is free, it's the application that costs.Comment
-
Maybe make a shroud (metal box around a metal box) to go around your mufflers to keep the heat off the plastic. Really looks like a fine project.
I've got a similar muffler on a utv, and it really works great, lots of snarl when you get on the throttle but not too loud when just under normal load. I like the way the headers look as well, and I bet that H.F. motor really sings.Comment
-
Looks good. One thing I would suggest beyond wrapping the exhaust is to apply reflective insulation to the inside of the tube. I also wrapped the underside of the rear seat and engine deck. Added fan to force fresh air into engine compartment and a cutout to allow hot air to escape above the exhaust. Hustlers are notorious for overheating and vapor locking on extremely hot southern summers.Comment
-
Hey Sean, what's going on with your build. You were moving like wildfire there for a while.Comment
-
I have a HF pipe bender and it works great, but I learned a trick for a friend that builds funny car drag racers. You can't just put pipe in a bender and have at it. You have to fill the pipe with something in-compressible and cap the ends, or the pipe just collapses. He uses sand. Cover one end with several layers of duct tape, fill pipe with sand, tapping it on the ground repeatedly so the sand packs in real good, then once you have the sand overflowing the other end of the pipe a bit, cap that end with more duct tape then it'll bend smooth as silk.Originally posted by SeanD View PostComment
-
it's been six months?!?! Man! Well... what had happened wuzz... I got to the point of building the body band around the -um- body, and I had gotten a couple old trailer hitches off customers' trucks that had been replaced after accidents, which I was going to incorporate into the body band-bumper assembly. BUT, one of them was square tubing and one was round tubing, which I didn't like. So, in waiting for another square tubing hitch to show up in the shop's metal pile I sold the last bike I had built, which then left me with NO PROJECT. So I bought another old bike and built it into a bagger...
Once it was done with a For Sale sign on it, I had gotten a second square tubing hitch, some angle iron, and went at it. Back on track! It also helped that I finally moved my "shop" setup into the big building behind our house and out of the basement garage. So I did the pie cut thing to get the 1/8" angle iron bent around the corners (the second corner was better than the first for sure), but didn't know what everyone else was doing as far as one piece, two, four pieces, whatever, and how to join the pieces of the band. I came up with this- a joint right next to the engine on both sides. That gives me one front and sides piece, and one rear piece. With the reciever hitches they are heavy and need more support than just the small bolts through plastic. This joint lets me pull the pieces in tight with the body. And yes, I will grind those two pieces flush with one another...
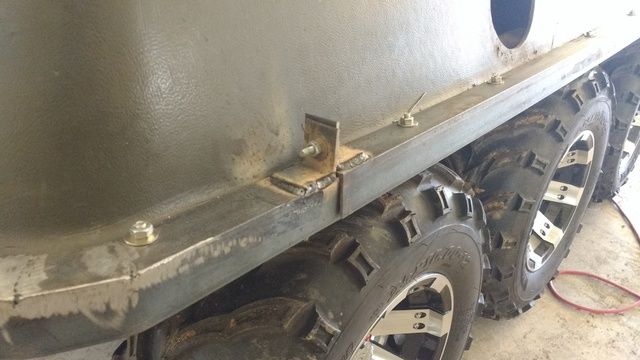
After the hitches were on, I went and drove it around the yard, only to see that they were way too floppy, especially with a winch stuck in the front (into a hitch). So I made up from more 1/8" angle iron these angry looking braces that double as skid bars on both ends. Now the whole bumper band assembly is RIGID.

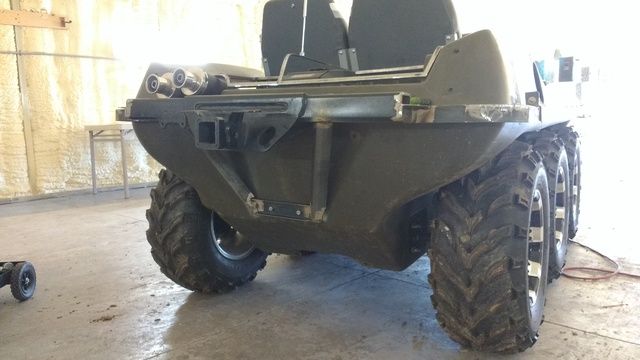
After I got to this point and was satisfied with all the fitment I started to take the WHOLE THING back apart so that I can paint it, rebuild the T20, and put it all back together again. By the end of today it should be completely blown apart again, and I can send all the metal parts off for bedliner while I fill holes in the body. yay.Last edited by SeanD; 02-18-2017, 10:46 AM.Comment
-
LOOKS GOOD !
Comment
-
That looks sharp. I really like the Vertical bracing. Nice and heavy duty.Comment
-
busco beach is a very large atv park outside goldsboro, n.c. twice a year ( oct. and april ) a large group of aatv enthusiasts gather for 3 or 4 days of trail riding. with good rains there is lot's of muddy holes and trails. there are numerous lakes, some to ride in, and camping or rv sites. it's a super time with lot's of great people. some come from the ga. area. check out the videos on this site and see what it's all about. johnboy va.Comment

Comment